Instagram Instagram

Entries in baking (53)

Friday
May112007

SHF #31: Neutral territory

Ahh, the changing personality of white.

The milkiest tones are soothing and fresh, while the chalkiest are stark and dramatic. The slightest shades of suggested colour bring moodiness and depth. It can be the quality of light on a blisteringly hot summer’s day, or the muffled whiteness of a snow-covered landscape. Almond, cream, malt, vanilla, buttercream; all not only evocative colours, but flavours as well.

With this tempting palette in mind, I am happy to announce Shades of White as the theme for this month’s Sugar High Friday, the dessert-based food blogging event created by Jennifer of Domestic Goddess fame.

Participation is simple; make a dessert featuring your chosen hue of white. Anything from the palest of champagne ices to frothy zabaglione to the barest tan of hazelnut cookies. Or let the character of form inspire; are you drawn to the simple elegance of blancmange, or the childhood taste of marshmallow, or the towering excess of a meringue crowned pie? The possibilities are endless.

Then, let us know about your culinary artistry, maybe explaining why you chose this dessert or what you liked about its particular shade. I will post a roundup here, so we can compare notes.

Here’s how it goes.

1. Sugar High Friday #31 roundup will be posted on Friday, May 25, 2007.

2. Please post your recipe on your site on Monday, May 21st, then email me by Noon EST Wednesday, May 23, 2007. Be sure to include your name, your blog name, your location, the recipe name and a permalink URL to the story. If possible, please provide a 100 x 100 pixel photo of your masterpiece, so I can include it in the gallery for the roundup. For ease of organization, please label the image file the same as the name of the dessert.

3. If you do not have a blog, please feel free to post your thoughts, ideas or feedback in the comments section of the Sugar High Friday posts. If you have a longer comment, you can also email me, and I will include your entry in the roundup.

One last thing, a plea - this is my first time hosting a food-blogging event. So be nice to the newbie! I hope you find the theme inspiring; I invite everyone to join.

Thursday
May032007

Getting to know you

Seven years ago Sean gave me one of my most treasured possessions. It was my birthday, and he had found a copy of the out-of-print, rather unknown, favourite book of my childhood.

Whereas my original copy had long ago lost whole sections out of overuse, this new copy was pristine perfection; the story intact and whole again.

Flipping through the pages, my enthusiasm for a tale of little mice and their adventures to a faraway land came rushing back. With the glee of a six-year-old, I pointed out the illustrations that had inspired me the most, explained to him the nuances of each character and hugged the book like the long-lost friend it was.

What made this gift all the more special, was that Sean and I had not known each other in childhood. It was only through my mentioning the book that he realized the importance to me. Having it now was a window to that youth, an opportunity for him to know the girl I had been.

Lucky for me, we have many ‘relics’ of Sean’s early years - our son Benjamin now plays with some of the same toys and is even measured on the same growth chart against which his father stood tall. But beyond all these, one of the most meaningful of legacies are the recipes I have been given by his family.

Whether it be the cheesy pasta salad that appears at every family gathering, or the apple cake that heralds fall, or Grandma's famous (and decadent) butter tarts, each of these recipes is inextricably tied to memories from the family I now call my own. Though unshared by me, I feel a part of those reminisces with each bite, and hopefully in the future, with each time I serve them.

Munching on a bakery-bought cookie a few days ago, I came to think of the recipe for Oatmeal Date Cookies from my dear Mother-in-Law. Passed down from her mother, it was the recipe noted with the scribble “Sean’s favourite” in the margins of their church’s fundraising cookbook.

Chewy, fat and unapologetically old-fashioned, these are the stuff of cookie-jar glory. I have dressed them up a bit with shards of almond butter toffee and chocolate chips; but that was just my mood that day. These are the perfect canvas for whatever strikes your fancy - white chocolate and dried cherries, perhaps? It doesn't matter the specific flavours of your childhood, as long as you remember to visit them once in a while.

Almond toffee oatmeal cookies
My own variation, based upon a recipe by my husband's maternal grandmother. They may look like your typical oatmeal cookies, but the salted toffee adds and unexpected depth of buttery flavour. I prefer some of the toffee pieces on the smaller side, so they melt into the batter when baking.

Ingredients

For the almond butter toffee
1/3 cup plus 1 tablespoon granulated sugar
1/4 cup unsalted butter
2 tablespoons water
1/8-1/4 teaspoon salt
1/3 cup flaked almonds

For the cookies
1 cup all-purpose flour
1/2 teaspoon baking powder
1/2 teaspoon baking soda
1/4 teaspoon salt
1/2 cup butter
1/2 cup firmly-packed light brown sugar
2 tablespoons dark corn syrup, golden syrup, honey or maple syrup
1 egg
1 teaspoon pure vanilla extract
1 1/2 cups old-fashioned rolled oats
3/4 cup chocolate chips
1 batch almond butter toffee, crushed into bits

To make the almond butter toffee

Grease a half sheet pan (13"x18") or cookie sheet.

Combine all ingredients, except the almonds, in a small, heavy bottomed saucepan. Over medium heat, stir until the butter is melted. Reduce the heat to medium-low and continue to cook, stirring occasionally, until a candy thermometer reaches 300ºF (150ºC). This will take about 25-30 minutes. If you do not have a candy thermometer, carefully drip a small amount of the sugar mixture into a cup of cold water; if it has reached the right temperature it will collect into a hard ball.

Meanwhile, in a skillet over medium-high heat, spread the almonds in a single layer. Toss the nuts occasionally to prevent scorching. Once they are light toasted brown and aromatic, remove from pan and set aside.

Mix nuts into butter toffee mixture. Working quickly, spread the toffee over the prepared half sheet pan in a thin layer. It will not fill the entire pan. Set aside to cool completely.

When cooled, break the toffee into irregular bits. I find it easiest to put pieces into a large, loosely sealed food storage bag and pounding the toffee into submission with the bottom of a skillet. You should end up with about 3/4 cup of nubby gravel.

For the cookies

Preheat the oven to 350°F (175°C).

In a medium bowl, sift together the flour, baking powder, baking soda and salt. Set aside.

In the bowl of a mixer fitted with the paddle attachment, or with a hand mixer, cream together the butter, brown sugar and corn syrup until light and fluffy. Scrape down the sides of the bowl as needed. Add the egg, beating well. Mix in vanilla.

With mixer on low speed, add flour mixture and mix until just incorporated. Using a rubber spatula or wooden spoon, stir in the oatmeal, chocolate chips and crushed toffee.

Drop 2 tablespoons of dough into mounds (I use a disher that is 1 1/2” across) onto parchment or silpat lined cookie sheets. Space mounds about 2 inches apart. Bake until lightly golden around the edges, but not crisp, about 10-12 minutes.

Cool on sheets for 5 minutes; transfer to a wire rack to cool completely.

Makes 2 dozen.

Notes:
• If anyone would like Sean’s Grandmother’s original recipe for Oatmeal Date Cookies, please leave a comment to that effect; I would be happy to oblige.
• Due to the buttery toffee, these cookies will melt and spread while baking. If you would like to reshape them, take a wide glass or bowl and swirl the slightly cooled (maybe after 10-15 seconds out of the oven) cookies in a circle. The edges will collect together neatly, as pictured.

Tuesday
Mar202007

Chocolate and charity; a sweet pairing

I am sure that anyone who hears about my endeavours in the kitchen would assume that I have one heck of a sweet tooth. And, really, I would be hard pressed to provide evidence to the contrary.

However, what one may not realize is that rarely do I truly overindulge in the confections that I so frequently describe; those are most often destined for family and friends, celebrations and gifts.

Of course I nibble here and there, but those who know me best know that my true achilles heel is ice cream; not surprisingly, my predilection of choice is most often in the form of chocolate.

Last evening I was looking for frozen creamy goodness - but sadly, my freezer was unexpectedly bare. Though my dear Sean would have been willing to retrieve my treat, it was a chilly night and I could not bear ask him to leave the warmth of our home (or namely, the comfort of the couch). I could have gone, but when faced with the option of going out in the cold, dark night or staying in my slippers and pottering about the kitchen, there is no contest.

With the Mixer out of commission, and me lacking the drive to do much more than stir, I had only one option: brownies. Fudgy and dense, satisfyingly decadent but uncommonly simple to make.

As luck would have it, I recently stumbled upon Jamie Oliver’s brownie recipe. The photo depicted what was surely the solution to my Monday doldrums. Nothing looked airy and light about these squares - they looked meltingly decadent, just the way I prefer a brownie.

After a modest amount of effort, we were rewarded with the smell of chocolate warming in the oven. Even my dear Sean, from the depths of the couch, was pressed to inquire "when will those be ready?" Gooey from the oven, these brownies made for stickey fingers and ebony-stained grins. The doldrums were a distant memory.

While not a pint of Häagen Dazs, sometimes a brownie will more than suffice.

Jamie Oliver’s bloomin’ brilliant brownies
Unctuous chocolate, tenuously bound by flour; they are more truffle than cake, bordering on a confection. This recipe is featured in Jamie's Little Book of Big Treats in support of Comic Relief.

Recipe

Notes:
• I opted to omit any add-ins (dried cherries, nuts). While I am sure that they would be delicious, I wanted nothing more than uniterrupted cocoa.
• I cannot bake anything with chocolate without a dash of vanilla extract and a bit of espresso powder. To my palate, they add a depth of flavour and make the chocolate more chocolatey. I added these, along with a pinch of salt, to the melted chocolate and butter mixture.
• When making brownies, the key to fudgy perfection is stirring the batter as little as possible once the flour has been added. With this in mind, I opted to add the eggs to the chocolate mixture first, rather than following the flour as indicated in the recipe.
• I only had a 9”x9” pan, rather than the 10” (25 cm) called for. The cooking time was increased to about 35 minutes (a 10 minute increase), but keep an eye on them after 25 minutes.

Please note, I have been establishing tags for archived posts. My apologies if this causes any confusion.

Saturday
Mar042006

The handy pantry; secrets to my success

I tell you, I feel for ducks; all is calm above water, but below feet are paddling madly. That about describes how I feel some days.

As you may have heard, I've been busy these last seven weeks. A particularly life-changing event, in the form of a perfect little bundle of boy, has taken up most of my energies. Energies formerly used for things like wandering markets aimlessly, or going out for a coffee and a chat or, on some days, brushing my hair. Not that I'm complaining - my days are filled with much more worthwhile endeavours; endeavours that bring me boundless joy.

But come on now, its not all puppy dogs and butterflies and all things lovely; there still are those times when it is the end of the day and you have to get dinner on the table.

I know I've touched upon it before, but a well-stocked pantry can be a lifesaver. I consider mine my bag of tricks, full of my go-to solutions for easy meals, last minute entertaining options and perennial favourites.

I remember when I had my first apartment, I was so excited about setting up my kitchen. I spent hours scouring cookbooks and the internet for ideas on what to stock in my pantry. I looked at the way I cooked, the way I lived and, most importantly, the tastes I crave. I used these ideas, and some trial and error, to come up with my list of essentials - my desert-island kitchen kit.

My dear Sean laughed the first time he saw my grocery database I've made - a master list of the foods I always like to have on hand, ready to be printed out at a moment’s notice. Though maybe not everyone is as type A as I am, I'm sure most have at least a mental list of those ingredients that they would rather never be without.

There are the usual suspects; pastas, rices, vinegars, oils, canned goods and dried herbs and spices. My baking pantry has jars filled with dried fruits, sugars, toffee chips and all manners of chocolates.

I have also learned to treat my refrigerator and freezer as an extension of my pantry staples. Fresh herbs, lemons and limes, chilies and cheeses can elevate a typical meal into something special. Frozen stocks add a depth of flavour to a quickly-assembled meal. Prepared puff pastry, phyllo dough, shortcrust pastry and a best-quality vanilla ice cream mean that a dessert is never too far away.

My latest addition to my little inventory has been frozen fruit, especially berries. Perfect for not only smoothies and frozen cocktails, but also for sauces, pies and cakes. These little jewels bring a dose of summertime sweetness to the grey days of March. In truth, I rely on them year-round.

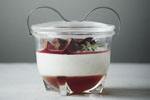
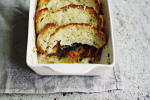
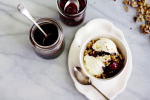
This last weekend, with family and friends visiting, it was a luxury to feel at the ready for hostessing ... even though we had not been to the grocery store in days. With my secret stash I was able to welcome them with open arms and a full table - the highlight of which was this berry cake. Rich with a cream cheese pound cake base and topped with luscious berries and a coconut almond streusel, I won rave reviews. Thank goodness for good planning and a full pantry.

Am I busy? Yes. Do I feel stressed? No - it’s all like water off a duck’s back.

Favourite Berry Cake
My own creation

Ingredients
For the cake
1 1/2 cups (3 sticks) butter, softened
1 (8 ounce) block of cream cheese, softened
3 cups sugar
6 eggs
2 teaspoons vanilla extract
3 cups flour
2 teaspoons salt

For the topping
2 to 21/2 cups berries, depending on your choice of mix
2/3 cup all-purpose flour
1/3 cup brown sugar
1/3 cup blanched sliced almonds
1/3 cup flaked coconut, use sweetened or unsweetened - your preference
6 tablespoons (3/4 stick) cold unsalted butter, cut into small pieces
Additional butter for greasing pans

If you would like to make the miniature version pictured, grease 8 four-inch round spingform pans and preheat the oven to 325°F (160°C). If baking one large cake, generously grease a 8-inch round springform pan and preheat the oven to 350°F (175°C).

Make the crumble topping first. In a small bowl, stir together the flour, brown sugar, almonds and flaked coconut. Using your fingers or a pastry cutter, cut in the cold butter until a coarse crumb forms. Set aside in the refrigerator while you assemble the cake.

In the bowl of an electric mixer, cream together the butter and cream cheese until smooth. Add the sugar and beat until light and fluffy, scraping down the sides of the bowl to make sure all the ingredients are well incorporated. Take your time at this step, allowing about five minutes.

Add the eggs, one at a time; beat well after each addition. Mix in vanilla.

In a bowl, sift together flour and salt. With the mixer on low, add the flour to the batter. Mix until just combined and smooth. Pour batter into prepared pans, and sprinkle over berries. Finish with the chilled crumb topping and bake.

For the miniature versions, they will be done after about 50-60 minutes, when they should be a pale golden brown and a cake tester comes out almost clean (there may be a tiny amount of clinging moisture). For the larger version, it will take about 75 minutes.

Allow to cool in the pan, on a wire rack, for 20 minutes. Unmould and allow to cool completely.

Notes:
• I use a full-fat (regular) cream cheese for this cake. I have not tried it with a reduced fat variety.
• Alternatively, you can also make this cake in two 8 1/2-by-4 1/2-by-2 1/2-inch loaf pans. Bake at 350°F for about 60-75 minutes.
• There are no leaveners in this cake; all of its rise comes from the amount of air beaten into the batter with the creaming process and the addition of the eggs. Take care at these steps to ensure a dense,yet well-formed, crumb.
• If the kitchen is particularly warm, you might want to keep the topping in the freezer until ready to use.
• If the cake browns too quickly, tent with aluminium foil.

My apologies. This recipe was initially published with a typo - the springform pan is meant to be an 8" instead of a 9" as orginally listed.

A sincere thank you to all of you who have written with your well wishes for the three of us. We are terribly happy and cannot express our gratitude for all the support we have received. I am sorry that I have not been able to respond personally to everyone, but please know that we are humbled by your generosity and kindness. All the best to you and yours.

Friday
Jan132006

Plain January Jane

The grey days of January have settled in, and I’m just about ready to wrap myself up in flannel, hunker down and coast my way through the rest of the month. I’m in no mood for fancy; I want goose down, cuddly sweaters and angora socks.

On that same note, there are foods that fit this mood. Without fanfare, they routinely deliver. Simple and to the point, these wallflowers of the recipe file are perennial favourites, but not always the life of the party.

Such is the case with these muffins. Reasonably healthy and utterly flavourful, they offer up a great sense of accomplishment after only a modest amount of effort. Truly, if you can produce warm baked goods in less than 10 minutes of prep time, do you not feel rather smart? I say, all the more time to spend cozied up with that goose down.

While some plans may prevent me from participating, I encourage everyone to check out Sugar Low Friday, hosted by the ever-fab Sam of Becks & Posh. The one-time event will be held on January 27, 2006, details to be found through the link.

Banana-Cranberry Bran Muffins

Ingredients
1 1/4 cups (300 ml) unbleached all-purpose flour (you can also use whole wheat)
1 tablespoon (15 ml) baking powder
1/2 teaspoon salt (2.5 ml)
1/4 cup canola or vegetable oil
1/3 cup honey or granulated sugar (or up to 1/2 cup if you prefer sweeter and depending on the bananas)
1 egg
1 cup (250 ml) milk
2 ripe bananas, mashed
1 1/2 cups (375 ml) flaked bran cereal
1/2 cup (125 ml) dried cranberries

Preheat oven to 375ºF (190ºC). Lightly grease a 12 cup muffin tin, or line with cupcake liners.

In a large bowl, sift together flour, baking powder and salt.

In another bowl, whisk together egg, honey or sugar, egg, milk and bananas. Stir in cereal. Add wet ingredients to dry and stir until just blended. Stir in cranberries. Divide evenly among prepared muffin cups.

Bake for 20 minutes, until a tester inserted in the centre of a muffin comes out clean. Leave muffins in tin to cool for 2-3 minutes, then remove to a rack to cool completely (or serve hot).

Makes 12.

Notes:
• These muffins do not rise a lot while baking, and so are more like little flat-topped cakes. If you prefer a larger, domed muffin, I would recommend dividing the batter between 6-8 muffins instead. Be sure to space them evenly in the tin and adjust the cooking time accordingly.
• A raisin bran cereal could also be substituted, as could fresh or frozen berries. Frozen berries will colour the batter a bit, due to their juice.
• Depending on your bananas, you may find you need to hold back a bit of the milk. I usually use between 3/4 cup and 1 cup.