Instagram Instagram

Entries in squares (4)

Thursday
Jan072010

Happily. Handily.

Date squares. Or do you call them bars? By whatever name, they were not a product of my childhood kitchen. My earliest association with these fruit-stuffed cookie sandwiches was elementary school bake sales, set up in the halls of our school for some charitable endeavour or another.

Those were exciting times, when our milk money was augmented with a few extra coins from Mum so that my brother and I could purchase a treat of our own choosing. Of our own choosing! I remember being giddy at the thought of such power. Upon arrival at school, all eyes would grow wide as the exotic array of baked goods emerged from backpacks. The riches were transferred to the careful hands of parent volunteers who laid them out on long tables in the hall outside our classroom. I don't know how I kept myself from swooning at the sight. Nor do I know how we lasted through what surely seemed an interminable wait until lunchtime.

A child of specific tastes, the exact moment the big hand and the little hand met at the top of the clock and that lunch bell rang, I'd make a beeline for the Rice Krispie treats. How do I love thee, you golden bricks of marshmallow-and-butter-bathed cereal. They were first-class sugar bombs, and a guilty favourite to this day. I vaguely recall date squares had their place on those tables, but they resided only on the edge of my awareness.

Fast forward to yesterday, when I had in my possession a stash of Medjools. I'd bought some for the specific purpose of a sticky-toffee-pudding-inspired cake; but when the matter of the cake was taken care of, a few handfuls remained, succulent and sweet beneath their sugar-flaked skin. In consideration of my previous nonchalance, it was surprising choice that I set about knocking together a pan of date squares. The first date squares I've ever baked.

I consulted various recipes, and took the best from the varied incarnations of date squares (bars?) I found. Some were with a shortbreadish base that had the butter and sugar creamed together before the introduction of the flour. A few had eggs involved, while most did not. There were oats and nuts to consider, and then there were dialogues in regards to the filling; sweeten or not to sweeten. Options galore.

I decided my treasures should be left as they were, so I stewed the dates briefly, then processed them into a dense, gungy purée that squelched pleasingly when spooned. The kicker in the filling was the few specks of floral-sharp clementine zest, which light up the mellowness of the dates like sparklers in the night sky. It was a modest elaboration that made all the difference.

The rest followed a simple method, you make the same sort of crisp topping I like for crumbles; cold butter is cut into a flour mixture to form irregular clumps, clumps which melt upon baking and crisp the surrounding dry ingredients into a rough and golden landscape. In this case the flour and oats are divided, with half patted into a tin to form the bottom crust. The dates slump in next, then the rest of the mixture is scattered over top.

When baked, the date filling sinks and seeps into the lower crust, so that the line between the two is blurred and what is left perfectly-bound strata of oats and fruit. The topping is not invited to their party and so turns sandy and delicate, crunchy only here and there. The perfect offset to the heft that lies beneath.

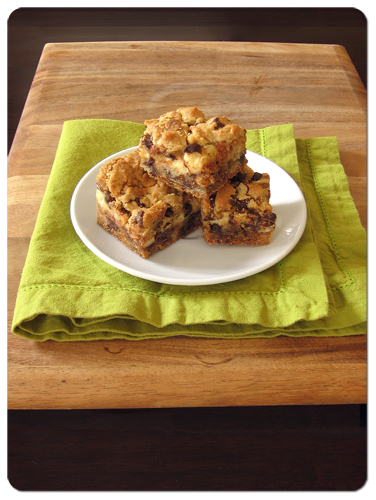
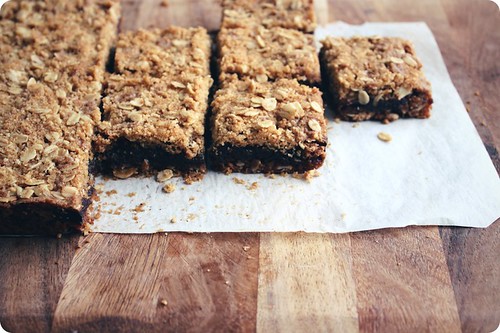
From the oven, the pan must rest, first on the counter and then in the fridge. The butter, and there is a good deal of butter here, firms up just enough to give it all some additional structure and the layers get a chance to settle into each other. All that's left is to cut the pan into bars (squares?) before you take a piece in one hand, a cold glass of milk in the other, and feel rather smug about your handiwork. There is something to be said for the act of slicing a tray of cookies that gives such a gratifying feeling of provision - a few swift swipes of the blade and you can feed a household for days. Happily. Handily.

I do not know what I was expecting with that first bite, but I surely wasn't expecting this. The skimpy serving of spices I had granted the crust had made their presence known in the most wonderful way; the squares were perfumed with the dark, deep notes of the wintry spices, and tasted of everything homespun and old-fashioned. And I liked it very much.

Now if by some rift in the space-time continuum third-grade me happens to be reading this, please take my advice and maybe give date squares a chance. And while we're at it, let me tell you now that our brief, torrid dalliance with crimped hair in the fifth grade is not a good idea. I don't care if all your friends own crimping irons, it's not a good look for them either.

Heed my words, younger me, you'll understand when you're older. And save your pennies for the next bake sale.

Oat and Nut Date Squares
Adapted from a variety of sources. I used some clementine to flavour the filling, but a few grates of orange zest would be just as good.

Ingredients
10 ounces (around 2 cups) pitted dates
1 cup water
zest from half a clementine
1/2 cup ground nuts, see note
1/2 cup whole wheat flour
1/2 cup all-purpose flour
1/2 teaspoon kosher salt
1/2 teaspoon baking soda
1/2 teaspoon ground cinnamon
1/8 teaspoon ground nutmeg
a pinch of ground clove
1 cup dark brown sugar, packed, see note
6 ounces (3/4 cup, 1 1/2 sticks) unsalted butter at coldish room temperature, diced
1 cup old-fashioned rolled oats

Preheat the oven to 350°F (175°C). Grease and line an 9-inch square pan with parchment paper so that the paper hangs over the sides of the pan.

In a small saucepan, pour the water over the dates. Bring to a boil over medium high heat, stirring often. Reduce the heat to medium low to maintain a simmer, cooking the fruit until all of the liquid has been absorbed and the dates become a soft, concentrated paste, around 10 minutes. Stir often. Set the fruit aside to cool, stir in the clementine zest.

Once the dates are cool, purée them in a food processor fitted with the metal blade attachment. Scrape out the dates to a bowl as best as you can, but don't worry if there's a bit left behind. Set the fruit aside.

Into the processor, add in the nuts, flours, salt, baking soda and spices. Pulse to combine. Add the sugar and pulse again. Using your fingers to keep the pieces separated, crumble in the butter into the dry ingredients. Pulse again a few times until the flour and butter mixture resembles a coarse, uneven meal. Pour the mixture into a large bowl and stir in the oats.

Press a generous half of the crust mixture into the prepared pan. Spoon the date filling over, spreading it to cover the crust completely. Sprinkle the rest of the crust mixture over the fruit. Bake in the preheated oven until the top crust is golden brown and crisp, around 30 minutes. Rotate the pan once during baking.

Cool the bars completely on a rack, still in the pan. Once at room temperature, chill in the refrigerator for 30 minutes to firm up. Slice as desired, serving them at room temperature or chilled.

Makes one 9-inch square pan, can be stored in an airtight container at room temperature or refrigerated (my preference).

Notes:

• You can choose the nuts to use here. I went with walnuts (robust), but pecans (buttery) and almonds (fragrant) are also good candidates. In the case of nut allergies (hi Hannah!), use an additional 1/2 cup of either of the flours.
• The kosher salt remains noticeable in the crust; if you prefer a less discernible result, use a finer-grained salt and possibly use less.
• I am tempted to try these again with 3/4 cup brown sugar and 1 1/4 cup of oats, but my family has said that they should be as they are. Just thought I'd mention.

Friday
May252007

SHF #31: The roundup

Whew. When I was first approached by Jennifer to host this month’s Sugar High Friday, I approached it with nervous optimism. Everyone’s had that feeling, that illogical fear of “what would happen if I threw a party, and nobody came?”

Thank goodness for food bloggers. I did not expect, and could not have hoped for, a more enthusiastic and supportive group of contributors to this month’s event. From the dramatic to the sublime, these desserts celebrating the shades of white run the spectrum. 45 entries from around the world, are all delicious variations on the theme. What a party!

Again, my gratitude to those who participated, and those of you who have come by to see the results of our little event. Cheers to Jennifer, once again of the Domestic Goddess, who will be the host of next month’s SHF installment. It will be a confectionery celebration of Canada’s 140th birthday on July 1st - look out for the announcement and details on her site.

And with that, on to the desserts; click the photos to link to the author's site ...

Tuesday
Mar202007

Chocolate and charity; a sweet pairing

I am sure that anyone who hears about my endeavours in the kitchen would assume that I have one heck of a sweet tooth. And, really, I would be hard pressed to provide evidence to the contrary.

However, what one may not realize is that rarely do I truly overindulge in the confections that I so frequently describe; those are most often destined for family and friends, celebrations and gifts.

Of course I nibble here and there, but those who know me best know that my true achilles heel is ice cream; not surprisingly, my predilection of choice is most often in the form of chocolate.

Last evening I was looking for frozen creamy goodness - but sadly, my freezer was unexpectedly bare. Though my dear Sean would have been willing to retrieve my treat, it was a chilly night and I could not bear ask him to leave the warmth of our home (or namely, the comfort of the couch). I could have gone, but when faced with the option of going out in the cold, dark night or staying in my slippers and pottering about the kitchen, there is no contest.

With the Mixer out of commission, and me lacking the drive to do much more than stir, I had only one option: brownies. Fudgy and dense, satisfyingly decadent but uncommonly simple to make.

As luck would have it, I recently stumbled upon Jamie Oliver’s brownie recipe. The photo depicted what was surely the solution to my Monday doldrums. Nothing looked airy and light about these squares - they looked meltingly decadent, just the way I prefer a brownie.

After a modest amount of effort, we were rewarded with the smell of chocolate warming in the oven. Even my dear Sean, from the depths of the couch, was pressed to inquire "when will those be ready?" Gooey from the oven, these brownies made for stickey fingers and ebony-stained grins. The doldrums were a distant memory.

While not a pint of Häagen Dazs, sometimes a brownie will more than suffice.

Jamie Oliver’s bloomin’ brilliant brownies
Unctuous chocolate, tenuously bound by flour; they are more truffle than cake, bordering on a confection. This recipe is featured in Jamie's Little Book of Big Treats in support of Comic Relief.

Recipe

Notes:
• I opted to omit any add-ins (dried cherries, nuts). While I am sure that they would be delicious, I wanted nothing more than uniterrupted cocoa.
• I cannot bake anything with chocolate without a dash of vanilla extract and a bit of espresso powder. To my palate, they add a depth of flavour and make the chocolate more chocolatey. I added these, along with a pinch of salt, to the melted chocolate and butter mixture.
• When making brownies, the key to fudgy perfection is stirring the batter as little as possible once the flour has been added. With this in mind, I opted to add the eggs to the chocolate mixture first, rather than following the flour as indicated in the recipe.
• I only had a 9”x9” pan, rather than the 10” (25 cm) called for. The cooking time was increased to about 35 minutes (a 10 minute increase), but keep an eye on them after 25 minutes.

Please note, I have been establishing tags for archived posts. My apologies if this causes any confusion.

Wednesday
Feb142007

Choosing substance over style makes commitment easy

I have never been ashamed to admit that I can be utterly shallow. Nor have I ever feigned ignorance of my obsession with chocolate in its purest form. However now and again a girl is struck by something that goes beyond infatuation and adoration. Something deeper than that; something that touches your very soul. Of course, I am talking about greed.

Were you expecting something different?

I will admit, maybe something along the lines of love and affection would be more apt for today - and I have been looking at lighter-than-air mousses and soufflés, pillowy madelines and coyly trembling panna cottas. But I cannot deny my want, nay the necessity, for something much more soul-satisfyingly decadent than a trifle of the palate.

Dense and rich, these squares are so very indulgent that one overlooks their rather indelicate appearance; they are reminiscent of a elementary bake sale treat but oh so much better. A tumble of chocolate, peanut butter and toffee chips, unctuous dulce de leche tempered by a ribbon of tart cheesecake ... sigh. Attempt to restrain yourself to just one.

Chockablock cheesecake squares
Fans of the famous recipe will note that the cookie base is a variation on the classic Nestlé® Toll House® cookies. I recommend cutting these into either 1 1/2”x2 1/4” bars or 1 1/2” squares.

For the cookie base
2 1/4 cups all-purpose flour
1 teaspoon baking soda
1 teaspoon salt
1 cup (2 sticks, 1/2 pound) unsalted butter, softened
1 cup light brown sugar, packed
1/2 cup granulated sugar
1 teaspoon vanilla extract
2 eggs
1 cup semisweet chocolate chips
2/3 cup peanut butter chips
1/3 cup of toffee bits

For the cheesecake layer
1 8 ounce package of cream cheese, softened
1/4 cup brown sugar, packed
1/4 cup granulated sugar
1/2 teaspoon vanilla extract
1 egg

1/2 cup dulce de leche or caramel sauce (use up to 1 cup, depending on your taste)

Preheat oven to 350ºF (175ºC). Butter the bottom and sides of a 9-by-9-inch baking pan. Line with parchment paper, allowing for a 1-inch overhang on two sides to form handles.

In a medium bowl, whisk together the flour, baking soda and salt. Set this aside.

In the bowl of a stand mixer fitted with a paddle attachment, cream together the butter and sugars on medium high speed until combined. Stop the mixer and scrape down the sides. Continue to beat the mixture, stopping to scrape down the sides as necessary, for approximately 3 minutes or until the butter is fluffy and pale in colour.

Add eggs, one at a time, beating well after each addition. Scrape down sides of bowl. With the mixer on low speed, gradually add the flour and stir to combine. Add in chips and candy. Refrigerate dough.

In the bowl of a stand mixer with the paddle attachment in place, beat the cream cheese and sugars on medium high speed until combined and smooth. Scrape down the sides of the bowl. On medium speed, add the egg and vanilla.

Take approximately half the refrigerated cookie dough and, with floured fingers, press into the prepared pan. Using an offset spatula, spread the dulce de leche over the bottom layer. Pour over the cream cheese mixture. Crumble the remaining cookie dough over the cream cheese.

Bake 35 to 40 minutes or until golden brown. As with many cheesecake recipes, you may see a bit of “wiggle” in the centre of the pan; not to worry, it will set up as it sits. Cool 1 hour. Refrigerate at least 4 hours, preferably overnight. Cut into squares or bars, as desired.

Makes 1 9-inch pan. Approximately 24-36 bars, depending on size. These bars should be stored in refrigerator and can be frozen.

Notes:
• For the cookie crust, I like to use a large flake sea or kosher salt for a salty-sweet combination.
• You can use whatever combination of morsels, nuts and candy you like for the cookie crust; aim for about 2 cups in total.
• If you prefer pockets of caramel, swirl the dulce de leche with the cream cheese filling, rather than layering it.
• The dulce de leche can be substituted with a chocolate ganache or thick chocolate fudge sauce as well.