Instagram Instagram

Entries in baking (53)

Thursday
Jun092005

Butter + sugar + heat = bliss

I’ve not cooked a meal since last Sunday. And that was pasta.

Between assembling, reheating, and opening takeout containers, I’ve not had to do any “real” cooking, as in I’ve not turned on a burner or the oven. True, the 33°C temperatures may have a bit to do with my recent affinity for salads, but still, how lovely it is to be able to throw together a meal with such wonderful produce at hand, great restaurants nearby, and lovely family members all too willing to cook.

I’ve had the privilege of considering cooking a luxury – not a necessity or a chore, but an activity I could choose to do when the spirit so moved me.

I finally turned the oven on this evening, and for nothing short of a worthy cause; baking. The ultimate in indulgence, baking sweets speaks immediately to images of celebration, of comfort and of joy.

Baking always seems alchemy to me; the magic process of taking ingredients, combining them in a certain order in specific proportions, exposing this creation to heat — and voilà, a result much greater than the sum of its parts. Baking is all about transformation. One cannot help but feel a surge of pride when presenting a still-warm treat from the oven.

These cookies, crispy and chewy, like a good cookie should be, are as basic as one could wish for. Sinfully buttery, sublimely sweet, they melt in your mouth and leave you reaching for another. Based on the Nestlé Toll House recipe, swapping flavourings for dried cranberries or cherries, toffee bits, or dark chocolate chunks is highly encouraged.

So I’ve baked. I’ve rolled up my sleeves, faced a hot kitchen and even licked a spoon. I feel terribly domestic.

I should confess though, I’m having a salad for dinner.

White chocolate macadamia nut cookies
Based on the Nestlé Toll House recipe

Ingredients
2 1/4 cups all-purpose flour
1 teaspoon baking soda
1 teaspoon salt
1 cup butter, softened
1/2 cup granulated sugar
1 cup packed brown sugar
1 teaspoon vanilla extract
2 eggs
1 cup white chocolate, in chunks (or more, if desired)
1/2 cup lightly toasted macadamia nuts (or more, if desired)

Preheat oven to 325°F.

In a small bowl, sift together flour, baking soda and salt. In the bowl of a mixer fitted with the paddle attachment, or by hand, beat together butter, sugars and vanilla, until the colour turns pale and the mixture lightens in texture.

Add eggs, one at a time, beating well after each addition. Gradually beat in flour mixture. Stir in chocolate and nuts. Drop rounded teaspoons onto ungreased baking sheets (I use a small icecream scoop and parchment lined baking sheets).
Bake for 9-12 minutes, or until golden brown. Let stand for 2 minutes, then remove a wire rack to cool completely.

Makes 3 dozen cookies.

Notes
• This dough freezes quite well, so I usually portion out cookies and individually freeze them on baking sheets. When hard, I transfer them to a freezer bag— then I can make as few or as many as I’d like, without having to defrost the whole batch.

Wednesday
Jun012005

À la mode

There has always been the need to eat; but somewhere along the way we discovered the notion of eating fashionably.

One of my greatest pleasures in my older cookbooks is to see the evolution of tastes through their pages. As Donna Hay put it in her book Modern Classics, Book 1, “What macaroni and cheese was to me, risotto will be to the children of today when they come adults doing the cooking in the future.” I find that idea fascinating; the way that foods, like any cultural phenomenon, move from innovation to trend, ending up in either the fad or classics category. We’ve all watched cuisines, techniques and specific flavours move in and out of the limelight.

The three books pictured in my inaugural post were all ones stolen from my Mother’s collection. Spanning 32 years, these publications chronicle an amazingly rapid progression of tastes, all promoting the au courant menus of the moment.

The oldest, The Ogilvie Cook Book (Ogilvie Flours Mills Co., Limited, 10th edition, revised 1957) promotes itself as “a liked and respected friend of our modern homemakers.” Truly the must-have guide to home entertaining, it includes Appetizer Rolls made with Velveeta Cheese, undiluted condensed soup, bacon and Parker House rolls; Extra Good Homemade Chili with cayenne, salt and pepper as the only seasonings; and Half Moon Bay Crabs served in homemade tin foil faux crab shells. Italian food is still an emerging cuisine for the North American household, while German specialties are mainstays and French cuisine is chic. Aspic and jellies figure heavily into multiple chapters.

I realize I sound tounge-in-cheek, but my interest in these recipes is sincere – the attention to detail and specificity of garnishes show evident care and a belief in these dishes. And though these may not be staples in my current repertoire, I respect what they represent to the homemakers of 50 years ago.

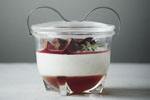
These mini cheesecakes are far from revolutionary. Simplicity itself, without much accoutrement or fuss – a soft vanilla centre topped with tart berries, presented in a crumbly crust. I remember when cheesecakes were all the rage when I was little – I am pretty sure I remember the first cheesecake I’d ever tried, one brought from New York by a favourite uncle. And though the humble cake may now be prominent on most chain-restaurant menus (and in the name of one chain in particular), in my opinion, its allure has not diminished.

My idea of a classic cheesecake
An amalgamation of recipes

Crust
1/4 cup butter, melted
1 1/4 cups graham wafer crumbs

Filling
24 ounces cream cheese (three packages), at room temperature
1 cup granulated sugar
3 eggs
1 tablespoon lemon zest (optional)
2 teaspoon vanilla
Pinch of salt (up to 1/2 teaspoon)
1 cup sour cream
Fresh berries, chocolate or sauces to garnish

Preheat oven to 180°C (350°F).

Lightly butter bottom and sides of a 91/2-inch springform pan. In a small bowl, stir crumbs with butter until mixed. Press onto bottom of pan. Bake in centre of preheated oven until set, about 8 to 10 minutes. Cool completely. Leave oven on.

Meanwhile, using a stand or handheld mixer beat cream cheese until smooth and creamy. Slowly add sugar and cornstarch, beating well combined, scraping down sides of bowl as needed. Add eggs one at a time, beating after each addition until incorporated. Beat in lemon juice, vanilla and salt. Add sour cream and stir just until mixed.

Wrap the underside and halfway up the sides of the springform pan with a double layer of heavy-duty foil. Pour cream cheese mixture into pan. Set pan in a larger ovenproof dish. Fill larger dish or roasting pan with enough hot water to come about 1 inch up the sides of pan. Do not fill water higher than where the foil comes up the side. Bake in centre of preheated oven. After 45 minutes the cheesecake will not be completely set; keep the door shut to the oven and turn it off. Allow the cheesecake to rest in the cooling oven for about one hour.

Remove pan from water and discard foil. Run a thin knife around outside edge of cheesecake to release it from the pan. Cool in pan on a baking rack at room temperature for one hour. Refrigerate for at least three hours, preferably overnight. Garnish with fresh berries, chocolate, whipped cream or however desired.

Cheesecake will keep well refrigerated for several days or can be frozen.

Notes
• To make the mini version as pictured, use standard 24 x 1/2 cup capacity muffin tins. Double the graham cracker crust amounts and divide mixture between the tins. Bake for only 4-5 minutes to set. Ladle cheesecake mixture into each muffin tin, until about 2/3 full. Bake in a Bain Marie for about 12 minutes, or until just set (the sides will be dry, the centre still quite moist). Follow cooling directions as listed above. After chilling, invert cakes onto a baking sheet, then carefully transfer to plates. Garnish and serve.
• If garnishing with chocolate, sweetened whipped cream or a particularly sweet fruit, I sometimes cut the sugar down to 3/4 cup.

Sunday
May082005

Mother's Day, in the shade of raspberry

I have a bit of a confession to make – I compulsively freeze things. I’ve become a freezer pack rat.

It began last winter. When faced with cold, dark nights after work, I wanted comfort and ease. So I began planning ahead, doubling recipes for hearty casseroles and stews, tucking away my bounty into neatly packed containers and promptly sending them into the deep freeze. I felt terribly domestic, organized and prepared. Whenever I opened the freezer, greeted by my handiwork, I felt accomplished.

But then, it started taking over. Somehow the ease of being able to tuck away food for a later day spawned a neurotic compulsion in me. Now I not only freeze pre-made meals, but I’ve begun freezing leftovers. Not exactly leftovers, but the odds and ends we sometimes find ourselves in possession of, through the course of a recipe. Think egg yolks (whisked with a bit of water), stock cubes, and compound butters.

No matter the mouthful or morsel, the tiniest tidbit, I cannot throw things out. Into the freezer they go, packed and labeled, waiting patiently for their culinary rebirth.

At present, a quick survey of my freezer produced:

• Bones from two chickens. From various recipes, for the day I finally make stock.
• 1/2 can of tomato paste, frozen in cubes. I couldn’t find it in the tube, and I hate those little cans.
• Pan drippings from a roast. I wasn’t making gravy that day, but I couldn’t part with the drippings.
• 1/2 cup of sweet garlic marinade. The chicken did not need the drenching I had believed.
• 1/2 batch of pumpkin purée. Excess from pumpkin cheesecake last Thanksgiving.
• Eight of the aforementioned egg yolks. Leftovers from a birthday pavlova.
• Three blacker than black bananas. I always seem to buy too many, these are destined for banana bread.
• 1 1/2 cups of raspberry purée. For a birthday cheesecake, I went a little blender happy. I used it for the cake, and for Bellinis, but still had excess.

The raspberry purée has been invading my thoughts. I’ve been planning a Mother’s Day brunch, and wanted to see if I could somehow incorporate it into my menu. Its colour was calling me — somewhere between rubies and fuchsia, the purée seemed perfect for the festive occasion.

Feeling excited over the prospect of conjuring something from the depths of my freezer, I surveyed the purée’s bunkmates. Spying those ripe bananas brought about my solution — muffins.

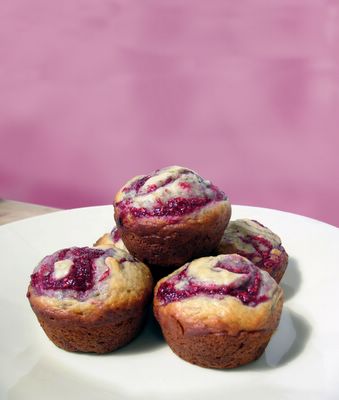
Absolutely a breeze to make, these muffins are the perfect start to a day or a midmorning snack. The intense, almost caramel sweetness of the banana base is cut by tart, jeweled jammy-ness of the berries.

Truth be told, my muffins were a bit overdone on the bottom. I wasn’t paying attention and I unnecessarily greased the pan, leading to the toasty brown colour seen above. Though I was tempted to hide my shame, I decided better of it – for today is a day we celebrate those who inspired us, encouraged us, and loved us always, even if we almost burnt the muffins.

Happy Mother's Day.

Raspberry swirl banana muffins
An adaptation of the blueberry muffin recipe from Modern Classics, Book 2 by Donna Hay

Ingredients
1/2 cup raspberry purée
1 1/2 tablespoons sugar
2 cups plain (all purpose) flour
2 teaspoons baking powder
1 teaspoon salt
3/4 cup sugar
1 cup sour cream
2 eggs
1/3 cup vegetable oil
1 cup mashed ripe bananas, about three whole bananas

In a small saucepan over medium-high heat, bring raspberry purée and sugar to a boil. Turn the temperature down and simmer the purée until it has reduced by half. Allow to cool.

Preheat oven to 180°C (350°F).

Sift together flour, baking powder and salt, stir in sugar.

In a separate bowl, whisk sour cream, eggs and oil, until smooth. Whisk in mashed bananas.

Stir the sour cream/banana mixture through the dry ingredients. Be careful not to overwork the batter – mix until just combined.

Spoon mixture into 12 x 1/2 cup capacity non-stick muffin tins until about two-thirds full. Spoon approximately one teaspoon of the reduced purée across the centre of each muffin. With the tip of a sharp knife or a skewer, draw the point through the raspberry, creating a marble effect.

Bake about 12 minutes, or until a skewer inserted through the centre comes out clean.

Makes 12.

Notes:
• My raspberry purée was simply that – puréed raspberries. It was quite tart, so I added a bit of sugar in the reduction. You may skip this addition if you’d like.
• I like to under fill my muffin tins to make miniature versions. If you choose to do so, this recipe will make 18 of the size pictured.

Page 1 ... 7 8 9 10 11