Instagram Instagram

Entries in dessert (47)

Tuesday
Apr212009

One ribbon-tied package (and a winner!)

Thanks to my sis-in-law Rene, for not only hosting the dinner tonight, but also being our photographer. She's especially snazzy.

Sorry about this. Really.

I know, we were chatting about chocolate and coffee just a few days ago. And it seems as though I have had sweets on the brain for weeks now.

But, if ever was there a day when maybe, just maybe dear reader, you could cut me some slack for my repetitive ways, I hope it will be today. Because really, who would begrudge a birthday girl her chocolate wish?

That's right, today was my birthday.

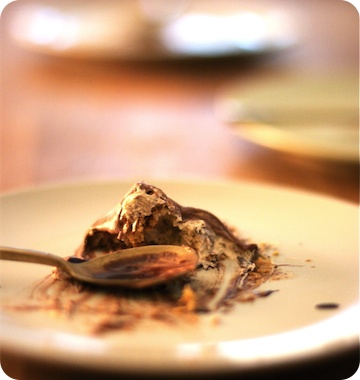
Please excuse my sweet tooth and forgive me for being a trifle scatterbrained just now, but I wanted to stop in to share with you the dessert we chose to celebrate.

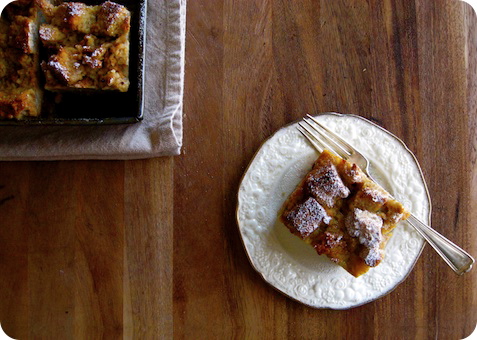
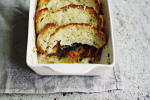
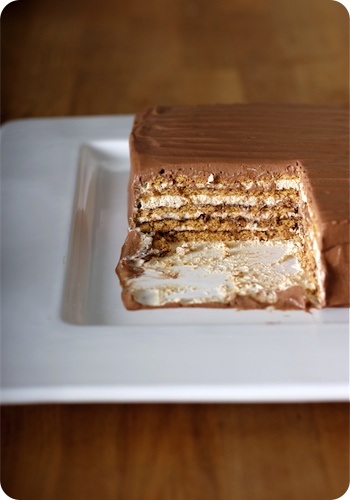
Our fancy-dress festivities are not for another few days, so today is all about a night just for family. And for me, if there is one dessert that ties together my thoughts of family and nostalgia all in one ribbon-tied package, it would be my Mum's Mocha Dessert.

When I was little, this Mocha Dessert was the often-requested sweet ending to my parents' dinner parties, parties I considered the height of elegance. Silver was polished to perfection, the good china was brought out, and the menu were planned days in advance. When the night arrived, the men were dapper and the ladies were always dressed to the nines; you can surely imagine how my six-year-old self loved the glamour of dark lipstick and dangling baubles.

I remember their conversations lasting into the night. The deep murmur of their voices, often punctuated by peals of sparkling laughter, made its way through the darkness, up the stairs and to my ears as I strained to catch what was surely exceptionally witty banter. I thought it all terribly romantic.

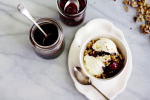
As an adult, I can appreciate why this simple recipe was the subject of such praise. Layers of graham crackers were sandwiched with coffee cream and drizzled with chocolate sauce. After a night's rest in the icebox, the formerly-disparate components relax into each other. The graham crackers loose all their crispness, the cream turns thick and luscious. In the end, everything is mousselike, with a delicate delineation of layers that yield to the slightest pressure from a spoon. A cross between an icebox cake and a tiramisù, I strongly believe that it was this ethereal confection that started my love affair with coffee.

This cake is ridiculously easy to make and decidedly old school. It is not about bells and whistles, or technique and the latest trend. Instead, like all fond memories, it simply makes me smile.

Of course I had a little bit of business to attend to today, and that is the announcement of the winner of the giveaway. I am happy to say that Random.org has selected Angela as the recipient of a one-year subscription to the food magazine of her choice. Angela, please contact me at tara [at] sevenspoons [dot] net with your contact information.

Thank you to everyone that entered and a here's wishing a happy day to each and every one of you!

Mocha Icebox Cake
Adapted, with thanks, from my Mum. Hers was made and served like a tiramisù, with more cream and less cookie, scooped out for serving. I have turned the dessert out on its head, and added some chocolate whipped cream.

Ingredients
3 1/2 cups heavy (whipping cream), divided
3/4 cup confectioner's sugar, divided
1 tablespoon instant coffee granules
a pinch of salt
1 teaspoon vanilla extract
45 honey graham crackers, the single kind
1/3 cup chocolate syrup, see note
1/3 cup cocoa powder, sifted

Line an 8-by-8-inch metal cake pan with a cross of clingfilm, leaving an overhang on all sides. Set aside.

In the bowl of a stand mixer with the whisk attachment, or in a medium bowl with a hand blender or whisk, begin to whip 2 cups of well-chilled heavy cream. Once the cream begins to thicken, sift in 1/2 cup confectioner's sugar, the coffee granules and salt. With the mixer on medium-high, whip until the cream begins to hold soft peaks. Add the vanilla, and beat until the cream just holds a stiff peak.

Spread a small amount of the cream on the bottom of the prepared cake pan. Lay 9 crackers, in a 3-by-3 grid, on top of the cream. Spoon 1/2 cup of the cream on top of the crackers. Then, using an offset spatula, gently spread the cream to cover the crackers entirely. Drizzle a few tablespoons of the chocolate syrup over the cream, spreading to form an even layer if desired.

Top with another layer of graham crackers, continuing the layering until you have 5 layers of crackers and 4 of the cream and chocolate. Make sure to reserve a small amount of cream to cover the last layer of crackers (no chocolate on this one).

Cover loosely with a piece of clingfilm, then draw the overhanging clingfilm from the sides up to cover the edges. Refrigerate for at least 6 hours and up to 2 days.

About 1 hour before serving, remove the cake from the fridge and peel back the clingfilm. Invert the cake onto a serving plate, removing the remaining clingfilm from the top and sides. Smooth out the sides with an offset spatula if needed. Place the cake in the freezer, uncovered, to chill for 30 minutes.

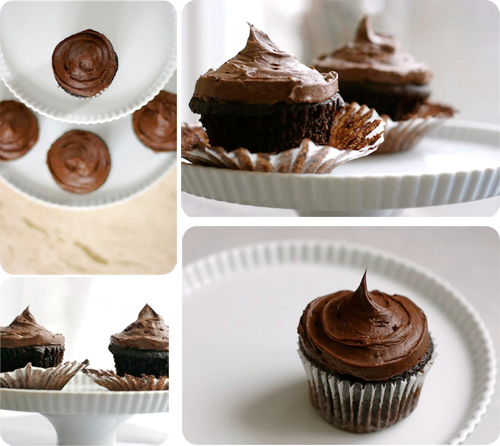
Prepare the cocoa cream. In the bowl of a stand mixer with the whisk attachment, or in a medium bowl with a hand blender or whisk, begin to whip 1 cup of well-chilled heavy cream. When the cream begins to thicken, sift in the reserved 1/2 cup confectioner's sugar and cocoa powder. With the machine set to medium-high, whip the cream until holds a firm peak, but being careful not to over beat.

Take the cake out of the refrigerator and gently spread a thin layer of the cocoa cream to cover. Once completely covered, use the remaining cream to decorate as desired. Chill the finished cake in the refrigerator for 30 minutes, then serve.

Notes:

• If you are going for authenticity, my Mum used Hershey's Chocolate Syrup (the dessert topping in the yellow tin, not the brown squeeze bottle). But if you are feeling posh you can make your own using one of these recipes.
• For the sake of honesty, I will say that maybe I went a little overboard and used a full 2 cups of cream for the cocoa frosting. The last 1/2 cup looked so sad in its carton, and heck, you only have one birthday a year. Totally not necessary to the cake, but enjoyably decadent. To follow suit, add a bit extra cocoa powder and confectioner's sugar, to taste.
• A pinch or two of instant coffee granules added to the cocoa cream is also a good thing.

Thursday
Apr092009

Just that bit friendlier (and a giveaway!)

It was the loaf pans, I think. They were at the start of all of this.

When I set about baking homemade sandwich bread, I tried Julia Child's recipe. A recipe which specifies a 8-by-4-inch loaf pan, instead of the more common (and larger) 9-by-5-inch variety. After baking my loaves and admiring their modelesque proportions (slim, tall), I was smitten. I took to baking many of my breads and cakes in these pans, thinking there was no harm in my fondness for foods on a smaller scale.

But those pans served only as a gateway to increasingly-elfin baked goods.

When baking a pound cake, I brought out miniature tube pans and split it into six. Banana bread was divided into eight little loaves to be tucked into lunches. My super-secret recipe Chocolate Crunch Bars were made in individual squares, rather than a monstrous slab. And then, of course, there were those Valentine's Day cupcakes.

Somewhere along the way of this Lilliputian baking, I had two realizations. Well, one realization, and one moment's pause. First, I realized I have amassed more than a few baking pans. Second, I became somewhat self-conscious about my weakness for the wee.

You see, dear reader, there has been some recent criticism of diminutive cakes.

I can agree that some cupcakes are over-the-top sweet, with such an excessive helping of tooth-aching frosting that they are nearly impossible to enjoy. And I do think that some bakeries have gone a trifle mad in their pricing of these cakes.

But I cannot subscribe to the theory that lies at the root of much of the disapproval. The objection of the individuality of the single-serving cake, a trait seen as embodiment of the "mine-all-mine" mentality that represents all that is wrong with the world.

In the eyes of these critics, the small is associated with the sole, and that is seen as sad. Lonely, even isolated.

And so, if no man should be an island, should no cake be a cupcake? Has this predilection for the compact been the result of a larger trend of greed?

Pshaw.

Now lest I ignite a debate on whether or not there is room in this world for a moment to treat oneself (I am firmly in the "yes" camp on that one), I will instead consider the fact that most of these criticisms are aimed at the purchase of cupcakes. There is no mention of making cupcakes; making them is another thing entirely.

Making small cakes almost always ensures sharing. The sheer number of of treats made in a single batch encourages generosity. Sure, a large cake can be doled out in slices and wrapped for giving, but most often it is served to those who happen to attend a specific event. In contrast, an armada of cupcakes (baked right in their travelling clothes) are perfectly suited to be sent out into the world - event or not.

You see, small cakes can be more approachable than one behemoth beauty. A layer cake on its pedestal is lovely, but a bit standoff-ish. All-too-often I have been at a party, admired the cake perched prettily on its stand, and noticed that nary a crumb has been touched. Unless the host serves, rarely does a guest feel bold enough to "be the first" to mar its pristine completeness.

But set out a tray of cupcakes, or single-serving squares, and they are scooped up before you can bat an eye.

Little cakes are just that bit friendlier. They do not stand on occasion. While a slice of cake may seem like it requires a holiday, a small cake slips easily into the everyday.

While we are at it, small cakes are cute and neat. Sure it is shallow, but even though I love some messy fun in the kitchen, I do believe that the recipients of my efforts appreciate the clean edges that personally-portioned baked goods provide. I am routinely inept at cutting straight lines, and so perfect shapes would surely be preferred over my mangled efforts.

But, all said, there is one trouble with making petite treats. Miniature baking pans are truly infuriating to keep clean. I have a serious case of dishpan hands from scrubbing all those teeny-tiny nooks and crannies.

I blame Julia.

Bittersweet chocolate cake
Adapted from a recipe for Chocolate Chip Mascarpone Cupcakes by Giada de Laurentiis. A note on its flavour; despite its appearances, this cake is not overly rich. It is the sort that is best with a cup of tea in the afternoon, or as a simple dessert. Canadians (and some Americans), will find the taste of this cake is strikingly similar to the chocolate glazed doughnuts from well-known national chain.

Ingredients for the cake
3 ounces unsweetened chocolate, chopped
3 ounces bittersweet chocolate, chopped
1 cup water, room temperature
1/2 cup sour cream, room temperature
3 cups all-purpose flour
1 teaspoon baking soda
1 teaspoon fine sea salt
1/2 teaspoon baking powder
2 1/4 cups granulated sugar
1 cup vegetable oil
3 large eggs
2 teaspoons vanilla extract
3/4 cup mini semi-sweet chocolate chips

Ingredients for the glaze
1/2 cup granulated sugar
1 shot of espresso
around 1/2 cup of water
1 1/2 teaspoons cocoa powder

Make the cakes. Preheat an oven to 325°F (160°C). Butter and flour two 8-by-4-inch loaf pans, set aside.

Place the two types of chocolate in the top of a double boiler or a heat proof bowl set over a pan of simmering water. Stir until melted; remove from heat and allow to cool slightly.

In a small bowl, whisk together the water and sour cream to combine. Set aside.

In a medium bowl, sift together the flour, baking powder, baking soda and salt. Set aside.

In a large bowl, using a hand mixer or whisk, beat together the sugar and oil until well blended, around 1 minute. Add the eggs, one at a time, beating well after each addition. Scrape down the sides of the bowl as needed. Stir in the vanilla, then the cooled chocolate. Add flour mixture alternating with sour cream, starting and ending with the flour mixture and stirring until just blended. Stir in the chocolate chips.

Divide the batter between the two prepared pans and bake until a cake tester inserted into the middle of the loaves comes out clean, around 55-65 minutes. Remove from oven, cool 10 minutes in pan, then remove the cakes to a wire rack to cool completely (right side up).

For the glaze, take the shot of espresso and pour it into a 1/2 cup liquid measure. Add enough water to bring the level up to a 1/2 cup. Pour the water mixture, sugar and cocoa into a small saucepan and whisk to combine. Bring to a boil over medium heat, stirring occasionally. Simmer until the glaze is thick, about 5 minutes.

To glaze the cakes, set the cooling rack over a rimmed baking sheet. Using a pastry brush, paint the glaze all over the top and sides of the cakes; carefully apply multiple thin coats for the finest finish. Let stand until set.

Makes two 8-by-4-inch loaf cakes.

Notes:

• If you do not like espresso, use only water for the glaze.
• The cake pictured was baked in a Nordic Ware Pro Cast Brownie Bundt pan (thanks Mum!). In this size, the recipe will yield about 36 cakes.

And now for the giveaway. The fine folks at Subscription.com were generous enough to offer me a complimentary magazine subscription. Sadly, I am unable to take advantage of their kindness due to international distribution restrictions. So, we thought to pass the offer on to you.

Subscription.com will give one reader a full-year subscription to the cooking/food magazine of their choice (as selected by the winner from their list of titles). There is no cost to be incurred by the winner, the only condition is that you must be is a resident of the United States or have a US mailing address. To enter, leave a comment at the end of this post, with a mention of your desire to be included in the draw, and I will compile these comments into a master list (this way, non-entrants can still comment if they'd like). A random winner will be selected and announced on April 21, 2009.

My apologies to Canadian and international readers for their exclusion. There will be some more giveaways in the future to make it up to you; please understand that I simply could not pass up the opportunity to share this prize.

Tuesday
Mar312009

Rah-rah-sis-boom-bah

[Thursday, March 26, 2009: Due to an under-the-weather little one, I will not be able to post today . Until he's feeling better, here is a sneak peak at what we've been enjoying this week - a luscious Grapefruit Tart with a buttery, shortbread crust. Just a bit of puckery-brightness for these early spring days.

Back soon.

Tuesday, March 31, 2009: Everyone is all better, and so I am back. Thanks for all your concern and well-wishes, and for keeping a spot warm for me.]

Orange peel. Air that is sugary sweet and heavy, ripe with moisture and the scent of citrus. I shut my eyes and inhale, swallowing whole.

Its February and I am in my parents' kitchen.

For years, my Mum made marmalade; each time turning to the same book, using the same recipe for as long as I can remember. Stains and smears have turned the page translucent in places, smudging the penciled notes along the margins.

The ceremony of marmalade making took the day. The speckled charcoal pot, used only for canning, appeared from the depths of cupboards. Sterilized jars lined up like soldiers on the counter, gleaming, waiting to be of service. I have a mix of memories of the procedure; the infinite boiling, reducing, concentrating of flavours, the endless task of cutting the thin peel into even thinner strips, staining my nails in the process.

And although at the time I did not much care for marmalade, the notion of those jars is still one of my strongest culinary memories and present-day aspirations. What care was there of winter when there was such warmth in the kitchen, such delicious bounty to be enjoyed?

While the calendar may (almost) read April, it still (almost) feels like February here. At best, early March. Maybe.

The sun may be warm but the wind is not; it still breathes bitterly against our faces each morning, sending me shivering back into the warmth of the house and reaching for a scarf. Just the other day I was greeted with snow in the moments just after sunrise; it cascaded delicately, like icing sugar upon a cake rather than a true snowfall, but it was frozen nonetheless. This morning there was no snow, thank goodness, but the grass was frost-tipped and blue in the early light.

Spring is dragging her feet.

But, there is hope. There are the teeniest buds on our lilac tree; tiny, perfect little bundled fists of green, holding within their grasp the promise of warm days to come. The afternoon light has changed its character, doffing its winter garb of blue-grey hues for warmer shades of palest flax. And while I wait, as patiently as I can, for local rhubarb and asparagus and, sigh, berries to make their way to market, at least I can count on citrus to bring even more sunshine to our day.

Bold and boisterous on the tongue, citrus is rah-rah-sis-boom-bah blithe, full of cheer and high kicks. Citrus fruits are sharp and spry, marching merrily ahead as spring lags behind, with enough pep in their step to wake our palates from the sedative effect of a season's worth of comforting richness.

I was looking for a tag-along companion for a Sunday brunch invite, something that could add some brilliance to what could be a gray morning. Citrus was surely the ticket, and I wanted to journey on the path of least-resistance; some quick Saturday baking and Sunday primping, with little worry and few opportunities to be lead astray.

I wholly ignored the option of sometimes-temperamental shortcrust pastry, eyeing in its stead a forgiving shortbread crust. I passed on the idea of a persnickety curd for its filling; with its demands of patient stirring over gentle heat and its abject fear of overcooking, a curd can be such the little fusspot. Not what I was looking for in a brunch guest.

A grapefruit-modified version of a traditional Key lime filling was my choice, whisked together and briefly baked, it demanded only the slightest attention; its presence fit perfectly in the bleary-eyed pottering about of Sunday morning.

Yellow upon yellow, this tart speaks of brightness in golden tones. The floral notes of Ruby Red grapefruit are accented by twangy lemon, and tempered by creamy-sweet condensed milk. The shortbread crust is the perfect foil for the citrus, buttery against all the tang of the filling.

So thoroughly-cheered was I, I (almost) felt prepared to be patient as I wait for spring's arrival. Almost.

Grapefruit tart with shortbread crust

Ingredients for the crust
1 1/2 cups all-purpose flour
1/4 teaspoon salt
3/4 cup (1 1/2 sticks) unsalted butter, room temperature
1/2 cup confectioners' sugar
2 large egg yolks, room temperature
2-3 teaspoons heavy cream

Ingredients for the filling
4 large egg yolks
1 can sweetened condensed milk
2 teaspoons grated grapefruit zest
1 teaspoon grated lemon zest
1/2 cup freshly squeezed grapefruit juice (preferably Ruby Red)
1 1/2 tablespoons freshly squeezed lemon juice
1/8 teaspoon salt

Prepare the crust first. Whisk together the flour and salt in a medium bowl and set aside. In the bowl of a stand mixer with the paddle attachment, or in a large bowl using a hand mixer, cream together the butter and sugar on low until light and well blended.

Add the eggs yolks, one at a time, beating well after each addition. Scrape down the sides of the bowl as needed. Add the flour and mix until almost blended. Slowly add 2 teaspoons of cream, checking if the dough has come together. If it is still a bit dry, add the rest. Stop mixing as soon as there is no longer flour visible.

Turn the dough out onto a piece of plastic wrap, using the wrap to shape the dough into a flattened disk. Wrap tightly, then refrigerate for 1 hour.

After the dough has chilled, lightly flour your work surface. Roll out the dough into a 1/4-inch thick circle, about 12 inches in diameter. On a parchment-lined baking sheet, drape the dough over a 9-inch flan ring, fitting the dough gently and pressing it into the edges. Chill the dough for 10 minutes.

Using a sharp paring knife, trim the dough so that it is flush with the rim. Return the tart shell to the refrigerator for 30 minutes to firm up and chill thoroughly.

Preheat an oven to 375°F (190°C). Line the tart shell with parchment, allowing a 1-inch overhand. Fill lined shell with pie weights and bake until the pastry's edges are beginning to colour, about 15 minutes. Remove parchment and weights, using the overhang of paper to assist. Continue baking until the pastry is light golden all over, about eight minutes more. Remove from the oven and transfer to a wire rack to cool completely (still on parchment lined baking sheet).

Turn the oven down to 350°F (175°C).

In the bowl of a stand mixer with the whisk attachment, or in a medium bowl with a hand mixer or whisk, beat the yolks on medium-high speed until fluffy and pale, about 3 minutes. Add condensed milk, zests, juices and salt, and beat to combine, scraping down side of bowl as needed.

Pour the filling into the cooled prepared tart shell and bake until just set, about 10 minutes. Still on its parchment, transfer the tart to a wire rack. Cool completely, then loosely cover in clingfilm and refrigerate for at least 1 hour or up to overnight.

Allow the tart to sit at room temperature for about 10 minutes before serving; remove the flan ring and garnish with some softly-whipped cream, crème Anglaise or simply with a dusting of confectioners' sugar.

Makes one 9-inch tart, serving 12.

Notes:

• Alternatively, use the leftover egg whites to top the tart with a torched Swiss meringue.
• The tart as shown was baked in a 10-inch quiche pan with extra-deeps sides and a removable bottom. The amount of filling and pastry require a deeper capacity.

Thursday
Mar192009

All the more welcome

Some leftovers lose their allure rather quickly. Seemingly overnight, they become insufferably-dull house guests who have overstayed their welcome. In the light of day, gone is their allure, and with it, any remnants of your hospitality.

Most members of the fried food family, for example, fall into this category. They are the sort of guest with only one amusing anecdote to share. Sure, they are ever so witty and amusing for that one story, but a singular performance is all they can muster. After that, the conversation falls flat and everyone is looking at their watches, praying that nobody is in the mood to stick around after dessert is finished.

On the other hand, there are those dishes you hope will stick around long enough to become leftovers; in fact, you anticipate their arrival. Every Thanksgiving, whether it is me or another family member roasting the requisite bird, we purposely over-estimate our needs just so we will have some left over. Goodness knows, turkey sandwiches in the days following are almost more tempting than the feast the day before.

Roasted vegetables are agreeable fresh off the barbecue and paired with grilled meats for supper, but they are all the more welcome the next day when they reappear in a sandwich or are tossed with some greens for a salad. These are the sort of kitchen guests you look forward to, those which seem sublime at all times, even if their sojourn lasts more than a day or two.

Bread might be the most wonderful of leftovers, with almost endless charms. Slightly-past-its prime brioche is perfect for summer pudding, and I am altogether too happy to have a country boule hang about, drying out, just so there can be a panzanella in a few days.

Up until last evening, our inordinately-large bread box was playing host to the stragglers from our St. Patrick's Day festivities, a half-eaten round of Irish soda bread. While the loaf was far from dry, thoughts of bread pudding inspired an impromptu kitchen visit.

Eggs, milk cream and sugar blended together in a quick custard base. Cubed bread took to its bath, soaking for a long while. After a slathering of velvety raisin jam, the bread rested again, before a long, low bake in the oven. Still warm, the bread had the slightest bit of resistance left, only just yielding to the tooth.

Exactly the sort of company I was looking for.

Irish soda bread pudding with raisin jam
This is a hearty, not overly-sweet rendition of bread pudding; suited as much for breakfast as it would be for dessert. The raisin jam, which is really more a purée, was included for a loved one who likes the taste of cooked raisins but not their texture. Layered in the pudding, the raisin jam becomes a dark ribbon of concentrated raisin-ness, ginger and spice. I particularly enjoyed how the crags and crevices of the bread cubes allowed for alternating pools of jam, then rivulets, so that each bite had its own character.

Ingredients for bread pudding
4 eggs, at room temperature
1/3 cup brown sugar, packed
1/2 teaspoon vanilla
1/2 teaspoon ground cinnamon
1/8 teaspoon ground nutmeg
1/8 teaspoon kosher salt
3 cups milk
1 half and half
A generous 6 cups of 3/4-inch cubed Irish Soda Bread, see note
1 recipe raisin jam

Ingredients for raisin jam
1 cup raisins
1/2 cup water
2 tablespoons orange juice
1/4 teaspoon freshly grated ginger
1/4 teaspoon cinnamon
1/8 teaspoon salt

Make the jam first; in a small saucepan over medium-high heat, combine all the jam ingredients. Bring to a boil, then reduce heat to maintain a simmer for around 10 minutes, stirring occasionally. At this point, the raisins should be soft and plumped, with a bit of moisture left in the pan. If it gets too dry and sticky, add more water, a tablespoon at a time. Working carefully, transfer the raisins to a small food processor or blender and purée until fairly smooth, again adding more water if necessary. The purée should be rather thick, but spreadable. Remove the jam to a bowl and allow to cool.

Meanwhile, lightly grease a 9-by-9-inch baking pan with butter and set aside.

In a large bowl, whisk together the eggs, brown sugar, vanilla, spices and salt. Whisk in the milk, continuing until all the ingredients are well-combined and the sugar is dissolved. Add the cubed bread, pressing down to submerge it into the milk mixture, and set aside to soak for around 30-40 minutes. By that point, almost all the liquid should be absorbed.

Preheat an oven to 350°F (175°C).

Spread half of the bread cubes in the prepared baking dish, making an even layer. Spoon the raisin jam over the cubes, spreading to cover all but a 1/4-inch border around the sides. Carefully top with remaining bread. If any liquid remains in the bowl, pour it over the pudding; soak for 10 minutes.

Set the baking dish in a larger roasting pan, and put in the preheated oven. Pour very hot water into the roasting pan, until it comes halfway up the side of the baking dish. Bake the bread pudding for about 50-60 minutes, or until a knife inserted near the centre comes out almost clean.

Serve warm or at room temperature, dusted with icing sugar or a drizzle of maple syrup.

Makes one 9-by-9-inch pan, serving 8.

Notes:

• The character of your soda bread will make all the difference here; I like a loaf that incorporates at least some whole wheat or oats, for added texture. The density of the bread will also determine how much soaking time is necessary. Be patient, and adjust timing accordingly.
• For a taller bread pudding, which is my preference, use a greased 8-by-8-inch baking pan instead. In this case, it may be that not all the liquid will fit in the pan right away. Pour as much as possible in without overflowing, let stand until absorbed and then repeat until done. Resist the urge to compress the bread too much, too soon. The cooking time will need to be longer to compensate for the additional depth.

Tuesday
Feb032009

A matter of taste; even more chocolate cake


A sugar-high birthday; taste testing chocolate cakes. In the bottom left photo, the famed Double Layer Chocolate Cake (in cupcake form) sits to the left of Martha Stewart's One Bowl Chocolate Cupcakes.

January 16th marked Benjamin's third birthday, a perfect excuse for round two of the chocolate cake battle raging in my recipe file. Our biggest little man had requested "chocolate with chocolate" to celebrate his day, and what sort of Mummy would I be if I refused?

I forget how it was exactly, but I stumbled upon the recipe for Double Chocolate Layer cake, from Chef Ed Kasky (as published in Gourmet magazine, March 1999). I must have been living under a rock this last decade, because this cake has quite a following, with over 1200 (hyperbole-laden) comments on Epicurious. It has also appeared on countless other sites and discussed in detail.

With all of that fanfare, there was no alternative than to try this cake for myself. It might be a bit of retread of covered territory, but I have never been one to deny my curiosity. I had to know what the fuss was about.

With multiple celebrations ahead of us, I followed my same procedure as before, this time with Martha Stewart's One Bowl Cupcakes, as published in her Baking Handbook (Clarkson Potter, 2005), against the lauded Double Layer Chocolate cake. The major difference between the two recipes is that the former is an all-cocoa preparation, whereas the latter includes both cocoa and melted chocolate. It should be noted, as reported in my earlier test, that I substitute some prepared coffee for the water called for in the Stewart cake.

The batters were equally-easy to come prepre, with the Gourmet recipe notably thinner in its consistency. The Stewart batter was more viscous, and was my preference when I surreptitiously licked some from the bowl while cleaning up.

Half of each batter went into cupcakes, with their liners marked to indicate the recipe used. The remaining batter was combined, weighed, divided and baked into layers for a single, staggeringly-tall four-layer cake. It was one of the tallest cakes I have ever made, taller than it was wide, and inspiring an awed reaction from our birthday boy.

Despite the impressive stature of the cake, the cupcakes were of my real interest. Using the same (by weight) of batter for each cup, the Martha Stewart cupcakes baked up ever-so-slightly taller, with a gentle dome and a bit of a rimmed edge. They were pretty, perfectly-formed and slightly cracked on top, an example of what a cupcake should look like. The Gourmet recipe baked up slightly flatter, but beyond that, the texture, colour and overall look of the cupcakes were identical.

So it was down to taste. We tasted the two blindly, cake alone and then with frosting, and it was a unanimous decision.

The Gourmet recipe for Double Chocolate Layer Cake won.

Here's the thing. This cake deserves fanfare. The most fantastic, festive, fanciful fanfare that you can imagine - and more. Deeply flavoured, with a dark and even crumb, the cake is moist and tender but just a bit toothsome. Truthfully, it is similar to the Martha Stewart recipe, boasting just about every quality that had made me declare it the winner over Beatty's Chocolate Cake from Ina Garten last summer. Where the Gourmet cake took an edge was in its subtle fudginess, a bit of (excuse the technical term) squidgy-ness, that made each bite that much more satisfying.

Now I will admit I am tempted to try the One Bowl Chocolate Cupcakes with a bit of melted chocolate stirred in, just to see how it would turn out. But for now, I am more than satisfied to say that the Double Layer Chocolate Cake from Gourmet warrants its fame.

Double Chocolate Layer Cake
From Chef Ed Kasky, as published in Gourmet Magazine, March 1999.

The recipe can be found online here.

Notes:

• Some comments on the Epicurious site report that they have had trouble with the Double-Chocolate Layer Cake overflowing their standard 10" pans. The recipe specifically requires 2" deep pans, which may remedy this problem. I can only comment on the taste of the cake, as I baked mine in four 8" round cake pans, with the remainder used for cupcakes, as pictured.

One Bowl Chocolate Cupcakes
From Martha Stewart's Baking Handbook.

The Martha Stewart Recipe from the Baking Handbook is not the same as the One Bowl Cupcakes recipe that has been published on her site online, nor is it the one that was published in Martha Stewart Living for February 2009. The recipe is subject to copyright; however, a quick search does find it published online (you are looking for the recipe that begins with flour as the first ingredient).

Page 1 ... 2 3 4 5 6 ... 10 Next 5 Entries »