Instagram Instagram

Entries in dessert (47)

Tuesday
Apr292008

Martha, Martha, Martha; a review of Martha Stewart's Cookies

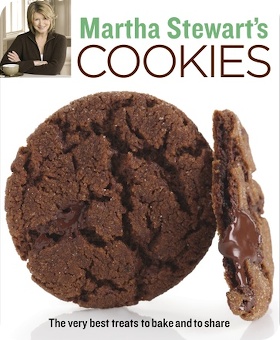
As of late, Martha Stewart, baking and food blogs seem to go hand in hand. With Sunday's launch of the cookie-centric contest at marthastewart.com, it is an appropriate opportunity to take a closer look at the prize up for grabs; copies of Martha Stewart's Cookies (Clarkson Potter, 2008). The latest cookbook from the editors of Martha Stewart Living, it is a comprehensive collection of 175 their most versatile and tempting treats.

With its ingenious imaged-based table of contents, coupled with chapter headings organized by cookie texture, this book speaks directly to cravings and their indulgence. I have read some recipes delightfully described as "everyday", a phrase that evokes idyllic notions of an overfilled cookie jar; these are chocolate chip cookies in a myriad of variations, fudgy brownies, delicate sugar cookies and shortbread. Other recipes range from the festive (from Crumbly and Sandy: Vanilla-Bean Spritz Wreaths) to the elegant (from Crisp and Crunchy: Sweet Cardamom Crackers) to the downright decadent (from Rich and Dense: Chocolate Pistachio Cookies).

In regards to content it should be noted that some of these recipes have been previously published in various publications under the Martha Stewart mantle, specifically the special edition Holiday Cookie series. Some readers could be frustrated by this repetition, while others may appreciate having their best-loved favourites in a trade paperback version.

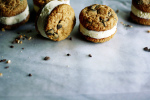
The layout of the recipes is clear and concise, each featuring a photo of the finished product. Although some follow the expected Martha Stewart aesthetic of colourful but simple styling, others depart from this look entirely. These shots are mid-range to close up photographs against a white background which, in comparison to the charm of the former, do seem a bit austere. That said, the minimalist approach does highlight the characteristic textures of the cookies quite well.

Two appendices, one on packaging and the other with information on techniques and cook's tools, are helpful additions. Inspired presentation ideas show off the cookies beautifully for giving, and the instructions frequently include step-by-step photos. The baking notes serve as a useful introduction to the novice baker and as helpful reminders to those more experienced.

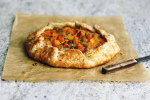
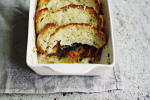
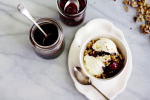
In the name of research, the Peanut Butter and Jelly Bars (above and below) were the first to be made from this book. The luscious batter inspired nostalgic thoughts of childhood. Its rich scent reminiscent of the best peanut butter cookie crossed with Reese Pieces; the sort that has greedy fingers fighting over rights to lick the bowl. The finished cookie lived up to the charms of the dough, with tender cookie underneath, a layer of tangy-sweet jam in between and the salty crunch of peanuts and crisp crumble as a crowning crust. Perfect for a lunchbox or after-school treat, these cookies will surely become a household classic.

Peanut Butter and Jelly Bars
From Martha Stewart Holiday Cookies 2001.

The recipe featured in the book is subject to copyright but is quite similar to this version.

Notes:

• I used a combination of mixed berry jam and homemade mixed berry compote for the filling as I wanted a bit of tartness to offset the buttery-rich cookie layer.

• Toffee bits, coconut, honey-roasted nuts or white chocolate chips would be a wonderful substitution or addition to the peanut topping. For those looking for true excess, a chocolate spread or dulce de leche could be used instead of jam filling.

Monday
Feb112008

A spoonful of sugar

With our impending arrival well on its way, we are currently attempting to reiterate the importance of sharing to our first born. Though his universe has happily (and steadily) revolved around Ben for the past two years, we have come to the point when patience, respect and understanding are becoming part of our daily conversations.

I am terribly thankful for his gaggle of contemporaries who help him in his education. He has had to learn that not everyone plays with blocks in exactly the same way, that many little hands can create stories with the Little People and that cuddles can be given to cousins and friends - not just Mummies and Daddies. He has started to learn to take his time with those younger, to allow for the independence of those older, and to realize that he is not the only one who would like a cookie. He has seen that our lives are interconnected with those of others; we share our days and ourselves, as well as our toys.

Such is the case with our Valentine's Day festivities. Even though Sean and I will have our own evening out, the day itself is saved for the shared celebration of both the sweethearts in my life. Each bring me such happy contentment, Benjamin will see that instead of choosing just one (something I could never do), I would rather choose to spoil everyone. He will see that treats, consideration and hugs can be shared equally, and that there is as much joy in the giving as in the receiving.

A weeknight family dinner calls for a dessert that is special but does not take too much attention away from enjoying everyone's company. Nothing too elaborate or fussy, an offering as perfectly sweet as those gathered around the table.

This cake is dense and moist, with the fine texture of a pound cake. The richness of butter and cream cheese is underscored by mellow almond and luscious bits of white chocolate that only almost melt into the batter. Perfect on its own, sublime when topped with raspberry sauce, and decadently stodgy as the base of a midwinter trifle - it is sure to send more than one heart aflutter.

If one happens to have miniature tube or Bundt pans, this batter makes adorable little plated desserts; the perfect size for two, or in our case three, forks to share.

White chocolate almond cake
From a variety of inspirations.

Ingredients
Melted butter for greasing the pan
3 cups all-purpose flour
2 teaspoons salt
1 1/2 cups unsalted butter, at room temperature
8 ounces cream cheese, at room temperature
3 cups granulated sugar
6 large eggs, at room temperature
1 teaspoon vanilla extract
1/2 teaspoon almond extract
3 tablespoons milk
1/2 cup finely chopped white chocolate

Almond simple syrup (optional)
1/2 cup granulated sugar
1/2 cup water
1/4 teaspoon almond extract

Preheat oven to 350°F (175°C). Using a pastry brush or kitchen towel, lightly coat a 10" tube pan with melted butter.

Sift together flour and salt in a medium bowl. Set aside.

In a stand mixer with the paddle attachment, or with an electric beater, cream together the softened butter, cream cheese and sugar on medium-high speed until light and fluffy. This will take about 5 minutes, being sure to scrape down the sides of the bowl periodically. Add the eggs, one at a time, scraping down the sides again and beating well after each addition. Beat in vanilla and almond extracts.

With the mixer on low, add the flour in two additions, alternating with the milk. Mix until just combined. With the mixer still on low (or with a rubber spatula), stir in the white chocolate. Pour the batter into the prepared pan, mounding the edges up slightly and leaving a bit of a furrow through the middle. Hit the pan against the counter to remove any trapped air bubbles.

While cake is baking, combine the water, sugar and almond extract in a small saucepan over low heat. Cook until the sugar is dissolved and the syrup becomes thick.

The cakes should be done after 75-85 minutes, until a cake tester inserted in the centre comes out clean and the top is golden brown. Allow to cool in pan, on a wire rack, for 10 minutes.

Turn the cake out onto the rack (see note) and, use a pastry brush to coat the cake entirely with the syrup. Allow to cool completely.

Notes:

• You will want to suspend the rack over a sheet pan to catch the excess glaze. A spoon can also be used to glaze the cake, but I prefer the finer finish a pastry brush offers.
• For a citrus variation, omit the almond extract and white chocolate from the cake. Add 1 teaspoon grated zest of your choice and one tablespoon of freshly-squeezed juice replaces the same amount of milk. For the syrup, omit the extract and substitute juice for the water.
• For a chocolate chip version, the white chocolate can be substituted with 3/4 cup bittersweet and the almond extract can be omitted (but this is not necessary). The syrup is made more of a glaze, substituting the extract with 1 teaspoon cocoa powder and boiling the mixture gently for 5 minutes. Spoon this over the top of the cake, allowing it to dribble down the sides.

Thursday
Jan242008

An everyday sort of thing

I wish I could say that every dish I made had a fabulous backstory. Something compelling, or educational or even enticingly tempting. Heck, I would even settle for vaguely amusing sometimes. But sadly, that is not the case.

In truth, most of the dishes that reach our table do so out of a straightforward need to stop the grumbling of our bellies. And more often than not, there is an emotional whim attached.

Such was the case with the menus we have enjoyed this week. A bitterly cold spell and some particularly heavy workloads took their toll by Tuesday, by which time we found ourselves in need of sustenance of both the body and spirit. That afternoon I called my dear Mum, not only for a bit of cheer but also for her minestrone recipe - a dish I have not had for years.

Preparing it for Sean and Benjamin brought instant comfort. All it asked of me was some idle chopping, followed by lazy stirring now and again. Just the sort of demand I could handle. The pot gently simmered on the stove, filling the kitchen with a heady steam. A mere half-hour later we were rewarded with a hearty meal, all slurped up with a spoon. I had meant to take a photo but we were far too impatient to allow for such an interruption.

On Wednesday the mood continued, though we were buoyed by the meal the night before. In anticipation of another late evening for Sean I set about making one of his all-time, desert island desserts - a crumble. Without enough produce to make the preferred apple version, I nosed my way through our pantry to assemble this apple and mixed berry hybrid. The frozen berries, a direct violation of my commitment to eating seasonally, add a bit of brightness to a dreary month with their luxuriously velvet juices coating the apples beautifully.

My finished product was what I had hoped; a buttery crust that gave way to a filling more subtle in its sweetness than other versions, with just enough spice to add some resonant warmth. An offering that was everyday but just a bit special, and altogether satisfying.

I wish I could say that this dessert was ground-breakingly interesting, but it is not. It is simply familiar, uncomplicated and good. Sometimes, that is more than enough.

Apple and mixed berry crumble
My own recipe. As laziness is an integral part of comfort cooking, the version pictured used frozen berries and their juices; resulting in a luscious sort of fruit slump on the plate. If you prefer a less juicy version, defrost and drain the berries before adding to the filling.

Ingredients
1/2 pound cold butter (2 sticks), diced, plus more at room temperature for pan
2/3 cup blanched, sliced almonds
1/3 cup unsweetened flaked coconut
2/3 cup packed brown sugar
3/4 cup rolled oats
1/2 teaspoon salt
3/4 cup all purpose flour
1/2 cup whole wheat flour
1 1/2 pounds tart baking apples, preferably Granny Smith, peeled, cored and cut into medium dice
1 1/2 pounds frozen berry mix, see note above
Juice and zest of 1/2 lemon
2/3 cup granulated sugar
2 tablespoons cornstarch
1/8 teaspoon ground cinnamon
1/8 teaspoon ground cardamom
1/8 teaspoon ground ginger

Preheat oven to 375ºF (190ºC). Lightly butter a 9"x13" baking dish and place this on a parchment-lined baking sheet.

In a large bowl, or in the bowl of a stand mixer with a paddle attachment, combine almonds, coconut, brown sugar, 1/4 teaspoon salt, oats and flours. Using a pastry cutter, or the mixer on its lowest speed, cut in 1 3/4 sticks (14 tablespoons) butter into the dry ingredients. When finished the mixture should resemble a coarse, uneven meal. Set aside.

In a large bowl, combine apples, frozen berries, lemon zest, lemon juice, sugar, cornstarch, spices and remaining 1/4 teaspoon salt. Toss gently to combine well. Pour fruit mixture into prepared baking dish and dot with the reserved butter.

Sprinkle topping evenly over dish, leaving a bit of the fruit peaking out at edges. Bake for 55-60 minutes, until the filling is bubbling and the top is golden brown. Allow to stand 5-10 minutes before serving.

Recipe Notes:
• You may want to adjust the sugar depending on your taste and the sweetness of the fruit.
• The coconut is an addition I always enjoy for textural contrast, but is not essential.
• The spice measurements are an approximation of "one good pinch" of each. Again, adjust as you see fit.

Sidenote:
• I our house this is a crumble, but I do see that some would call it a crisp. What would call it?

Wednesday
Oct172007

All apologies and a plea - updated!

I am always struck by the generosity and kindness of those of you who read this site. Even with my recent absence (which will be explained in an upcoming post), I have still been the regular recipient of a host of comments, queries and stories from many of you. I cannot tell you how much this all means to me.

It was in one of these recent messages that Lillian, an enthusiastic and engaging reader from Louisiana, took the time to mention a recipe and entry for gaufrettes she'd come across. From the book French cooking for Americans by Louis Diat, here is the entry. My thanks to her.

Gaufres

Trace French cookery through the years and you will find certain specialties such as Gaufres, appearing century after century. These thin crisp, waffle-like tidbits have been sold on the streets of French cities ever since the twelfth century. In those early days the marchands de gaufres, that is, the vendors who sold them, always set up business in the streets near the doors of cathedrals and churches on days of great religious festivals. There they made and sold their wares to the throngs of people coming from the mass, people whose devotions must surely have been interrupted by the drifting fragrance of gaufres sizzling outside. Gaufres are still sold in French cities but today you will find them more often in the parks where the youngsters congregate.

Gaufres are cooked in an iron called a gaufrier which has two flat iron plates clamped and held together by long handles. The iron plates are decorated with designs which become imprinted on the cakes and very old gaufriers have beautiful and interesting designs, many of which have some definite religious significance.

My mother baked a kind of gaufre on a baking sheet and rolled them on a small stick. When cold she filled them with a cream filling or whipped cream. They are called gaufrettes, sometimes cigarettes.

My favorites are Gaufres with Cream, sometimes called Gaufres de Bruxelles, made in an oblong iron which puts deep indentations on the cakes, much like an American waffle iron. I think an American waffle iron could be used. Bur for a real gaufrier, if you have nostalgia for one, seek out an importer of French cooking equipment to supply you.

Gaufrettes or cigarettes

In giving the proportions of ingredients for gaufrettes it is almost impossible to indicate exact measurements because the size of the egg whites and the kind of flour will affect the consistency. It is best to bake a trial one. If the finished gaufrette is so thin it breaks and cannot be handled, the mixture needs a little more flour. If on the other hand the gaufrette is thick and clumsy to roll, a little more melted butter should be added.

2 egg whites
1/2 cup sugar
vanilla extract (or seeds from bean)
3 tablespoons butter, melted and cooled
1/3 cup flour

Beat egg whites until stiff. Sprinkle sugar over them a little at a time and fold into egg whites slowly and carefully. Add flour the same way. Add butter, also folding it in carefully. Butter and flour a baking sheet and put into a hot oven of 450 to 475 degrees until pan is hot. Drop batter by tablespoons on the hot pan, spreading it as thinly as possible. Bake in a hot oven of 450 to 475 degrees a few minutes until golden brown. When done, roll while still hot around a stick about the size of a thick pencil. When cold serve plain or filled with cream filling of whipped cream.

Batter for Gaufres

1 1/3 cups flour
2/3 cup sugar
4 tablespoons butter, melted
2 eggs
1 egg yolk
milk (3/4 to 1 cup)
vanilla extract (or seeds from bean)

Sift together flour and sugar. Mix together egg and egg yolk, add to flour mixture and mix until smooth. Add butter, vanilla and milk to make a thin batter. (Batter should be about the thickness or a crepe batter.) Heat both sides of gaufrier on top of stove, then butter both sides. When butter is sizzling hot pour in a tablespoon of batter, spreading it thinly. Close gaufrier and cook a few minutes on each side, or until golden brown. While still hot roll around the handle of a wooden spoon or stick of similar size. Or if preferred leave them flat.

Gaufrettes with cream

These gaufrettes are baked in a special iron, one that is square in shape, and made with deep indentations, as contrasted with the usual flat, round gaufrier. It is in fact very much like a waffle iron. The finished gaufrette is both soft and crisp, is very light and exceedingly tender and delicate. The advantage of these gaufrettes over waffles is that they are served cold and so can be made up ahead of time. They are a very choice dainty for afternoon tea when something rich is desired.

1 cup flour
6 egg yolks
1 tablespoon sugar
1/4 cup cream
1/4 cup butter, melted and cooled
pinch of salt
6 egg whites

Put all ingredients except egg whites in a bowl and mix together. Beat egg whites until stiff and carefully fold into batter. Pour into a square gaufrier with deep indentations (or a waffle iron) that has been heated and buttered. Cook on both sides until brown. Remove and cool. Fill each of the small holes with sweetened whipped cream or Creme Patissiere (recipe follows). Makes 6.

Crème patissiere

Pastry creams include all the cream fillings used in making various kinds of pastry desserts. Some of these creamy mixtures such as crème patissiere are also the foundations for many other desserts or, as we call them, entremets. Since most of these creams contain eggs it is important to know how to handle eggs when adding them to hot mixtures. You can't just stir them in as you do many other ingredients because when eggs are added directly to a hot liquid they will curdle. Nor can you allow the mixture to boil after eggs are added because that, too, will cause them to curdle. (If the mixture contains a thickening such as flour or cornstarch it can be boiled for minute or two.) The following simple procedure will insure the desired smooth, delicate texture: add some of the hot liquid to the beaten eggs, stirring vigorously all the time, in order to thin them out a little and heat them up at the same time. Then turn this back into the hot mixture and stir constantly until boiling point is reached. Do not allow to boil. Remove from heat and pour immediately into a cold bowl and cool quickly. The quicker a pastry cream cools the better, and an occasional stirring will prevent a thin crust from forming on top.

3/4 cup sugar
5-6 eggs
1/3 cup flour
2 cups milk
1 piece vanilla bean (or extract)
pinch salt

Mix together sugar and egg yolks and work up with a spoon until the mixture is creamy and light colored. Add flour and mix just enough to combine it but don't work it up. Scald milk and vanilla bean. Add to egg yolk mixture, little by little, and stir until well combined. Turn mixture back into saucepan and cook, stirring vigorously, until it comes back to boiling point. Boil about 2 minutes. Remove vanilla bean (or add extract to taste). Strain and let cool, stirring occasionally, to prevent a crust from forming on top.

Please see original post below for the backstory.

Some time ago, one of my dear readers requested a recipe for gaufrettes, the delicate French waffle cookie. I divided my attention between research and the demands of a toddler, trolling my cookbooks and searching online. Sadly, I was disappointed with my findings. None of my cookbooks garnered success; on the upside I shall be using this as an excuse to buy more. After all that, the delay only came up with the following links:

Category Mistake
Sweet C
Free Cooking Recipes
Recipe Link

However, never having tried any of them, I am wary to recommend these results. And so, I'm appealing to the rest of my readers - do any of you have an absolutely fantastic, full-proof and wonderful recipe you would be so kind to share? Or would those with more expertise comment on the links I have listed? Please contact me via my profile or post your thoughts in the comments section.

I have tried this recipe from Williams-Sonoma for gloriously tempting pizzelle. While not exactly a gaufrette, I am more than happy to vouch for their deliciousness.

And to the original reader, thank you for your patience!

Monday
Sep102007

Baking, Sunday style

After weeks of a heat that turned once-lush lawns to straw, this past Sunday dawned misty and gray. A constant drizzle pattered its way through the leaves, and the mercifully cool air smelled of damp earth.

It was a day to spend indoors, in the comfortable routine of business about the house, getting bits and pieces in order and lazily flipping through the weekend newspapers. By far, my favourite sort of day.

As far as food went, our menu was decided by consensus - following only our inclinations without worry of schedules or agenda. Immediate and extended family members stopped by for a cup of of tea, a chat or general diversion.

Some time in the early afternoon I caught wind of collected whispers, mentioned cravings for something as a snack, a cake perhaps. Nothing decadent, just a nibble of something a bit sweet.

Banana bread; this old fashioned loaf seemed the perfect fit for a rain-soaked Sunday afternoon. Studded with moist chunks of banana, their richness undercut by the acid twang of yogurt, this was the sort of loaf that sits on the counter with a knife nearby. For the remainder of the day we snacked, coming back for another slice, another crumb, whenever temptation arose.

Yogurt banana bread
This recipe yields a meltingly moist loaf with a cake-like texture. However it may look though, do not be fooled. This bread is not the overly sweet, dessert variety. The perfect partner to coffee, it is much more subtle in its charm.

Ingredients
1 cup all purpose flour
1/2 cup whole wheat flour
1 1/4 teaspoons salt
1 teaspoon baking powder
1/4 teaspoon baking soda
1/4 teaspoon ground cinnamon
1/4 teaspoon ground nutmeg
3 large, ripe bananas, mashed
1/2 cup well-drained yogurt (see note)
4 1/2 ounces unsalted butter at room temperature, plus more for greasing the pan
3/4 cup granulated sugar
1/4 cup firmly-packed brown sugar
2 eggs
1/2 teaspoon vanilla extract

Preheat oven to 350°F (175°C). Lightly butter a standard, 9"x5"x3" loaf pan.

In a medium bowl, sift together the flours, salt, baking powder and spices.

In another bowl, mix the yogurt and banana together until well blended. Set aside.

In the bowl of a stand mixer fitted with the flat beater, beat the butter and sugar on medium speed, scraping down the sides of the bowl, until light and fluffy. It should take 3 to 4 minutes. Add the eggs, one at a time, with the mixer on medium speed and beating well after each addition. Add the vanilla and beat to combine.

Add half the flour mixture to the butter, beating on medium-low until blended. Scrape down the sides of the bowl, add the bananas and sour cream, beating until distributed. Add in the remaining flour, still stirring on medium-low until just combined. Transfer the batter to the prepared pan.

Bake in a preheated oven for about 1 hour and 10-15 minutes, until a cake tester inserted in the centre comes out clean the bread pulls away from the side of the pan. Cool in tin for 10 minutes, then turn out to a rack to cool completely.

Makes 1 loaf.

Notes:

• I used well-drained 1% yogurt.
• For the loaf pictured, the pan was the darker metal kind. For that reason, I reduced the oven temperature by about 15 degrees F to keep the exterior tender and golden. If this is the case with yours, you may need to adjust the cooking time accordingly.

Page 1 ... 4 5 6 7 8 ... 10 Next 5 Entries »