Instagram Instagram

Entries in Gourmet magazine (5)

Sunday
Jul042010

Good to go

twirled

At 10:54 or so on Wednesday night, I started thinking about crackers. The thought was so engrossing, the interest so strong, that it took no more than three seconds after the notion entered my mind for me to say to the friend with whom I was chatting "I would really like some crackers."

I am a riveting conversationalist.

There were no crackers in the pantry, so to satisfy my desire would mean productivity on my part. Good sense and laziness thankfully won the day, and I managed to leave the kitchen neat and tidy that night.

In a stunning display of restraint, I held off until the morning. And thus, at 7:15 a.m. on Thursday a bowl of dough, dusted in flour and proofing quietly, rising and puffing proudly, resided on our counter. By noon, there would be Garlic Herb Bread Twists.

Please don't look at me like a crazy person, I know full well that a stick of bread may not be a cracker, per se, but they met our requirements with ease. I wasn't aiming for a crackers-and-cheese cracker, not a shingle demoted to the role of vehicle for something else. I wanted salt, crunch, a snack on its own that required no further accessory.

These fit the bill.

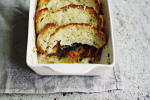
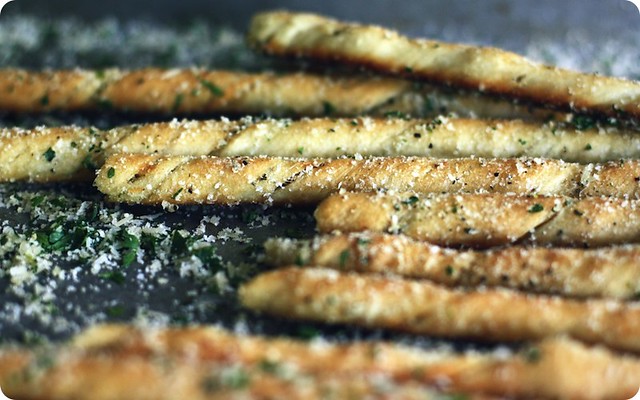
All they take is pizza dough, bought or homemade, laminated with parmesan, rosemary and thyme, salt and pepper. Cut and twirled into curling lengths, they receive a brush of garlic oil before they're into the oven. A second anointing as they come out of the heat, in my version the oil is cut with honey, and then a toss through a mix of Parmesan and parsley. Thoroughly coated, utterly habit-forming, they're good to go.

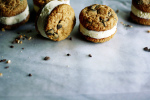
I like the ones with some relative heft - their crust has a pleasing substance, and through the middle the crumb is spongy and dense for a satisfying chew. However, Sean prefers those stretched thin and allowed to crisp, so their crunch is not only at the edge but remains right on though. The one for him are the ones down below, gnarled and uneven, thoroughly golden and pleasurably snappy.

Eight hours is what it took from impulse to the making of these cracker-ish sticks, three hours from start to munching, and less than an afternoon for them to be gone. A pretty neat little timeline I'd say. In the name of efficiency, however, I think next time I won't bother waiting and set about making them right the very minute the craving strikes.

And strike it will, to be sure. Patience may be a virtue, but snacks are a necessity.

tips

Garlic Herb Bread Sticks

From Gourmet Magazine, July 2009. Since I have made changes to the ingredients and method, I've rewritten the recipe for ease. To bring further depth to the garlic oil, the garlic is steeped in warm oil to rid it of any harsh bite. I've also added a pour of honey, to round out and soften the piquancy of the cheese and garlic.

Ingredients
1 tablespoon chopped fresh rosemary
1 tablespoon chopped fresh thyme
1 cup grated Parmigiano-Reggiano (2 ounces), divided
1 clove garlic, minced
1/4 cup olive oil
3 garlic cloves, minced
2 lb pizza dough, (or use store-bought)
A generous teaspoon honey
1/4 cup finely chopped flat-leaf parsley
Salt and freshly-ground black pepper

Preheat oven to 400°F (200°C), with racks in the upper and lower thirds. Line two baking sheets with parchment paper, and set aside.

In a small bowl, stir together rosemary, thyme, 1/4 cup cheese, 1/2 teaspoon salt and 1/4 teaspoon pepper.

In a small saucepan, stir together the olive oil and garlic. Place the pan over medium heat, and warm gently until the garlic starts to become fragrant. Do not cook the garlic or let it sizzle. Remove from the heat, stir in 1/4 teaspoon salt and 1/4 teaspoon pepper and set aside to cool.

Divide the dough in half, covering one portion with a tea towel (not terry cloth). On a lightly-floured work surface and with a floured pin, roll out second portion to a rough rectangle measuring 15- by 10-inches.

Sprinkle half the herb mixture over the lower (crosswise) half of the dough. Fold the dough towards you, bringing the two top corners to the bottom, sealing in the herbs. Roll gently to bring the envelope of dough to a 10- by 8-inch rectangle. Using a knife or pizza wheel, cut the dough lengthways into 9 strips, each less than 1-inch in width. Twist each strip, turning from both ends, and place on one of the prepared baking sheets, each strip about 1 inch apart. Brush the strips with garlic oil, using 1 tablespoon divided amongst the 9. Set aside.

Repeat process, rolling out the reserved dough, sprinkling with the remaining herbs and cheese mixture, rolling again, cutting and shaping. Arrange these strips on the other baking sheet, and brush them with 1 tablespoon of oil divided between them. Set aside for 5 minutes.

Bake the twists in the preheated oven, rotating pans and switching positions halfway through, until golden brown and crisp. This should take between 20-25 minutes.

While the breadsticks bake, stir the honey into the remaining garlic oil. Sprinkle the remaining 3/4 cup cheese on a shallow baking pan along with the parsley.

When the breadsticks are done and still hot, brush lightly with the oil and honey. Immediately roll them in the cheese and parsley, until well coated. Serve warm or at room temperature.

Makes 18.

Thursday
Nov262009

Hale and hearty

Today is Monday dressed up in Thursday's clothing. Of this, I am certain.

Unexpected company for the last two days led to Tuesday and Wednesday's schedules taking on the traits of Saturday and Sunday respectively, with a weekend-ish pace to boot. But that didn't mean we were exempt from the requirements of midweek days, so that was packed in too.

Today is back to its usual routine, behaving decidedly like the start of the week rather than the end.

But the calendar says it is Thursday, and the fourth Thursday of November at that, which makes it American Thanksgiving. But then, all the chatter about turkeys and pies and pumpkins conjures memories of the Canadian holiday of the same name, which we celebrated in October. On the second Monday of the month to be precise.

Here we are, back to Monday. On Thursday. I'm not sure if I should be coming or going, getting ready to face a new week or eager to bid goodbye one.

Thank goodness that on this Monday-ish Thursday there is still some kale around. Kale might not sound like a consolation, but when your mind is awhirl, a plate of kale is as good as a spot as any to choose to settle gently. In fact, I would say that on a rainy fall evening that nothing is more soothing than sitting someplace comfy, tucking your feet up, and scooping up your supper by the emerald forkful.

This kale is roughly torn, with some of the bitterness blanched out of its leaves before it slumps into a pile of soft onions and garlic. As it hits the heat, the resulting steam is savourily-aromatic, damp and dense with the vegetal essence of sturdy greens. After cooking the kale softens to supple leatheriness, its sinewy leaves still hale and hearty but more relaxed. Fleshy crowns of walnuts add autumnal bulk, and cranberries give both a tempered sweetness and an appreciated touch of acidity.

The final effect is one of Rudolph among the evergreens, complete with the white flecks of a light snowfall; and as this Thursday is the last before December, it might be perfect timing.

Kale with walnuts and cranberries
A interpretation of recipes from Gourmet, available here and here.

Ingredients
1 pound kale, washed well, trimmed of tough ribs and torn into large pieces
1 tablespoon unsalted butter
1 tablespoon extra virgin olive oil
1 small onion, minced
3 cloves garlic, minced
1/2 cup chopped walnuts
1/4 cup dried cranberries
Kosher salt and freshly-ground black pepper

Bring a large pot of salted water to boil.

Boil the kale until bright green and just tender, about 5 minutes. Immediately plunge the greens into a bowl of ice water to stop the cooking. Once cooled, drain well but do not squeeze.

In the same pot over medium heat, melt the butter with the olive oil. Add the onion and cook, stirring occassionally, until the onion is fragrant and beginning to turn translucent, about 2-3 minutes. Stir in the garlic and cook for 30 seconds more. Tumble in the walnuts, tossing to coat well with the butter/oil. Continue to cook until the nuts are golden and lightly toasted, around 2 minutes. Stir in the cranberries.

Using your hands or tongs, separate the kale as best as you can and add to the pot. Stir to combine, and continue to turn the leaves through the onion and walnut mixture until they are warmed through and softened. Season to taste with salt and pepper.

Serves 4.

Thursday
Sep242009

The ideal dinner companion

Dearest Gnocchi;

I hate it when we argue. You get huffy and difficult, I call for delivery. Neither of us ends up happy.

I said some things I didn't mean. I was upset and I was being rash. I wasn't thinking straight. I was hungry.

I am sorry.

I insinuated that you were uncooperative, and that was unkind. You've never been shy to express your preference for a coaxing hand over an impatient one, and I should have kept that in mind.

It was cruel of me to mention your flabby midsection. (And please don't think that unintentional rhyme makes my sentiment any less sincere.) You were having an off day. I see that now.

Grant me this, please - you were being somewhat, completely impossible to work with, no? We can each shoulder some of the blame I should think, don't you?

Alright then, I'll settle to call it even. After your return performance the other night, I'm in a forgiving mood.

That night you behaved beautifully; your character was beguiling, delicate. You were the ideal dinner guest. Your company was so delicious that our earlier spat was the furthest thing from my mind.

Let's never fight again.

Sweet Potato Gnocchi with Brussels Sprouts and Walnuts
I should start by saying that this is not the recipe that gave me such troubles last week. The gnocchi by Melissa Roberts by way of Gourmet are a treat, and the recipe together quickly enough as to reassure the harried cook of their competence.

The combination of sweet potato and sprout is a new one to me, as I threw them together on a whim, but their shared earthiness makes them a match for the ages, with the sweetness of one subduing the slight bitterness of the other. Then we introduce some meaty walnuts for texture, a moment of crunch amongst the softness. Fine, salty threads of Parmesan round out the group, bringing along just enough nuttiness to repeat that same note found in its platemates. Fast friends, to be sure.

Ingredients
2 tablespoons olive oil
1 tablespoon unsalted butter
8 ounces Brussels sprouts, trimmed, halved and steamed until just tender
Salt and freshly-ground black pepper
Half recipe Sweet Potato Gnocchi (uncooked pasta only, not sauce)
1/3 cup chopped walnuts, toasted
Grated Parmesan cheese, to serve

In a large well-seasoned or nonstick skillet over medium heat, melt the butter into the olive oil. Cook until the butter begins to brown, around 1-2 minutes. Working quickly, add the Brussels sprouts to the pan, cut sides down. Let them sizzle just long enough to pick up some colour, then toss to coat with the butter and oil. Season with salt and pepper. Turn off the heat.

Meanwhile, in a large pot of boiling salted water, cook the gnocchi for around 3 minutes, or from the moment they float to the surface wait a minute more. Using a slotted spoon, transfer the gnocchi to the still-warm skillet with the sprouts and half of the toasted walnuts. Gently fold to combine, then check again for seasoning.

Remove to a serving dish, sprinkle with the reserved walnuts and top with Parmesan cheese.

Serves 4 as a first course or 6 as a generous side.

Note: The ever-charming Kelly, who has had her own dumpling issues in the past, was also beguiled by the Sweet Potato Gnocchi and wrote about it here.

Thursday
Aug272009

Nuzzle in close

IMG_07752a

I have been thinking about this Buttermilk Pudding Cake for quite some time. When I saw it's photo, with those carmine-coloured berries all snuggled up against a cushion of tender, melting cake, the image stuck with me. It looked like all things dreamy, served up on a spoon.

Nevertheless, with such a short ingredient list, the skeptic in me raised a singular eyebrow - something the actual me cannot do without looking oddly quizzical or slightly pained. Could such a meagre collection of ingredients really amount to a dessert that lived up to its looks?

Oh my yes. If I was not blissfully married already, I would be writing Mrs. Tara Buttermilk Pudding Cake over and over in notepads, with hearts all around. I might whittle a million pencils down to the tiniest of nubs, and my hands could cramp, but I wouldn't care. Not at all. I am head-over-heels lost over this cake.

After getting all your bits and bobs in order, this is a cake that takes all of five minutes to make (with a mixer, a little longer by hand), but tastes exponentially better than the effort it requires. After stirring and whipping the disparate components, they are folded together into a marshmallow-tender batter. It sighs and slips its way into a pan, baking gently until pouffed on top and turned luscious below.

The only gentle suggestion I might offer would be to switch the raspberries for fresh peaches, as around here, raspberries are terribly last month. We live in peach-growing country, and at present the trees are heavy with their weight. For this, you want the ample-bosomed variety, full and soft, with a velvet skin that begs you to nuzzle in close and get a bit familiar. That yielding flesh mimics the softness of the cake's custardy belly, in delicious repetition.

And now that you have been formally introduced I do believe you should give this cake a thought as well.

If you require more reason than the case I have laid before you, you could be like me, and take my unabashedly shameless excuse, disguised under a flimsy veil of altruism. First, agree to make a recipe for a loved one that requires buttermilk, then accidentally-on-purpose purchase more buttermilk than said recipe requires. Wait a few days. Finally, choose a quiet afternoon to nobly bake the aforementioned Buttermilk Pudding Cake, as you wouldn't want the excess to go to waste.

Wink, wink, nudge, nudge. Everybody wins.

On a personal note, I want to dedicate this post to the talented and breathtakingly-honest Jess. She mentioned elsewhere that this dish took her fancy, and as she's been through more in her 28th year than many go through in decades, the least I could do is offer her something that might make her smile, as if to say - "We're so glad to see you on the other side."

IMG_07942A

Buttermilk Pudding Cake with Maple Sugar Peaches
From Gourmet.com, with minor changes. As you can see from the telltale marks on the dishes, this cake soufflés beautifully in the oven, but collapses quickly upon its removal from the heat. For the prettiest presentation, I would take the cake straight from oven to table in its fully plumped glory, then cruelly make your guests wait as it cools.

Ingredients
4 medium peaches, sliced into 1/2 to 3/4-inch wedges (or thereabouts)
2-3 tablespoons maple sugar or equal amounts of maple syrup
Softened butter for greasing the pan
1/4 cup all-purpose flour
1/4 teaspoon salt
1 1/3 cups well-shaken buttermilk
4 tablespoons (1/2 stick) unsalted butter, melted and cooled
3 large eggs, separated
2/3 cup granulated sugar, divided

In a medium bowl, gently stir together the peaches and enough maple sugar or syrup to sweeten to taste. Allow to macerate at room temperature while preparing the cake.

Preheat an oven to 350°F (175°C). Lightly butter the inside of a 1 1/2-quart shallow baking dish. Set aside.

In a large bowl, whisk together the flour and salt. In another mixing bowl, whisk together the buttermilk, butter, egg yolks, and 1/3 cup granulated sugar until well combined and the sugar is pretty much dissolved. Add the liquids to the flour mixture, stirring until just combined. Set aside.

In a large mixing bowl, either by hand or with a mixer, beat the reserved egg whites on medium speed until frothy and opaque. Increase the speed to medium high, or if by hand beat faster, and start adding the remaining sugar a tablespoons at a time, beating well to incorporate each addition. Continue whipping the egg whites until they just hold a stiff peak. Do not over beat.

Working quickly but gently, stir about one-third of the egg whites into the prepared batter. Once almost combined, add another third of whites, this time folding the batter over the whites to incorporate thoroughly. Repeat with the last of the whites.

Pour the batter into the prepared baking dish, place this dish in a larger dish or roasting pan, and pour hot water from a recently-boiled kettle in the larger pan until it comes halfway up the sides of the smaller. Bake the cake in this water bath in the preheated oven for 4- to 50 minutes, until puffed and golden. Remove from the oven and allow to cool 5 to 10 minutes before serving with the peaches alongside.

Serves 6, but I would really think 4, greedily, is the way to go. Sharing is difficult with this one.

Notes:
• I used Brien's superfine maple sugar, which has lighter taste than others I have tried, with an understated sweetness rather than that throat-warming hit associated with maple syrup. I further preferred maple sugar over syrup as it seemed to draw more juices out of the peaches, and thickened those juices only slightly.

Tuesday
Feb032009

A matter of taste; even more chocolate cake


A sugar-high birthday; taste testing chocolate cakes. In the bottom left photo, the famed Double Layer Chocolate Cake (in cupcake form) sits to the left of Martha Stewart's One Bowl Chocolate Cupcakes.

January 16th marked Benjamin's third birthday, a perfect excuse for round two of the chocolate cake battle raging in my recipe file. Our biggest little man had requested "chocolate with chocolate" to celebrate his day, and what sort of Mummy would I be if I refused?

I forget how it was exactly, but I stumbled upon the recipe for Double Chocolate Layer cake, from Chef Ed Kasky (as published in Gourmet magazine, March 1999). I must have been living under a rock this last decade, because this cake has quite a following, with over 1200 (hyperbole-laden) comments on Epicurious. It has also appeared on countless other sites and discussed in detail.

With all of that fanfare, there was no alternative than to try this cake for myself. It might be a bit of retread of covered territory, but I have never been one to deny my curiosity. I had to know what the fuss was about.

With multiple celebrations ahead of us, I followed my same procedure as before, this time with Martha Stewart's One Bowl Cupcakes, as published in her Baking Handbook (Clarkson Potter, 2005), against the lauded Double Layer Chocolate cake. The major difference between the two recipes is that the former is an all-cocoa preparation, whereas the latter includes both cocoa and melted chocolate. It should be noted, as reported in my earlier test, that I substitute some prepared coffee for the water called for in the Stewart cake.

The batters were equally-easy to come prepre, with the Gourmet recipe notably thinner in its consistency. The Stewart batter was more viscous, and was my preference when I surreptitiously licked some from the bowl while cleaning up.

Half of each batter went into cupcakes, with their liners marked to indicate the recipe used. The remaining batter was combined, weighed, divided and baked into layers for a single, staggeringly-tall four-layer cake. It was one of the tallest cakes I have ever made, taller than it was wide, and inspiring an awed reaction from our birthday boy.

Despite the impressive stature of the cake, the cupcakes were of my real interest. Using the same (by weight) of batter for each cup, the Martha Stewart cupcakes baked up ever-so-slightly taller, with a gentle dome and a bit of a rimmed edge. They were pretty, perfectly-formed and slightly cracked on top, an example of what a cupcake should look like. The Gourmet recipe baked up slightly flatter, but beyond that, the texture, colour and overall look of the cupcakes were identical.

So it was down to taste. We tasted the two blindly, cake alone and then with frosting, and it was a unanimous decision.

The Gourmet recipe for Double Chocolate Layer Cake won.

Here's the thing. This cake deserves fanfare. The most fantastic, festive, fanciful fanfare that you can imagine - and more. Deeply flavoured, with a dark and even crumb, the cake is moist and tender but just a bit toothsome. Truthfully, it is similar to the Martha Stewart recipe, boasting just about every quality that had made me declare it the winner over Beatty's Chocolate Cake from Ina Garten last summer. Where the Gourmet cake took an edge was in its subtle fudginess, a bit of (excuse the technical term) squidgy-ness, that made each bite that much more satisfying.

Now I will admit I am tempted to try the One Bowl Chocolate Cupcakes with a bit of melted chocolate stirred in, just to see how it would turn out. But for now, I am more than satisfied to say that the Double Layer Chocolate Cake from Gourmet warrants its fame.

Double Chocolate Layer Cake
From Chef Ed Kasky, as published in Gourmet Magazine, March 1999.

The recipe can be found online here.

Notes:

• Some comments on the Epicurious site report that they have had trouble with the Double-Chocolate Layer Cake overflowing their standard 10" pans. The recipe specifically requires 2" deep pans, which may remedy this problem. I can only comment on the taste of the cake, as I baked mine in four 8" round cake pans, with the remainder used for cupcakes, as pictured.

One Bowl Chocolate Cupcakes
From Martha Stewart's Baking Handbook.

The Martha Stewart Recipe from the Baking Handbook is not the same as the One Bowl Cupcakes recipe that has been published on her site online, nor is it the one that was published in Martha Stewart Living for February 2009. The recipe is subject to copyright; however, a quick search does find it published online (you are looking for the recipe that begins with flour as the first ingredient).