Instagram Instagram

Entries in sweet (57)

Monday
Sep012008

A tantalizing portrait

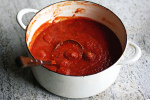
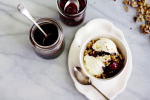
Mark Bittman's tomato jam; wonderful to look at, tastes even better. Photos taken by my sister-in-law.

It was love at first sight. Or at least greed at first glance.

It was early. I was still in my pajamas and had only recently padded into the kitchen. Coffee in hand, I flicked open the newspaper and there it was. Across the countertop lay spread a photo so alluring, so beautiful, that my breath caught and I stopped mid sip.

Now what ever could have caught my rapt attention? What was the object of my early-morning desire, you ask?

Mark Bittman's Tomato Jam. (You know me well enough to know it would be about food.)

But seriously. Look at this. It is just a spoonful of gorgeousness. To call it red would be a disservice; it seems too plain. Scarlet doesn't cut it, brick doesn't even come close. Vermilion? Crimson? I cannot come up with an adjective that captures the particular hue of this luscious-looking stuff.

Attempts to describe aside, I did know one thing from the start. I wanted to try this jam. I needed to make it. And I needed to make it right away.

And so, I set about making a batch of tomato jam. Lucky for me, my dear Sean is used to the vagrancies of my behaviour and said not a word when I started mincing green chilies and ginger. After a minimal bit of chopping, stirring and grinding, on my stove sat a bubbling pot. Soon the smell of coffee met and mingled with scents of ripe tomatoes and grassy cumin, with an underlying warmth of cinnamon and clove.

The pot remained for the remainder of the coffee, and for the duration of breakfast. All the while deepening in colour and texture; what started out as bright and watery slowly turned darker, richer. In the end, I was left with a sticky sweet relish, heady with spice but with a good balance of acidity. It was complex without being overly complicated.

The jam was even better after it cooled overnight in the fridge. Akin to a chutney, it is an unexpected but delicious accompaniment to bread and cheese. I would offer more suggestions for its use, but I haven't gotten that far; I've just started exploring the possibilities.

I can tell you this though, this tomato jam looks good enough to eat. And its looks do not deceive.


Tomato Jam
By Mark Bittman, as published in the New York Times (August 19, 2008) and in syndication.

Recipe and an associated video are both available online.

Notes:

• I used a mix of tomatoes from our garden, all rather sweet in their own right. While I understand its role in setting the jam, I was still wary of the amount of sugar in the recipe - so I used a generous 3/4 of a cup and upped the tomatoes to a full 2 lbs.
• For another savory note I included 1 large garlic clove, grated.
• Wanting enough heat to cut through the sweetness, I used two small green chilies instead of the jalapeño.
• When I make this again I might include a bit of lime zest, if I'm so inclined.
• Most likely due to the reduced amount of sugar and additional tomatoes, my cooking time was closer to 2 hours to reach the consistency I was looking for.

Tuesday
Jul292008

Present imperfect

It just so happened that I was watching Heston Blumenthal's "In Search of Perfection" on the same day that my dear Sean requested some peanut butter cookies. For those not familiar with the show, it follows the Michelin-starred chef as he seeks out the quintessential recipe for various dishes. Whether it be Peking duck or risotto, Mr. Blumenthal looks to understand every aspect of the recipe, studying (in great detail) the importance and contribution of each ingredient, preparation and cooking method.

In this episode he tackled trifle. He examined its historical origins, researched the way tastes move around the human palate, and considered the effects of temperature on textural perception. A fascinating half hour later he presented his final imagining of the dessert - complete with saffron syllabub, strawberry jelly and a sweetened olive pureé.

Throughout the exercise, I could not help but compare his to the "standard" trifle that appears on our holiday table; a base of fluffy lemon-scented sponge, then scarlet-red raspberries staining layers of creamy custard and mascarpone cream, all topped off with bronzed shards of almond brittle. A far cry from Mr. Blumenthal's version, but my family will settle for nothing less.

And although this trifle has been deemed "perfect", I am still one to tweak things a little, depending on the fruit available, the audience I am serving or to better suit my whims.

Now I was thinking about the search for perfection, and the infinite possibilities when it comes to food. Every person perceives things differently, every person responds to flavours and textures in their own way. Every person has their own set of memories that are conjured by a smell or a taste. Each of us has a different set of criteria to satisfy; the journey towards finding the definitive form of any dish really is, well, endless.

But I digress. Back to Sean's request. While he had provided me with a recipe for his cookies (from Martha Stewart's cookie book) I could not help but delve a little deeper. When I asked him what kind of peanut butter cookie he was looking for, Sean immediately replied "soft and chewy." The Martha recipe sounded perfectly delicious, but the photo showed a cookie that looked more crisp than tender. After that, I consulted Dorie Greenspan's book for her advice, but came away empty handed.

In the end, I combined a few recipes, and drew upon my experience with baking. Albeit a bit unorthodox in measurements, I patched together a recipe that uses brown sugar for tenderness and caramel tones, granulated sugar for body and a bit of crispness, salt for added depth, and crunchy peanut butter for texture. Upon first bite, Sean declared these the best he'd ever had. Not too bad for a first try.

I am already thinking about what to change on my next attempt.

Soft and chewy peanut butter cookies
Living up to their title, these cookies are unbelievably tender. A great candidate for ice cream sandwiches - with a dulce de leche filling perhaps? Although I specify chunky peanut butter, that was only for personal preference. This recipe would work perfectly well with smooth.

Ingredients

1 cup plus 1 tablespoon all-purpose flour
1/4 teaspoon kosher salt (up to 1/2 teaspoon if you particularly like savoury sweets)
3/4 teaspoon baking soda
1/2 cup (8 tablespoons/1 stick) unsalted butter, at room temperature
3/4 cup chunky peanut butter
1/2 cup plus 2 tablespoons packed golden or dark brown sugar
1/4 cup plus 2 tablespoons granulated sugar
1 large egg
1/2 teaspoon vanilla extract
sea salt, optional, for sprinkling

Preheat oven to 350°F (175°C). Use parchment paper to line several standard baking sheets and set aside.

In a bowl, sift together the flour, salt and baking soda. Set aside.

In the bowl of a stand mixer with the paddle attachment, or with a hand mixer, cream together the butter and peanut butter until light and fluffy. Add the sugars and beat on high for three minutes, scraping down the sides of the bowl as needed.

Add the egg and vanilla, then mix on medium speed until well blended.

Add the dry ingredients to the bowl and stir to just combine. Refrigerate the batter for 10-15 minutes to set up and chill thoroughly.

Using a 1 1/4" ice cream scoop dish out mounds of dough onto the prepared baking sheet (alternatively, use a generous 2 tablespoons of batter for each cookie), spacing them about 2 inches apart. Dip a fork into warm water and use the tines to press the dough balls lightly; you only want to slightly flatten their shape and leave the imprint of the fork. Freshly dip the fork between pressing each cookie. Sprinkle with sea salt, if desired.

Bake in the preheated oven for 18 minutes, rotating the sheets once during baking. Cool on pan for two minutes, then remove to a baking rack to cool completely.

Makes 18.

Notes:
• For a crisper cookie, bake for 20 minutes.
• Toffee bits, chopped peanuts or chocolate chips would all be great additions to this cookie.

Sunday
Jul202008

A master's work; a review of Chocolate Epiphany


François Payard's Chocolate Meringue Tarts in miniature; photo courtesy of Deep Media.

When I was little, I took piano lessons to little success. Even though I could manage to replicate notes on the page, I never had the 'sense' for the keys that makes one feel in ownership of the music. Nonetheless, I would spend the requisite time practicing on the keyboard at home, repeating the disjointed notes over and over until I hoped I had mastered them.

It was during these practices that my father would sometimes wander into the room and take over the keys; though wholly self-taught, he had such an ear for music that he could easily reproduce my melodies in their entirety. What's more, he would infuse them with nuance and a character deeper than the notes themselves.

In that simple exercise I saw what it mean to be an artist.

I had a similar feeling of revelation when I had the opportunity to review François Payard's third book, Chocolate Epiphany (Clarkson Potter, 2008). Though a fairly-proficient home baker, I could not help but be awed by the chocolate creations featured within. From the straightforward to the fanciful to the elegant, Payard (with Anne E. McBride) presents confections as beautiful as they are delicious.

Though focused solely on chocolate, the book covers a surprising breadth of recipes. After the helpful introductory guide, breakfast and brunch dishes are offered first, followed by chapters highlighting specific dessert forms (cookies, cakes and mousses, among others). The recipes encompass both the traditional and the unexpected, with classic favourites placed alongside inventive combinations of flavours and textures. There is no prejudice regarding chocolate varieties, with white, milk and dark all given the opportunity to shine.

As to be expected with his pedigree, the acclaimed pastry chef, James Beard Award winner and owner of a collection of pâtisseries/bistros includes recipes that are somewhat intimidating at first glance. These require a good deal of patience, reasonable skill and, in many cases, specialty equipment.

For example, the American Opera Cake calls for no less than four separate component recipes and three pages of instructions. That said, the expertly-detailed steps allow for stunning results that merit the effort. Between the chocolate cake layers Payard ingeniously switches the classic coffee buttercream filling for a peanut version alternated with a decadent peanut butter ganache. If that was not enough, a dark chocolate ganache is finally poured over all. The finished cake is a masterpiece of textures and a show-stopping celebration dessert to say the least.

Equally impressive are the Chocolate Pavlovas with Chocolate Mascarpone Mousse. Here Payard innovates by reconfiguring the form from a simple flat base into a full sphere of meringue filled with liqueur-laced mousse and topped with a flourish of mascarpone cream. Again, this is a recipe that one should carefully read before attempting, but the instructions are well laid out, concise and easy to follow.

Amongst these rather grand recipes Payard sprinkles in some beatifully-simple ones. Triple Chocolate Financiers (recipe) are a perfect little treat alongside coffee, Chocolate Rice Crispies are a bit of kitchy fun, and Chocolate Blinis elevate breakfast to a whole new level.

I was particularly fond of the Chocolate Meringue Tart (pictured, above). A cocoa makeover of the lemon meringue version from his childhood, Payard creates a recipe that is easy to assemble but with outstanding results. His Sweet Tart Dough comes together quickly and is a joy to work with. It is baked until golden, then filled with a luscious dark chocolate filling and crowned with peaks of scorched Swiss Meringue. Absolutely delicious.

One caveat, I did end up with an excess of filling even though I followed the recipe to the specific weight measurement of each ingredient.

Rounding out the contents is an indispensable chapter of basics; buttercreams, Crème Anglaise, doughs, and often-used base cakes are explained here, with tips and tricks usually only learned with years of experience. For those wishing to replicate the exquisite decorations that adorn many of the desserts, there are also step-by-step directions to creations like chocolate fans, drops, sticks, and shards.

The sumptuous photographs by Rogerio Voltan are tempting to say the least; with tightly cropped images that beautifully convey the various textures and elements of the recipes. My only complaint is that I could not find photo captions for the desserts featured on the chapter cover pages. While this information is included in the general index, the omission of labels alongside the specific images might be frustrating to those who find it difficult to match the photos with the corresponding recipe.

Nonetheless, Chocolate Epiphany is decadence at its best; truly an opus of cacao bean, with a Maestro's passion and expertise leading the way.

Some recipes from the book can be found online here and here.


Cover image courtesy Clarkson Potter.

Monday
May052008

Martha, Martha, Martha; an addendum

You know a new cookbook is a good one when you find the excuse to bake twice in one week, just so you can try another recipe.

(As labelled in the book) Milk Chocolate cookies from Martha Stewart's Cookies. Thin and crisp at the edges but still tender at the middle, these cookies have just enough deep chocolate flavour to feel a treat but not overly-indulgent; a dangerous trait, to be sure. In my opinion the cookies I took out after about 11-12 minutes, rather than the recipe's instructed 15, were the perfect balance of chewy and crunch - but this is a matter of personal taste.

To read a full review of Martha’s latest cookbook, please see my previous post.

Monday
Feb112008

A spoonful of sugar

With our impending arrival well on its way, we are currently attempting to reiterate the importance of sharing to our first born. Though his universe has happily (and steadily) revolved around Ben for the past two years, we have come to the point when patience, respect and understanding are becoming part of our daily conversations.

I am terribly thankful for his gaggle of contemporaries who help him in his education. He has had to learn that not everyone plays with blocks in exactly the same way, that many little hands can create stories with the Little People and that cuddles can be given to cousins and friends - not just Mummies and Daddies. He has started to learn to take his time with those younger, to allow for the independence of those older, and to realize that he is not the only one who would like a cookie. He has seen that our lives are interconnected with those of others; we share our days and ourselves, as well as our toys.

Such is the case with our Valentine's Day festivities. Even though Sean and I will have our own evening out, the day itself is saved for the shared celebration of both the sweethearts in my life. Each bring me such happy contentment, Benjamin will see that instead of choosing just one (something I could never do), I would rather choose to spoil everyone. He will see that treats, consideration and hugs can be shared equally, and that there is as much joy in the giving as in the receiving.

A weeknight family dinner calls for a dessert that is special but does not take too much attention away from enjoying everyone's company. Nothing too elaborate or fussy, an offering as perfectly sweet as those gathered around the table.

This cake is dense and moist, with the fine texture of a pound cake. The richness of butter and cream cheese is underscored by mellow almond and luscious bits of white chocolate that only almost melt into the batter. Perfect on its own, sublime when topped with raspberry sauce, and decadently stodgy as the base of a midwinter trifle - it is sure to send more than one heart aflutter.

If one happens to have miniature tube or Bundt pans, this batter makes adorable little plated desserts; the perfect size for two, or in our case three, forks to share.

White chocolate almond cake
From a variety of inspirations.

Ingredients
Melted butter for greasing the pan
3 cups all-purpose flour
2 teaspoons salt
1 1/2 cups unsalted butter, at room temperature
8 ounces cream cheese, at room temperature
3 cups granulated sugar
6 large eggs, at room temperature
1 teaspoon vanilla extract
1/2 teaspoon almond extract
3 tablespoons milk
1/2 cup finely chopped white chocolate

Almond simple syrup (optional)
1/2 cup granulated sugar
1/2 cup water
1/4 teaspoon almond extract

Preheat oven to 350°F (175°C). Using a pastry brush or kitchen towel, lightly coat a 10" tube pan with melted butter.

Sift together flour and salt in a medium bowl. Set aside.

In a stand mixer with the paddle attachment, or with an electric beater, cream together the softened butter, cream cheese and sugar on medium-high speed until light and fluffy. This will take about 5 minutes, being sure to scrape down the sides of the bowl periodically. Add the eggs, one at a time, scraping down the sides again and beating well after each addition. Beat in vanilla and almond extracts.

With the mixer on low, add the flour in two additions, alternating with the milk. Mix until just combined. With the mixer still on low (or with a rubber spatula), stir in the white chocolate. Pour the batter into the prepared pan, mounding the edges up slightly and leaving a bit of a furrow through the middle. Hit the pan against the counter to remove any trapped air bubbles.

While cake is baking, combine the water, sugar and almond extract in a small saucepan over low heat. Cook until the sugar is dissolved and the syrup becomes thick.

The cakes should be done after 75-85 minutes, until a cake tester inserted in the centre comes out clean and the top is golden brown. Allow to cool in pan, on a wire rack, for 10 minutes.

Turn the cake out onto the rack (see note) and, use a pastry brush to coat the cake entirely with the syrup. Allow to cool completely.

Notes:

• You will want to suspend the rack over a sheet pan to catch the excess glaze. A spoon can also be used to glaze the cake, but I prefer the finer finish a pastry brush offers.
• For a citrus variation, omit the almond extract and white chocolate from the cake. Add 1 teaspoon grated zest of your choice and one tablespoon of freshly-squeezed juice replaces the same amount of milk. For the syrup, omit the extract and substitute juice for the water.
• For a chocolate chip version, the white chocolate can be substituted with 3/4 cup bittersweet and the almond extract can be omitted (but this is not necessary). The syrup is made more of a glaze, substituting the extract with 1 teaspoon cocoa powder and boiling the mixture gently for 5 minutes. Spoon this over the top of the cake, allowing it to dribble down the sides.

Page 1 ... 4 5 6 7 8 ... 12 Next 5 Entries »