Instagram Instagram

Entries in sweet (57)

Thursday
Jan222009

Curing what ails me

Important note: My sincere apologies; when this was first posted, there was an error in the quantity of milk used - it should be 2 cups. If anyone did make the recipe with the incorrect amount of liquid, I hope you did not fret too much; bake the oatmeal for an additional 15 or so minutes. The bottom oats will be a bit softer, but some of the excess liquid will have absorbed. Serves me right for attempting to write while my head was shrouded in cold symptoms!

I am feeling more than a tad under the weather. I know that a lot of people, including my dear husband, are in the same circumstance just now, but even company is not making this misery go away any faster.

The company is appreciated though, as Sean and I are spending our time comparing analogies to our symptoms. At last count he was mired in a rather fog-shrouded bog, whilst I was enjoying the company of particularly-prodigious pachyderms as they perched upon my head.

I am not so sick as to require reinforcements to help me wrangle the boys or make it through my day, but I am sick enough that said wrangling sometimes sets my mind aswirl and by the end of the day I am reaching for the coziest of sweaters and the softest of pillows. I am not so sick that I did not get dressed today, but I am sick enough that when I noticed my socks did not exactly match, I shrugged my shoulders and pulled them on anyway.

I had meant to write about bread baking and chocolate cakes and other such interesting things. But to be honest, I am not in the mood for food just now. I have little appetite, and when I do eat, that's not the food I am wanting - I want warmth, and I want it in a bowl.

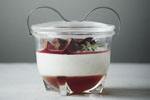
Wandering about the kitchen this morning, I set about making a pot of steel cut oats; hearty and filling, a regular winter breakfast for us. I took pause however, and thought of baked oatmeal instead. This is the goose down duvet of breakfasts; stewed fruit is tucked beneath a layer of soft, pillowy oats, with a thin, crisp crust atop. My banana and blueberry version is like eating banana bread combined with a fruit crumble, with the best qualities of a breakfast bar and oatmeal cookie thrown in for good measure.

The potent mix of spice and fruit filled the kitchen with a soothing fug that brought appetites to the table. Textured and toothsome, the oatmeal was greedily spooned out and gobbled up, warming both our hearts and bellies. It was just what the doctor ordered.

Be well.

Endnote: If anyone might happen to find me, still in my robe (and possibly mismatched socks) eating this cold out of the fridge (and directly from the dish), please don't judge.


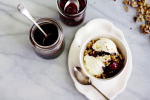
Baked oatmeal with blueberries and banana

Perfect for a cold morning, this baked oatmeal can be served as is or, as I like it, with a splash of extra milk or a dollop of yogurt.

Ingredients
Softened butter for greasing the pan
2 cups large flake rolled oats (not instant)
1/2 cup sliced almonds, lightly toasted
1/3 cup brown sugar, packed
1/4 cup pepitas, lightly toasted
2 teaspoons flax seeds
1 teaspoon baking powder
3/4 teaspoon ground cinnamon
1/4 teaspoon ground ginger
1/8 teaspoon ground nutmeg
1/8 teaspoon ground clove
1/8 teaspoon kosher salt
2 cups milk (I use 1%)
1 large egg
2 tablespoons unsalted butter, melted
1 teaspoon vanilla
1 teaspoon pure maple syrup
2 medium bananas, diced
1/2 cup frozen blueberries (not thawed)
Coarse sugar, optional

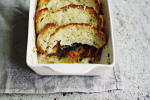
Preheat oven to 375°F (190°C). Lightly grease the inside of a 8" round baking dish (around 2 quart capacity) and set aside.

In a medium bowl, mix together the oats, almonds, brown sugar, pepitas, flax seeds, baking powder, spices and salt. Set aside.

In another bowl, whisk together the milk, egg, almost all of the butter (save about 1 teaspoon for drizzling over the finished dish), vanilla and maple syrup. Set aside.

In the prepared baking dish, spread the diced bananas in an even layer, then scatter the blueberries over top. Pile the oat mixture to cover the fruit, but do not pack too tightly. Carefully pour the wet milk mixture over the oats; it will look as if there is too much liquid, but not to worry, it will be absorbed during baking.

Drizzle over the reserved butter, sprinkle with a scant teaspoon of coarse sugar (or to taste), and bake for 35-40 minutes, until the oatmeal is puffed and set, with a golden brown top.

Remove from the oven, allow to cool for a few minutes, then enjoy.

Makes about 4 hearty servings.

Notes:
• Although I have given measurements, the fruit simply needs to completely cover the base of the baking dish. You might need to adjust your quantities to suit your baking dish. Speaking of which, an 8x8 inch square baking dish can be used in place of the round; the oatmeal will be crisper, though.
• This is one of those recipes that allows for a host of variations; I simply pillaged my pantry for ingredients and went from there. Almost any nuts and an array of fresh and dried fruit would all work here. Some specifically-tasty combinations: grated apple with almonds, bananas, dried cranberries and pecans, blackberries and peaches with almonds, dried figs with pistachios, or diced pears with walnuts. In each case, spices should also be adapted accordingly.

Menu for Hope V update: Marty McCarthy, winner of CA06: The flavours of Canada, please email me at tara[at]sevenspoons[dot]net with your contact information.

Friday
Dec122008

A festive fête


Please excuse the rather plain cake plate for serving; I do believe that Mom deserves the frilliest, prettiest of cake stands, but for fear of losing it all in transport, I had to err on the side of (dowdy) sensibleness.

Now with the holiday season in (almost) full swing, one might be expect to find me knee-deep in mistletoe and ornaments. And while those baubles have a place in the house these days, there are also cake pans laying about, a box of icing tips open and waiting, and some birthday candles at the ready.

Today is someone's birthday.

I am lucky enough to have both a Mum and a Mom. "Mum" is my own mother, a woman after whom I follow in many ways - our humour, our aesthetic, and our looks (though neither of us truly see it), are rather in sync. We have a shorthand version of communication, where I can simply describe a situation, often searching to find the right words, and even with those gaps she instinctively knows what I mean and how I would react; because, in truth, she'd most likely react the same way.

My "Mom" is my husband Sean's mother. Coming into my life when I was already headstrong and full of opinions, she is the person who has brought me a new perspective. With distinctly different backgrounds and experiences, it is because of our divergent styles that she has shown me new avenues to expand my horizons. For instance, I never knew how much I adored Depression Glass until I saw her charming collection, and she is now the one with whom I am happy to wander antique markets and country stores.

She is a quilter, whereas I come from a family of knitters; it has been her love of that art that has taught me to appreciate the details of a well-stitched piece, and the beauty in fabrics. It is with her that I have enjoyed conversations over a cup of tea, shared at a tiny table laid perfectly with china and silver and a tiered tray with filled with dainty sandwiches, delectable sweets and delicate scones with cream.

She was the one with whom I bought my earrings for my wedding day.

But most of all what Mom has brought into my life has been enthusiasm; whether it be for the seasons (she has a greener-than-green thumb), the holidays or her grandsons, Mom is one that is ready to embrace each one, with arms open wide. In truth, my celebratory efforts seem minimalist in comparison to hers, me with my clear lights and greenery, her with kaleidoscope of fantastic rainbow-hues and sparkles for days.

Today is her birthday, and in the midst of all the snow outside my window, a winter-white cake seemed apt. Four moist layers of warmly-spiced carrot cake sandwich luscious cream cheese frosting, crowned with a delicate circle of floral-ish decorations. Charmingly vintage, I do hope Mom will approve.

Have a wonderful day.

Mom's Birthday Carrot Cake
I originally came up with this variation on a recipe from
Dorie Greenspan for our housewarming party. Mom had spoken fondly of a carrot cake from her childhood, and I was attempting to recreate it for her - happily, she said my efforts were a success. The use of both fresh and dried ginger adds another dimension of subtle, spicy heat.

Ingredients
2 cups all-purpose flour
2 teaspoons baking powder
2 teaspoon baking soda
1 teaspoon ground cinnamon
1/2 teaspoon ground ginger
1/4 teaspoon ground nutmeg
1/4 teaspoon ground cloves
3/4 teaspoon salt
3 cups of grated carrots
1 cup chopped walnuts, toasted
1 cup sweetened, shredded coconut
zest of half an orange, grated fine
1/4 teaspoon fresh ginger, grated
1/2 cup golden raisins
1 1/2 cups granulated sugar
1/2 cup of dark or old-fashioned brown sugar
1 cup, plus two tablespoons canola oil
4 eggs

1 batch Cream Cheese Frosting from Ina Garten, I omit the almond extract

Preheat the oven to 325°F (160°C). Butter four 8-by-2-inch round cake pans. Dust with flour, and tap out any excess. Set aside.

Into a medium bowl, sift together flour, baking powder, baking soda, spices and salt. In another medium bowl, stir together the carrots, walnuts, coconut, fresh ginger and orange zest. Set aside.

In the bowl of a stand mixer with the paddle attachment, add the oil and sugars. Beat, on medium high speed, for about five minutes or until the mixture is smooth and light. Scrape down the sides of the bowl with a rubber spatula now and again.

Add eggs, one at a time, beating well after each addition and scraping down sides of bowl. Reduce speed to low and add the flour mixture, blending just until all the flour is incorporated. With the mixer still on low, add the carrots and stir to combine.

Divide the batter evenly between the four prepared cake pans and bake until golden and a wooden skewer inserted into the center comes out clean, about 25-30 minutes. Cool in pans on a wire rack for about 10 minutes, then turn out to cool completely (turn the cakes right side up).

Smear a bit of frosting on the base of your cake plate or stand. Place one layer on the cake plate, then place four strips of parchment paper around perimeter, tucking the edges under the cake - this parchment will keep the cake plate neat.

Spread between 1/4 to 1/3 of a cup of frosting over the cake (I never have measured, you are aiming for a thin, even layer), then place another cake on top. Repeat process with the next two layers and top with last remaining layer.

Spread top and sides of cake with thinly with frosting, forming what is called a crumb coat. It does not need to be perfect, but the cake should be completely covered so that crumbs will not migrate into the final coat. Chill for at 30 minutes or until the frosting is slightly firm to the touch.

Use the remaining frosting to coat the top and sides of the cake, as desired. Use a thin-bladed knife to score where the frosting meets the parchment paper to break the seal, and remove.

Makes one 8-inch cake.

Notes:
• This cake is exceedingly tender, which is why I use multiple cake pans instead of splitting the layers. You could easily use two pans to make two layers, adjusting the cooking time accordingly.
• The Cream Cheese Frosting is very soft, and not the easiest to pipe. If it gets too warm, chill both the cake and frosting for about 10 minutes to firm up. Even with such measures, keep in mind that this is not the type of frosting that allows for a perfectly-smooth finish.

Thursday
Nov272008

Attention to detail

The little things can make all the difference.

The perfect cup of coffee to start a cold winter's morning. Finding the paper within reach of the front door, rather than having to traipse across the front lawn in your robe and slippers. Catching a cab on the first try. Reaching your hand in your coat pocket to discover that ten dollar bill you forgot you had.

An unexpected thank you.

All of these are little things, but little things do add up. Little things can make your day.

And, as I just was reminded, little things can change your cookies entirely.

Any time it is requested that I bake peanut butter cookies, I automatically reach for this recipe. Nonetheless, I have kept to my word and have continuously tweaked and adjusted the ingredients and method - partially because I sometimes have a ridiculously-short attention span when it comes to cooking and cannot commit to following anything to the letter, and partially as I still am in search of the ultimate cookie.

On a recent occasion, as I was creaming together the butter and sugars, I recalled my fondness for peanut butter and honey sandwiches as a child. Without a second thought, I grabbed some honey from the pantry, popped off its lid, and watched as it oozed goldenly onto the whirring beaters. From there, I continued with the recipe as per usual.

The dough was softer and more pliable than before. Considering liquid sugars grant a toothsome density to baked goods, and also knowing my disdain for thin, dried-out drop cookies, I chose to freeze the shaped balls of dough rather than chilling the batter as I did in the original version. After a quick arctic blast they held up nicely against the pressure of the fork when marked with their distinctive pattern. Into the oven they went.

Assumedly due to the change in sugars, I noticed that after 16 minutes the cookies were already pleasantly bronzed, sporting a modest hump. The height remained after cooling, allowing for a slightly crunchy top but a cakey, moist centre. In comparison to the crumbled chewiness of their flatter predecessors, these were a wholly different cookie altogether.

The cookies tasted richer. Maybe it was depth of mellow sweetness from the honey that accentuated the roasted quality of the peanut butter; the peanutty-ness was more pronounced, but still well-rounded. Now this was my idea of a really good cookie - not to say the previous version doesn't have its slightly-crisper charms.

Sometimes magic is truly in the details.

Note: Some may notice that the above photo returns to the style of my Happenstance series. To be honest, I had not intended to write about this recipe, but I was so happy with the effect of small changes on the recipe that I felt compelled to share. As this was such a spontaneous impulse, shooting again in that format seemed appropriate.

Soft and chewier peanut butter cookies
My own recipe. With a crisp edge and a soft interior, these cookies are one step closer on my quest for peanut butter perfection.

Ingredients

1 cup plus 1 tablespoon all-purpose flour
1/4 teaspoon kosher salt (up to 1/2 teaspoon if you particularly like savoury sweets)
3/4 teaspoon baking soda
1/2 cup (8 tablespoons/1 stick) unsalted butter, at room temperature
3/4 cup chunky peanut butter
1/2 cup plus 2 tablespoons packed golden or dark brown sugar
1/4 cup plus 1 tablespoon granulated sugar
1 tablespoon honey
1 large egg
1/2 teaspoon vanilla extract
sea salt, optional, for sprinkling

Preheat oven to 350°F (175°C). Use parchment paper to line several standard baking sheets and set aside.

In a bowl, sift together the flour, salt and baking soda. Set aside.

In the bowl of a stand mixer with the paddle attachment, or with a hand mixer, cream together the butter and peanut butter until light and fluffy. Add the sugars and honey and beat on high for three minutes, scraping down the sides of the bowl as needed.

Add the egg and vanilla, then mix on medium speed until well blended.

Add the dry ingredients to the bowl and stir to just combine. Using a 1 1/4" ice cream scoop dish out mounds of dough onto the prepared baking sheet (alternatively, use a generous 2 tablespoons of batter for each cookie), spacing them about 2 inches apart. Place onto baking sheet and freeze the batter for 10-15 minutes to set up and chill thoroughly.

Dip a fork into warm water and use the tines to press the dough balls lightly; you only want to slightly flatten their shape and leave the imprint of the fork. Freshly dip the fork between pressing each cookie. Sprinkle with sea salt, if desired.

Bake in the preheated oven for 16 minutes, rotating the sheets once during baking. Cool on pan for two minutes, then remove to a baking rack to cool completely.

Makes 18.

Monday
Oct062008

Mum in motion

Whew. I know it is just Monday, but I already feel as though I have had a marathon week. These last few weekends have flown by, more hectic than relaxed, and I am feeling the effect.

The busyness of it all is mostly with happy tasks, thank goodness; the sort of work that is wholly gratifying, but not always easy. Renovations, projects, an almost-four-month-old delight who believes that he is grown up enough to debut his first two teeth, a most wonderfully-mischievous toddler, friends, baking, cooking, planning, organizing, birthdays ... I'll say it again. Whew.

Tomorrow a dear, dear loved one will jet off for a faraway land for an extended trip. As exciting as that is, the last few days have been abuzz with expectant, frenetic energy as we all aid in preparations for departure and simultaneously prepare ourselves for three weeks of missing someone terribly.

I am looking ahead though; this weekend is Canadian Thanksgiving, and there is cooking to be done. Although this year we are not hosting the festivities, we are contributing to the celebration. I am thinking of doing David Lebovitz's showstopping Spiced Pumpkin Cheesecake with Caramel Bourbon Sauce. Jim Lahey's No Knead Bread has been requested, and I might pack a tin of Pecorino Crackers from Giada De Laurentiis (these are featured in De Laurentiis' new book; look out for my review next week). My only decision left is to settle on a cranberry sauce to make.

With all of this going on, I want something quick I can nibble while doing any number of other things through my day. And so, with a bit of time to throw together something, I turned to my favourite snack for these sort of days - granola bars.

Far from the overly-cloying packaged versions that verge on candy bar status, these little offer a bit of salty and sweet; as well-suited for breakfast with coffee as they are as a mid-afternoon bite all on their own. Delicious and portable, a balance of nutrition with a bit of treat, multitasking has never been as appealing than this.

Endnote: I feel compelled to mention that Thanksgiving is my favourite holiday; in fact, this time of year is my absolute, preferred season. All of this is a wonderful sort of busy, and though I might wish for more hours in the day sometimes, I would not wish away a second of it.

Apple Cranberry Granola Bars
My version of a base recipe from Alton Brown. By adding the cashews at the end their salt does not get fully mixed into the bars, resulting in little pockets of salty goodness.

Ingredients

8 ounces old-fashioned rolled oats
2 ounces wheat germ
1 1/2 ounce flax seed
2 ounces raw pumpkin seeds
3 ounces sliced almonds
1 1/2 ounces shredded coconut (sweetened or unsweetened)
4 ounces honey
2 ounces golden syrup
1 3/4 ounces light brown sugar (sometimes called yellow or golden)
1 ounce unsalted butter, plus extra for pan
1/2 teaspoon kosher salt
1 teaspoon vanilla extract
2 ounces dried apples, chopped
2 1/2 ounces dried cranberries, chopped
1 1/2 ounces salted cashews, roughly chopped

Directions

Butter a 9 by 9-inch baking dish and set aside. Preheat the oven to 350°F (175°C).

Spread the oats, wheat germ, flax seed, pumpkin seeds, almonds, and coconut onto a baking sheet. Place in the oven and toast for 15 minutes, tossing to toast evenly.

Meanwhile, combine the honey, golden syrup, brown sugar, and butter in a large, microwave-safe bowl. Heat, on a low setting, stirring occasionally. Once the sugar is completely dissolved, stir in the salt and vanilla extract.

When the oat mixture is lightly toasted, remove it from the oven and reduce the heat to 300°F (150°C). Quickly add the oat mixture to the sugars, then the dried fruit and nuts, stirring to fully combine and coat. Pour mixture into the prepared baking dish.

Using the back of a greased spatula, press and flatten the mixture until evenly distributed. Bake in the preheated oven for 25 minutes, rotating once during baking. Remove from the oven to a rack and allow to cool completely. Turn out onto a cutting board and slice into desired squares or bars. Store in an airtight container at room temperature for up to a week.

Makes one 9x9 inch pan.

Notes:

• I put a second baking dish of the same size on top of the bars as they come out of the oven, weighted down with cans. This extra compression makes for bars that will cut easily and hold their shape. For a crisp bar, allow the pan to completely cool before removing the weights. If you prefer a softer bar, you can do this for only part of the cooling time, or skip the step entirely.
• In my mind, the perfect portion of these is achieved by cutting the pan into 2 1/4" squares. This yields 16 small bars.
• It hardly needs saying, but this is a recipe that can easily be tailored to suit personal preferences; as long as the general ratio of liquids to solids remains, sensible substitutions are easily made.

Monday
Sep292008

Almost better than pencils


A warm nibble for the cooler days ahead; spiced pumpkin scones. Photos courtesy of Deep Media.

“Don't you love New York in the fall? It makes me wanna buy school supplies. I would send you a bouquet of newly sharpened pencils ..."

Sometimes I think I would really like to go back to school.

I could say that it was because I wanted to be surrounded by knowledge, or that I long for the daily exchange of ideas or that I crave an opportunity to stretch my mental boundaries. But, while all of that is well and good, I must be honest.

The thing that would most excite me about back-to-school would most likely be the stationery.

My love of lists is old news, I know. But it is a continuing, relentless habit. What you might not realize though is that the quirk is even deeper-rooted than the itemized collection of things to do; in fact, lists only scratch the surface of my fondness for writing things down, getting organized, and the supplies associated with both.

The whir of a label maker makes me happy. I have spread sheets detailing gifts given for holidays over the last five years. I was recently miffed to find out that Ikea had discontinued the glass jars I like for pantry storage. I have been known to colour code paper clips to best suit the subject matter they clamp. Seriously. And yes, I got made fun of for that one.

As you can well imagine, my level of commitment to eccentricity has led me down many an aisle of a stationery store. And so then you can imagine, I have bought enough stationery to be particular in my purchases. Rollerball, not ball point pens please. A mechanical pencil with no more than a 0.5 millimetre lead, thank you.

But back to the lists. My incessant scribbles need a home, and this brings me to my greatest love of school supplies - notebooks. Oh, how I adore a brand-new notebook. Whether tiny or fat, simple in its decoration or elaborate, a notebook smacks of promise and new beginnings. Some notebooks seem to make ideas flow easier; inspiring one to sit down and put thoughts to paper.

Throughout our house, our car and in my purse, you will find notebooks. Teeny tiny scratch pads for quick reminders are tucked in the junk drawer in the kitchen. On the desk is a thin, spiral bound notepad of my father's, containing a story about a squirrel I wrote in elementary school. A collection of journals line a shelf in the den, their contents spanning years of our lives. Innumerable recipes and food thoughts are jotted down on scraps of paper and tucked into random books and magazines, or take up books of their own.

It was in one of these (many) notebooks that I came upon a recipe for Spiced Pumpkin Scones and, as a bonus, a mystery. Reading it over, I realized that I had absolutely no recognition of the words whatsoever. Though in my handwriting, with notes and substitutions in the margin, I have absolutely no remembrance of where the recipe came from, or when I heard of it.

Mysterious provenance aside, I was charmed by prospect of lightly-spiced scones; perfect for the cooler weather forecast for the weekend. They were quick work through the use of a stand mixer. Butter is blended into dry ingredients, then liquids are added to that. Dump everything out onto a work surface, knead lightly, and you're done. All that is left is to cut the dough into the desired size and bake.

A scant 15 minutes later a tray full of proudly-puffed scones are yours to be enjoyed. The addition of cake flour helps to keep them tender, while the pumpkin purée adds moisture and pleasing saffron yellowness. Lovely on their own, even better with a smear of butter and a cup of tea. Simply delicious.

Wherever this recipe came from, I am so glad I had someplace to write it down.

Some of my favourite stationery sources are:
Russel + Hazel, See Jane Work, Etsy, and of course the classic, Moleskine.

Spontaneous moments often end up overshadowing the most stylized effort. While enjoying these little bites outside, the cooling rack was momentarily placed amongst the stones. I was so taken by the texture of the crumbly, crackled scones against the gravel, I felt compelled to include the image here.

Spiced pumpkin scones
Of unknown origin, but so tasty that I am tempted to claim them as my own.

Ingredients
2 cups cake flour
2 1/2 cups all-purpose flour
1/2 cup light brown sugar, packed
1 1/2 tablespoons baking powder
1/2 teaspoon baking soda
1/2 teaspoon salt
1 1/2 teaspoons ground cinnamon
3/4 teaspoon ground ginger
1/2 teaspoon ground nutmeg
1/8 teaspoon ground clove
1 cup (1/2 pound, 2 sticks) chilled unsalted butter, diced
2 eggs, beaten
1 cup canned pumpkin purée (unsweetened)
2/3 cup 18% (table, coffee) cream, chilled
1 egg beaten with 2 tablespoons of milk or cream, for egg wash
Granulated or sanding sugar, for garnish

Preheat oven to 400°F (200°C). Use parchment paper to line a standard baking sheet and set aside.

In the bowl of a stand mixer with the paddle attachment, combine the flours, sugar, baking powder, baking soda, salt and spices. On the machine's lowest setting, cut in the chilled butter until the mixture resembles course meal. The butter should be in small pieces approximately the size of peas.

Lightly whisk together the eggs, pumpkin purée and cream. With the machine running still on low (or stir), pour the liquids slowly into the flour and butter mixture, stirring until just combined. Small bits of butter should still be visible, but almost all the flour should be incorporated.

Turn the dough out onto a lightly floured surface. Working quickly, gently knead the dough, folding and pressing gently until fairly smooth. Divide the dough into four, and shape each ball of dough into a 4" round about 3/4"-1" thick. Cut each round into six wedges, and place on the prepared baking sheet. Once finished, brush each scone with the egg wash and sprinkle with granulated or sanding sugar.

Bake in preheated oven for about 15 minutes, or until the the tops are lightly golden and the cut sides look flaky and dry. When fully cooked, they should feel light for their size and sound almost hollow when tapped underneath. Cool on a wire rack for at least 5 minutes. Best served warm.

Makes 24 medium scones.

Notes:

• 1 tablespoon of pumpkin pie spice can be substituted for the individual spices.
• The scones can be frozen before baking. After cutting them out, place them on a parchment-lined baking sheet and freeze uncovered. Once firm to the touch, remove to an airtight container or a freezer bag and store. To bake, take the scones from the freezer and preheat the oven. Wait 10 extra minutes after your oven has reached temperature, then egg wash and sugar the scones. Bake for 15-18 minutes, until cooked through.
• These can be made without the aid of a stand mixer. Use a pastry cutter or two knives to cut the butter into the flour, then stir in the wet ingredients. Do not over mix, stir until just blended. From here, the method remains the same.
• If your kitchen is very warm, chill the cut scones for 15 minutes before baking for best results.

Page 1 ... 3 4 5 6 7 ... 12 Next 5 Entries »