Instagram Instagram

Entries in sweet (57)

Thursday
Sep292005

Celebrating the start of something good

As I was discussing with a friend recently, fall has a very specific personality to it. While I love summer for all its brightness and enthusiasm, this time of year seems bring along a sense of hospitality. The market is still filled with colour, albeit from a kaleidoscope of rainbow hues to a wash of sunset shades. Now is the time to start braising meats and revisiting classic cold-weather comfort food. It is this idea of hearth and home, of generosity and bounty, that truly makes autumn my favourite season.

It was with this thought in mind that I started thinking about what to do with the apples I had from Schouwenaar Orchards and Vineyards. It was the weekend after the official start to fall, and I was looking for something that was homey and comforting. As I padded through the house in my slippers and robe, my gaze fell across the most recent edition of Everyday Food Magazine. Curled up to our breakfast counter, perched on a stool and with hands wrapped firmly around a warm mug, I flipped through the pages until I came upon an in-depth article on apples — with recipes both savoury and sweet, including one for an applesauce cake.

Remembering a favourite recipe for homemade applesauce using apple cider, I switched my mug for a peeler and started to work. Using a mix of Redcort, McIntosh and Galas, I happily worked away, and soon the kitchen was filled with the smells of mulled spices and the cooking fruit. What a perfect way to start a Saturday.

Once it had cooled I was left with a slightly tart, but sweetly balanced, sauce. With this success boosting my confidence, I turned to the cake recipe. As I’ve mentioned before, I'm not one to leave well enough alone — so I gave into my need to fiddle and started scribbling notes.

I had just received the thoughtful gift of miniature tube pans from my mother, so they had to be used, no doubt about it. The magazine called for light brown sugar only, but instead I included a bit of Demerara sugar, wanting the depth of almost burnt sweetness it brings. I also omitted the cardamom, as my cider applesauce was highly spiced. In one batch, I switched out the honey for maple syrup, for no other reason that I thought the spicy caramel taste would bring another note to compliment the apples.

Apple cider applesauce
Well-flavoured and slightly tangy, this is a great simple applesauce to use alone or in cooking. It has more character than store bought varieties, and comes together quite quickly. As an added bonus, your kitchen will smell heavenly as it cooks. You can use a mulled cider for this recipe, but may want to omit the cinnamon called for.

3 pounds apples, peeled, cored and cut into ½” slices (or thereabouts)
1 cinnamon stick or ½ teaspoon ground cinnamon
1 cup apple cider
2 teaspoons freshly squeezed lemon juice
Honey (optional)

In a large saucepan, combine apples, cinnamon and cider and bring to a boil. Cover and reduce heat, let simmer for 40 minutes, stirring occasionally. If the sauce looks too dry at any time, add a few tablespoons of water.

When apples are tender, remove from heat and discard cinnamon stick (if using). Stir in lemon juice, and check for sweetness. If needed, add honey to taste, to balance flavours.

Makes approximately 4 cups.

Notes
• Sugar can be used instead of the honey, but should then be added before the apples are fully cooled so that it can dissolve. I find honey a much more mellow sweet, and enjoy the resiny depth it adds.

Applesauce Cake
Inspired by the recipe published in Everyday Food.

Non-stick cooking spray
3 cups all-purpose flour (spooned and levelled)
2 teaspoons baking soda
1 teaspoon salt
1 ½ teaspoons ground cinnamon (you may omit this if you used a heavily-mulled cider in the applesauce)
1 cup unsalted butter, softened
1 ½ cups packed light brown sugar
½ cup Demerara sugar
¼ cup maple syrup or honey
2 large eggs
2 cups apple cider applesauce (or store-bought)

Icing/confectioner’s sugar (optional)

Preheat oven to 175° C (350°F).

Generously coat twelve 1 cup capacity miniature tube pans (usually in available in sheets of six), or a 10 inch tube pan.

In a large bowl, sift together flour, baking soda, salt and cinnamon.

In the bowl of an electric mixer (or using a handheld), beat together butter, brown sugars and maple syrup/honey until light and fluffy. Add eggs, one at a time, beating until well combined. The mixture should be pale and airy. With mixer on low, gradually add spoonfuls of the flour mixture, mixing until just combined. Beat in applesauce.

Spoon batter into prepared pans, smoothing the tops. Bake until a toothpick or cake tester comes out mostly clean (slightly wet) when inserted in the middle of the cake, 12-18 minutes with the miniature pans, or 50-60 using a traditional tube pan. Be sure not to over bake.

Cool in pan on a wire rack for 10 minutes. Invert onto a cutting board or baking sheet, and then again onto rack, top side up. Allow to cool completely. Serve either top or bottom side up (I liked the bottoms), with a light dusting of icing sugar.

Notes:
• Can be served alone, or with a scoop of cinnamon ice cream or a dollop of maple whipped cream.
• This cake keeps well, wrapped in the fridge. The flavours will mellow and blend.
• This batter is also good when baked in muffin tins - served with a bit of sweet butter, they make a lovely snack or breakfast.

Tuesday
Sep202005

A friend for dinner, Nigella Bites

This is my third instalment of my series in exploring my cookbooks, this time featuring Nigella Bites by Nigella Lawson.

I find that different books respond to different moods. When I want to know the minutiae of proper hollandaise technique, I know that there is nowhere to turn but a dog-eared copy of Larousse Gastronomique. A desire for “classic American cooking” is easily sated by flipping though one of the many books by Marion Cunningham. In the mood for adventure? Madhur Jaffrey’s soothing tone can lead even the novice home cook through the complex world of spices.

But there is one author I turn to most often when I’m looking for companionship - Nigella Lawson. One known for her conversational prose rather than complex (or always accurate) preparations, her books bring pure comfort; it is rainy day reading at its best. She doesn't take herself to seriously, with recipes ranging from classic to kitch. Charming and engaging, her writing is like having a chat with another food-loving friend. Details are scattered sometimes, and the stories can be rambling, but it really is all about the food.

I find her books to be inspirational, not in the sense of something to aspire towards, but rather a style of cooking that is closely related to my own everyday routine yet full of new ideas. It is accessible and simple, but still with a world-travelled palate and with an evident fondness for the social aspect of preparing and sharing food.

I will admit, I rarely follow her recipes to the letter. I usually try to make them as written the first time, but after that I usually tweak and fiddle to suit my own tastes. The fact that Lawson includes space for notes in her books speaks to me of her desire for the reader to make each recipe personal - she does not aspire to be the definitive expert on a dish, but rather seems content in introducing you to a method or an ingredient.

Such was the case with this gorgeous Chocolate Cloud Cake. Featured in the book, Nigella Bites, it was such a success I ended up making three in the same amount of days. True, no two cakes were identical (I also took ideas from recipes from Williams-Sonoma and Ina Garten), but hers was the original inspiration — and really, isn’t that saying something? Densely fudgy with a crackling, brownie-like top, this cake is deceptively simple to make, with results far greater than the effort involved.

Chocolate Cloud Cake
Also available online (including US measurements) at Nigella.com.

On days when I want the warmth of the hearth rather than the hurly burly of the city streets I stay in and read cookery books, and this recipe comes from just the sort of book that gives most succour, Classic Home Desserts by Richard Sax.

The cake itself (which was the pudding I made for last New Year's Eve dinner) is as richly and rewardingly sustaining: a melting, dark, flourless, chocolate base, the sort that sinks damply on cooling; the fallen centre then cloudily filled with softly whipped cream and sprinkled with cocoa powder. As Richard Sax says 'intensity, then relief, in each bite'.

For the cake
250g (9 ounces) dark chocolate, minimum 70% cocoa solids
125g unsalted butter, softened
6 eggs: 2 whole, 4 separated
175g caster sugar
2 tablespoons Cointreau (optional)
Grated zest of 1 orange (optional)
23cm (9 inch) springform cake tin

For the cream topping:
500ml double cream
1 teaspoon vanilla extract
1 tablespoon Cointreau (optional)
Half teaspoon unsweetened cocoa powder for sprinkling

Preheat the oven to 180ºC/gas mark 4.

Line the bottom of the cake tin with baking parchment.

Melt the chocolate either in a double boiler or a microwave, and then let the butter melt in the warm chocolate.

Beat the 2 whole eggs and 4 egg yolks with 75g of the caster sugar, then gently add the chocolate mixture, the Cointreau and orange zest.

In another bowl, whisk the 4 egg whites until foamy, then gradually add the 100g of sugar and whisk until the whites are holding their shape but not too stiff. Lighten the chocolate mixture with a dollop of egg whites, and then fold in the rest of the whites. Pour into the prepared tin and bake for 35-40 minutes or until the cake is risen and cracked and the centre is no longer wobbly. Cool the cake in its tin on a wire rack; the middle will sink as it cools.

When you are ready to eat, place the still tin-bound cake on a cake stand or plate for serving and carefully remove the cake from its tin. Don't worry about cracks or rough edges: it's the crater look we're going for here. Whip the cream until it's soft and then add the vanilla and Cointreau and continue whisking until the cream is firm but not stiff. Fill the crater of the cake with the whipped cream, easing it out gently towards the edges of the cake, and dust the top lightly with cocoa powder pushed through a tea-strainer.

Serves 8-12

Notes:
• You can make this into an Easter Nest Cake by folding 200g melted chocolate into the cream topping and dotting with the sugar-coated eggs instead of the cocoa. Leave the Cointreau out of both the cake and the cream. (NL)
• When I made this cake, I took some license and added 2 teaspoons of instant espresso powder to the egg yolk/chocolate mixture. I also used a mix of bittersweet and semisweet chocolates, for added depth.
• I ran out of parchment paper, and had fine success using a non-stick pan that I buttered and dusted with cocoa powder.
• Miniature versions of this cake are adorable, using six 4-inch springform pans. Adjust cooking times accordingly.

Saturday
Aug062005

On insipired collaboration

I will be continuing my cookbook exploration, as promised. Stay tuned.

I am, as you may have suspected, one of the many food-obsessed.

While eating breakfast, I’ll be planning my lunch and preparing a mental shopping list for dinner. When we go out, I’m constanly looking in market stalls, restaurant menus and other people’s grocery carts for inspiration. When enjoying a meal, I’m critquing the bite in my mouth, keeping an eye on the presentation, and rarely does my date survive without at least one bite stolen from his plate.

When faced with a dish, I automatically compare it to the times I have had it before, considering what I like and would improve in this incarnation, and looking for ways in which I can create my own version. It’s a compulsion, and I relish every minute of it.

I realize that the food-obsessed is not a rare breed, but we are a passionate, inquisitive and enthusiastic bunch. Not a terrible combination, I’d say.

Most recently, I became fixated on peaches. The hot hazy days of late July were upon us and, in my opinion, there is nothing more equatable to summer than the honeyed sweetness of a ripe peach. One bite into the yeilding flesh, with juices flowing down your chin, and you’re tasting all of the season.

Living in a prime stone and soft fruit region, my anticipation grew, and I began culling recipe books and websites for peach recipes, finally stumbling upon a streusel cake from Williams and Sonoma.

But oh, one recipe would be too simple. Still on my mission for the perfect recipe, I clicked over to the charming Delicious Delicious and was interested in Caryn’s blueberry streusel muffins. What if I took the W&S peach recipe and converted it to muffins or mini-cakes instead?

I have no idea where the sour cream came in. I swear, I was all set on my recipe, and out of nowhere came the thought of the tangy density of a good sour cream crumb cake entered my busy little brain. And so, I was lost. The third recipe hunt began. Donna Hay’s Modern Classics: Book 2 proved my saviour, with her sublimely simple muffin base recipe (my usual standby).

So I was set. I would combine the struesel from Williams Sonoma, the form from Caryn, the base from Donna Hay (slightly altered) and I would have my peach perfection.

Then my dear father offered me a pint of gorgeously bursting blueberries. Remembering the colour combination of black and peach from Nigella’s fruit bake with yoghurt (blackberries and peaches), I couldn’t resist his offer. This was collaboration at its best, and the result could not have been more rewarding.

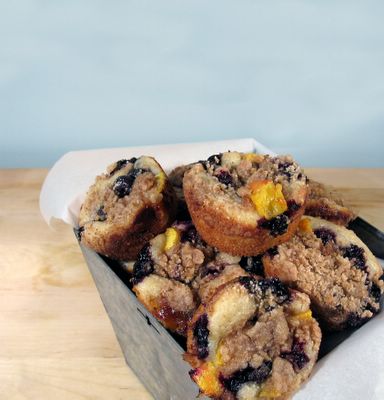
Blueberry peach sour cream crumb cake
With thanks to the many contributors.

For the topping:
3/4 cup all-purpose flour
1/3 cup firmly packed light brown sugar
1/4 cup granulated sugar
1 teaspoon ground cinnamon
6 tablespoons (3/4 stick) cold unsalted butter, cut into small pieces

For the cake:
2 cups plain (all purpose) flour
2 teaspoons baking powder
1 teaspoon salt
3/4 cup sugar
1 cup sour cream
2 eggs
1 teaspoon vanilla extract
1/3 cup vegetable oil

1 cup blueberries
2 medium sized peaches, peeled, pitted and cubed into medium chunks

Preheat oven to 350°F (175°C). Butter and flour a 9 inch round springform pan (see Note).

To prepare the streusel, stir together the flour, brown and granulated sugars and cinnamon in a bowl. Using a pastry blender, two knives or your fingers, cut or rub the butter until coarse crumbs form. Set aside – if working in a warm kitchen, refrigerate until needed.

For the cake, sift together flour, baking powder and salt in a bowl. Stir in sugar. In a separate bowl, whisk together sour cream, eggs, vanilla and oil, until smooth.

Stir the sour cream/egg mixture through the dry ingredients. Be careful not to overwork the batter – mix until just combined.

In a small bowl, combine the blueberries and peaches.

Pour batter into prepared springform pan and spread evenly to fill the base (the batter will look like it is too little, but it will expand while baking). Sprinkle the mixed fruit over the batter and evenly top with the streusel.

Bake until lightly golden brown and a cake tester or toothpick inserted in the centre comes out clean, about 35 minutes. Transfer the pan to a wire rack to cool for 20 minutes. Remove the sides of the springform pan. Can be served warm or at room temperature.

Notes :
• As pictured, this recipe can also be made in a 12 x 1/2 cup capacity non-stick muffin pan. When spooning in the batter, fill until about two-thirds full. Reduce the cooking time to approximately 12 minutes. In this preparation, you will have extra streusel topping, which can be frozen for a later use.
• To peel peaches, simply bring a two-thirds filled saucepan of water to boil. Using a small knife, cut a small, shallow “X” into the bloom end of each peach and immerse the peach into the boiling water for 30 seconds. Lift out with a slotted spoon and transfer to an ice bath until cool (you can skip this step and allow them to cool on a board, but I find the ice bath expedites the process). Once cooled, the skins should peel off easily, using either your fingers or the knife.

Wednesday
Jun292005

The essence of home

I’ve been putting off writing this post. The topic seemed simple enough, but whenever I tried to come up with an answer to the question, I was overwhelmed.

“What does Canada taste like to you?”

Deciding on one taste that most embodies the Canadian experience is, in my opinion, nearly impossible. With a country of such physical size and cultural contrasts, to concentrate on one flavour would be to exclude the thousands of other culinary adventures there are to be had.

To me, Canada tastes like maple syrup on my father’s French toast. I think of a butter-drenched crab boil on one coast, and Asian-influenced seafood on the other. Summer evenings wandering the streets of Montréal, shopping for decadent Opéra cakes. The requisite hotdog from Toronto street vendors. Breakfast cooked over a campfire, with smoky bacon and biscuits baked in a cast iron pan.

Canada tastes as sweet as summer fruit, as hearty as pierogies and as complex as our world-renowned wines. Canadian food reflects our varied climates, our landscapes and our seasons – it is the expression of the way we have created communities in this immigrant nation, and suggests the direction of what is to come.

Despite my travels, I would wager to say 85% of all the meals I’ve ever eaten have been in Canada. Seeing that I’m now somewhat obsessed with food, my food adventures this country surely have been nothing short of inspiring. Though I am itching to continue to travel the world and try new things, Canada will always be home to me. There is enough to explore down the street, throughout the province and across the nation to sustain me for years to come.

Maybe it would be easier if I concentrated on what Canada Day tastes like to me?

That’s easy. Growing up in a city on the edge of Lake Ontario, Canada Day meant one thing, and one thing alone – the annual Lion’s Club carnival. Every long weekend for the summer, the Lion’s Club carnival would make its rounds through local fairs and festivals throughout our region. And Canada Day was when it would come to my city.

Along with the other kids in our neighbourhood, I would watch the workers set up the tilt-a-whirl, Ferris wheel, and midway down by the beach. Soon enough, you could smell the popcorn and the air would become heavy with the sweetness of cotton candy. Twinkling lights would greet nightfall, and we would wait for the inky blackness to blanket the lake completely – setting the stage for the evening’s fireworks display.

Inspired by those memories, I’ve created miniature sweet wonton cones filled with icewine-macerated strawberries. The strawberries come from a nearby farm, the wine from a winery down the highway, and the wontons are my nod to Canada’s distinct cultural heritage. It is seasonal, the ingredients are local, and there is a bit of kitschy humour – how very Canadian. And red and white on Canada Day - how can you go wrong?

For an explanation of icewine and its production, click here.

Icewine strawberries in sweet wonton cones
My own creation, with apologies to Thomas Keller

Ingredients
1 pint strawberries
1/4 cup icewine
1 cup clarified butter
16 x 3 1/2” square wonton wrappers (4 are in case of mishap – and anyway, that is what my package contained)
2 tablespoons granulated sugar or Demerara sugar

Sweetened whipped cream, to serve

Speciality utensils
12 conical shaped metal forms (the type used for kulfi will do) or conical paper cups for water dispensers

Preheat oven to 350°F (175°C).

Hull and slice the strawberries, taking into account the size of your cone forms. Add the berries to a bowl and add the icewine. Stir lightly to combine, and refrigerate for at least two hours.

On a baking sheet, set out the metal forms or the paper cups. Brush each wonton on both sides with clarified butter. Wrap wonton wrappers around the cups to form cones, making sure to press the seams together. Twist the bottom to secure the point, if necessary. Lightly dust the cones with the granulated sugar, and bake for 7 minutes or until golden brown and crispy. Allow to cones to cool and remove from forms.

To serve, mound some of the macerated strawberries into your sugared cones, and top with the whipped cream.

Notes
• I used an Inniskillin 2002 Riesling Icewine for this recipe, thinking the floral apricot notes and bright acidity would complement the strawberries. Any icewine you enjoy would be suitable, or even a late harvest Vidal would be a great substitution, offering a bit of spice and sweet peach flavours.
• For Ontario readers, the LCBO does offer icewine in small bottles (a bit larger than hotel room minis). This size would be perfect to splash on a few berries, and are reasonably priced.
• I chose not to add sugar to the berries, but you may want to check for sweetness and add sugar accordingly.
• For the photograph, I used a non-sugared cone. It was terribly humid that day, and sugar was melting into a sticky mess. However, I would not suggest skipping this step as the wonton seems too savoury without this bit of gilding.
• The next time I make these cones, if I'm feeling particularly industrious that is, I think I would experiment with a tuile cone instead - if anyone experiments, please let me know!

Thursday
Jun092005

Butter + sugar + heat = bliss

I’ve not cooked a meal since last Sunday. And that was pasta.

Between assembling, reheating, and opening takeout containers, I’ve not had to do any “real” cooking, as in I’ve not turned on a burner or the oven. True, the 33°C temperatures may have a bit to do with my recent affinity for salads, but still, how lovely it is to be able to throw together a meal with such wonderful produce at hand, great restaurants nearby, and lovely family members all too willing to cook.

I’ve had the privilege of considering cooking a luxury – not a necessity or a chore, but an activity I could choose to do when the spirit so moved me.

I finally turned the oven on this evening, and for nothing short of a worthy cause; baking. The ultimate in indulgence, baking sweets speaks immediately to images of celebration, of comfort and of joy.

Baking always seems alchemy to me; the magic process of taking ingredients, combining them in a certain order in specific proportions, exposing this creation to heat — and voilà, a result much greater than the sum of its parts. Baking is all about transformation. One cannot help but feel a surge of pride when presenting a still-warm treat from the oven.

These cookies, crispy and chewy, like a good cookie should be, are as basic as one could wish for. Sinfully buttery, sublimely sweet, they melt in your mouth and leave you reaching for another. Based on the Nestlé Toll House recipe, swapping flavourings for dried cranberries or cherries, toffee bits, or dark chocolate chunks is highly encouraged.

So I’ve baked. I’ve rolled up my sleeves, faced a hot kitchen and even licked a spoon. I feel terribly domestic.

I should confess though, I’m having a salad for dinner.

White chocolate macadamia nut cookies
Based on the Nestlé Toll House recipe

Ingredients
2 1/4 cups all-purpose flour
1 teaspoon baking soda
1 teaspoon salt
1 cup butter, softened
1/2 cup granulated sugar
1 cup packed brown sugar
1 teaspoon vanilla extract
2 eggs
1 cup white chocolate, in chunks (or more, if desired)
1/2 cup lightly toasted macadamia nuts (or more, if desired)

Preheat oven to 325°F.

In a small bowl, sift together flour, baking soda and salt. In the bowl of a mixer fitted with the paddle attachment, or by hand, beat together butter, sugars and vanilla, until the colour turns pale and the mixture lightens in texture.

Add eggs, one at a time, beating well after each addition. Gradually beat in flour mixture. Stir in chocolate and nuts. Drop rounded teaspoons onto ungreased baking sheets (I use a small icecream scoop and parchment lined baking sheets).
Bake for 9-12 minutes, or until golden brown. Let stand for 2 minutes, then remove a wire rack to cool completely.

Makes 3 dozen cookies.

Notes
• This dough freezes quite well, so I usually portion out cookies and individually freeze them on baking sheets. When hard, I transfer them to a freezer bag— then I can make as few or as many as I’d like, without having to defrost the whole batch.