Instagram Instagram

Entries in sweet (57)

Tuesday
Dec052006

Idol worship

I was recently watching a biography on Nigella Lawson and was surprised to hear about the controversy surrounding the title of her book How to be a Domestic Goddess: Baking and the Art of Comfort Cooking. Though I may be behind the times to discuss an almost six-year-old debate, at the time I had been unaware of the outrage expressed over her title.

Long story short, some reviewers took the title rather literally, believing that it implied a throwback to pre-feminist ideology. Nigella’s proponents jumped to her rescue, declaring the statement to be facetious; a cheeky attempt at irony.

While an admitted Nigella fan, I will not take this opportunity to defend her humour. Instead, casting aside the trappings of gender roles, I pose a question - is it, for a female or male, terrible to wish oneself worshipped for a job well done?

On the field, in the classroom and around the conference table, we are taught to perform to the best of our abilities. And there are goals to which we choose to aspire, without thought of apology. Why should it be any different in the domestic realm? Is it not one of the most basic, and somewhat noble, desires to want to be able to provide delicious food for those you love?

As much as there is art in the culinary world, there is also basic skill. Some behaviours are learned and it is a talent that can be improved. There is effort; frequently resulting in sweat and sometimes dissolving into tears. Anyone who has ever attempted a holiday meal for family and friends can surely attest to that.

It is in light of this struggle that I will proudly show off my collected burns that decorate my hands and forearms, the nicks on my cutting boards or the scorch marks on my pots and pans. I have survived the trial by fire and come out with feast fit for celebration. Truth be told, I would fully expect the display of these war wounds to illicit an appropriate amount of fawning attention from my loved ones.

With imminent adoration in mind, I happily face the Saturday morning request from my dear Sean - pancakes. Quite content, you will most often find me padding about in fuzzy slippers and spatula in hand, lazily flipping cakes and feeling rather pleased with myself.

Over the years I have played with recipes, striving for perfection and finally settling on one which seems to meet the criteria. Most recently, our bundle of boy, Benjamin, has started stealing nibbles (no syrup, of course). Two clean plates, two toothy grins and two rounded bellies is praise enough for my efforts - and I feel blessed enough, indeed.

I would like to dedicate this post to my dear, dear friend Michèle, a goddess in her own right.

Spiced pillow pancakes
With the subtle warmth of spice floating up from the pan, these fluffy cakes offer some wintertime aromatherapy. It hardly needs saying, but these call for nothing less than a drizzle of your best amber maple syrup. One apology - I always hate a recipe where you have an egg yolk left over. If you choose, omit the third egg white and reduce the flour by 1/4 cup. You will, of course, sacrifice a bit of lift.

Ingredients

2 3/4 cups all purpose flour
4 tablespoons golden or brown sugar
4 teaspoons baking powder
1 1/2 teaspoons salt
1/4 teaspoon nutmeg
1/2 teaspoon cinnamon
1/8 teaspoon (a good pinch) ground cardamom
3 egg whites
2 egg yolks
2 1/2 cups milk
1 1/2 teaspoons vanilla
6 tablespoons melted clarified butter, plus more for cooking

In a medium bowl, sift together the flour, sugar, baking powder, salt and spices. Set aside. In a small bowl beat egg whites until soft peaks form. Set aside. In a third bowl, whisk together the remaining wet ingredients to combine.

Add the egg yolk mixture to the dry ingredients, stirring until just dampened. Some lumps are a good thing here; you are not going for a perfectly smooth batter. Add a dollop of the egg whites to the batter and fold to lighten. Once fully incorporated, fold in the the remaining egg white. Again, I do not mix to fully combine; the batter should be striped with white and tan at this stage.

While the batter rests, preheat a non-stick or cast iron griddle over medium heat. Lightly brush with melted clarified butter if desired. Ladle about 1/3 cup of the batter onto the pan. Cook until the edges become dry and bubbles begin to form in the centre, about 2 minutes. Flip and cook on the other side until golden and puffed, about another 2 minutes. Remove to a platter and keep warm in a low oven if needed. Continue until all batter is used.

Makes 20 pancakes, serving about 6.

Notes:
• Vegetable oil can be substituted for the clarified butter.
• Grated apple can be added to this batter. You may need to adjust the flour accordingly.
• If looking for ease of cleanup and perfectly-portioned cakes, use a spring-loaded ice cream scoop instead of a ladle.

Wednesday
Aug302006

What I did over summer vacation ....

While I may have not had the opportunity to sit in front of the computer lately, I have been managing to spend a good deal of time standing in front of the stove (and grill, and oven and cutting board). True to my word, here is a list of some of the recipes that have been keeping me busy, and our bellies full, over the summer. If there are any items of particular interest, please feel free to let me know and I would be more than happy to provide additional information. Happy eating!

Legend

BCFS= Barefoot Contessa Family Style, Ina Garten
BIP = Barefoot in Paris, Ina Garten
FS= Forever Summer, Nigella Lawson
MSBH = Martha Stewart’s Baking Handbook, Martha Stewart
NC= The Naked Chef, Jamie Oliver
TBCC = The Barefoot Contessa Cookbook, Ina Garten
TIC = The Instant Cook, Donna Hay
* = Recipe prepared with changes

Those items without notation are my own.

Breakfast

• Pancakes: I have a standby recipe of my own but I've recently been experimenting with these as well.
• Hashed browns (BCFS)
• Frittata with chèvre and oven-roasted tomatoes

Mains

• Herb-baked eggs (BIP)
• Lemon and parsley chicken (TIC)
• Grilled chicken and vegetable stacks (TIC)
• Griddled aubergines with feta, mint and chili (FS)
• My Mom's pea and mushroom subsi
Tabbouleh with chickpeas
Ben’s tomato and herb spaghetti
• Salmon and asparagus tart
Le grand aiöli
Seared tuna with mango salsa: The salsa is great as printed, but I have tweaked the recipe. In once case, I used sriracha chili sauce instead of the jalapeno and added some toasted sesame oil to finish. On another occasion I used peaches in the salsa, to pair with a grilled chili-rubbed pork loin.
• Roast leg of lamb (NC)
• Rack of lamb persillade (BIP)
• Perfect roast chicken (TBCC): I do not actually use Garten's recipe exactly, but this is the closest to my method and a source of inspiration.

Desserts

• One-bowl chocolate cupcakes* (MSBH): made once as cupcakes, once as a layered slab cake. Both delicious, moist and insanely popular.
• Dark chocolate frosting (MSBH)
Outrageous chocolate cookies*
Double Chocolate Cheesecake*: I am told family members fought over this cake.
Blueberry cheesecake
Mixed berry cream cake
Arborio rice pudding: Instead of apples and caramel, I recently made this with mango purée and cardamom.
• Honey poached peaches: Recipe below.

Honey poached peaches
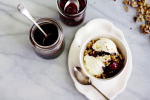
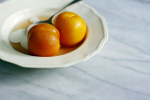
If at all possible, start these peaches the day before serving. I love the visual combination of the spiky green pistachio slivers against smooth, blushed peach cheeks. It is the perfect dessert to linger over in the late summer sun.

Ingredients
3 cups water
5 tablespoons honey
3 tablespoons sugar
1 vanilla bean, split lengthways
5-6 medium peaches, about 1 kilogram in total, halved lengthways (see note)

In a medium saucepan, combine water, honey, sugar and vanilla bean. Cover and simmer for 5 minutes. Add peach halves cut side down (this may need to be done in batches), and simmer uncovered for 3-4 minutes. Turn using a pair of spoons and simmer for an additional 2-3 minutes, until the flesh is just tender when pricked with the tip of a knife or tines of a fork. Cooking time will, of course, depend on the ripeness of the fruit. Using a slotted spoon, remove to a bowl and continue until all the peaches are cooked.

Increase the heat and boil the remaining poaching liquid until reduced to a syrup consistency. The poaching will stain the syrup a pink-peach, which will deepen upon reduction.

While the liquid is reducing, use your fingers to peel the skins off the peaches and remove any remaining stones.

Pull out the vanilla pod and pour syrup over the peaches. Cover and chill, for at least an hour or preferably overnight. The longer the peaches sit, the more they will soak up the deeply aromatic liquid.

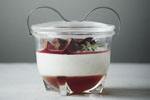
Serve as pictured with ricotta cream and a sprinkling of slivered pistachios, or over ice cream or simply as they are.

Serves 4-6.

Notes:

• If the peaches are freestone, then remove stones before cooking. If not, then pit after cooking. Leaving the peels on the peaches will not only protect the tender flesh, but also tattoo the fruit a mottled sunset hue.
• Testing for doneness on the cut side of the peach helps to hide any marks.
• My dear Sean’s mother suggests these peaches on top of Belgian waffles for a truly decadent brunch.

Saturday
Mar042006

The handy pantry; secrets to my success

I tell you, I feel for ducks; all is calm above water, but below feet are paddling madly. That about describes how I feel some days.

As you may have heard, I've been busy these last seven weeks. A particularly life-changing event, in the form of a perfect little bundle of boy, has taken up most of my energies. Energies formerly used for things like wandering markets aimlessly, or going out for a coffee and a chat or, on some days, brushing my hair. Not that I'm complaining - my days are filled with much more worthwhile endeavours; endeavours that bring me boundless joy.

But come on now, its not all puppy dogs and butterflies and all things lovely; there still are those times when it is the end of the day and you have to get dinner on the table.

I know I've touched upon it before, but a well-stocked pantry can be a lifesaver. I consider mine my bag of tricks, full of my go-to solutions for easy meals, last minute entertaining options and perennial favourites.

I remember when I had my first apartment, I was so excited about setting up my kitchen. I spent hours scouring cookbooks and the internet for ideas on what to stock in my pantry. I looked at the way I cooked, the way I lived and, most importantly, the tastes I crave. I used these ideas, and some trial and error, to come up with my list of essentials - my desert-island kitchen kit.

My dear Sean laughed the first time he saw my grocery database I've made - a master list of the foods I always like to have on hand, ready to be printed out at a moment’s notice. Though maybe not everyone is as type A as I am, I'm sure most have at least a mental list of those ingredients that they would rather never be without.

There are the usual suspects; pastas, rices, vinegars, oils, canned goods and dried herbs and spices. My baking pantry has jars filled with dried fruits, sugars, toffee chips and all manners of chocolates.

I have also learned to treat my refrigerator and freezer as an extension of my pantry staples. Fresh herbs, lemons and limes, chilies and cheeses can elevate a typical meal into something special. Frozen stocks add a depth of flavour to a quickly-assembled meal. Prepared puff pastry, phyllo dough, shortcrust pastry and a best-quality vanilla ice cream mean that a dessert is never too far away.

My latest addition to my little inventory has been frozen fruit, especially berries. Perfect for not only smoothies and frozen cocktails, but also for sauces, pies and cakes. These little jewels bring a dose of summertime sweetness to the grey days of March. In truth, I rely on them year-round.

This last weekend, with family and friends visiting, it was a luxury to feel at the ready for hostessing ... even though we had not been to the grocery store in days. With my secret stash I was able to welcome them with open arms and a full table - the highlight of which was this berry cake. Rich with a cream cheese pound cake base and topped with luscious berries and a coconut almond streusel, I won rave reviews. Thank goodness for good planning and a full pantry.

Am I busy? Yes. Do I feel stressed? No - it’s all like water off a duck’s back.

Favourite Berry Cake
My own creation

Ingredients
For the cake
1 1/2 cups (3 sticks) butter, softened
1 (8 ounce) block of cream cheese, softened
3 cups sugar
6 eggs
2 teaspoons vanilla extract
3 cups flour
2 teaspoons salt

For the topping
2 to 21/2 cups berries, depending on your choice of mix
2/3 cup all-purpose flour
1/3 cup brown sugar
1/3 cup blanched sliced almonds
1/3 cup flaked coconut, use sweetened or unsweetened - your preference
6 tablespoons (3/4 stick) cold unsalted butter, cut into small pieces
Additional butter for greasing pans

If you would like to make the miniature version pictured, grease 8 four-inch round spingform pans and preheat the oven to 325°F (160°C). If baking one large cake, generously grease a 8-inch round springform pan and preheat the oven to 350°F (175°C).

Make the crumble topping first. In a small bowl, stir together the flour, brown sugar, almonds and flaked coconut. Using your fingers or a pastry cutter, cut in the cold butter until a coarse crumb forms. Set aside in the refrigerator while you assemble the cake.

In the bowl of an electric mixer, cream together the butter and cream cheese until smooth. Add the sugar and beat until light and fluffy, scraping down the sides of the bowl to make sure all the ingredients are well incorporated. Take your time at this step, allowing about five minutes.

Add the eggs, one at a time; beat well after each addition. Mix in vanilla.

In a bowl, sift together flour and salt. With the mixer on low, add the flour to the batter. Mix until just combined and smooth. Pour batter into prepared pans, and sprinkle over berries. Finish with the chilled crumb topping and bake.

For the miniature versions, they will be done after about 50-60 minutes, when they should be a pale golden brown and a cake tester comes out almost clean (there may be a tiny amount of clinging moisture). For the larger version, it will take about 75 minutes.

Allow to cool in the pan, on a wire rack, for 20 minutes. Unmould and allow to cool completely.

Notes:
• I use a full-fat (regular) cream cheese for this cake. I have not tried it with a reduced fat variety.
• Alternatively, you can also make this cake in two 8 1/2-by-4 1/2-by-2 1/2-inch loaf pans. Bake at 350°F for about 60-75 minutes.
• There are no leaveners in this cake; all of its rise comes from the amount of air beaten into the batter with the creaming process and the addition of the eggs. Take care at these steps to ensure a dense,yet well-formed, crumb.
• If the kitchen is particularly warm, you might want to keep the topping in the freezer until ready to use.
• If the cake browns too quickly, tent with aluminium foil.

My apologies. This recipe was initially published with a typo - the springform pan is meant to be an 8" instead of a 9" as orginally listed.

A sincere thank you to all of you who have written with your well wishes for the three of us. We are terribly happy and cannot express our gratitude for all the support we have received. I am sorry that I have not been able to respond personally to everyone, but please know that we are humbled by your generosity and kindness. All the best to you and yours.

Thursday
Dec222005

Comfort comes in small packages

Recently at Seven Spoons:
Tara speaks from the depths of the couch, towers of magazines and cookbooks obscure her from view. Dear S is otherwise occupied with Ms. Billie, the feline mistress of the house, who is making quick work of the deconstruction of a bag of gift bows.

Tara: I’m torn. Florentines or tuiles? Both look lovely and would be perfect to package up for friends.
S: Uh huh, whatever you want, sweetie.
Tara: (opening another book, sending others flying) Take a look at these stunning cookies Martha’s made. Gingerbread snowflakes, piped with royal icing then dusted with sanding sugar. They sparkle so prettily - and you know I’m a sucker for anything with sparkles. I could do those, then some I saw in Gourmet ... I just need to find my copy ... (begins searching)
S: Do any of our friends like gingerbread? How about making the cookies from last year?
Tara: But that is boring.
S: But they were yummy. And I liked them.
Tara stops looking.

How can one not get excited to try new things come Holiday season? Bombarded with delectable images upon every magazine rack, bookshelf and television show, the season smacks of promise - there is always a new cookie to try, another way to roast a turkey, and this year’s penultimate side dish.

However, at least with my family, rarely do these new fangled recipes garner much praise. True they are well-received, but it is not often are they requested the year following. Not because they are not truly tasty, but because they are just not the tradition.

Take for example my father’s turkey. A few years ago he gallantly deboned an entire bird at our request, stuffed it with a savoury filling and then rolled into roulade - dark meat cradling the white meat inside. The turkey was perfect, moist throughout and utterly impressive.

Though it was, by far, the best bird I’ve ever eaten (and by my Mother’s command has been the only way we have celebrated the holidays for the last five seasons), there are still dissenters among the family. Since the turkey, no matter how beautifully tied, no longer resembles the classic image of a proper bronzed beast it is somehow considered inferior. My ever diplomatic Dad now roasts separate pieces of turkey to appease those souls.

It seems certain dishes are so firmly rooted in our sense of the season that we cannot be so foolhardy as to alter them. As we prepare the meal, going through the motions of making the brussels sprouts, stirring the gravy or getting out the same china we use every year - there is something inherent in these movements, in their ritual and rhythm that reminds us of years past and of memories shared. It is simply not Christmas without these tastes and smells and textures.

While I am all for innovation, I choose to spend this time looking forward and behind; taking note of now only where I am going but where I have been. There is comfort in the known, there is affection in tradition and there is pride in all that has stood up to the tests of time. Sometimes all that is needed are the tastes of home to assure us that there is still some right in the world.

These jam thumbprints are ridiculously easy and immediately invoke a sense of nostalgia, for a time we may or may not have known. Buttery shortbread, crowned with bronzed bits of coconut and gushing with a jam filling, you cannot get more classic than these.

Jam Thumbprints
Recipe published on Food TV.com courtesy of Ina Garten. Originally published in Barefoot Contessa Family Style. This recipe produces a fabulously rich shortbread base; experiment with different shapes and fillings to suit your tastes. I used Blackberry jam for my version, and upped the salt to 1/3 teaspoon.

Monday
Oct172005

How to end a week

My apologies on the delay, as some happenings have prevented me from posting. The full write up will be up soon, but please enjoy the recipe!

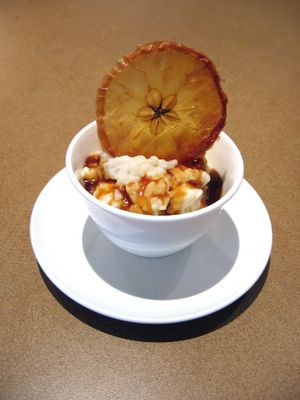
Arborio rice pudding with Calvados and cinnamon caramel
A lovely, comforting treat, which boasts a risotto-like consistency but requires minimal effort.

3 1/2 cups milk/cream mixture (I used 2 3/4 cups milk and 3/4 cups 10% cream, but use whatever is on hand or what suits your tastes)
1/2 cup Arborio or other short-grain white rice
1 vanilla bean
1/3 cup granulated sugar
2 teaspoons Calvados
1/4 cup heavy cream (optional)
Cinnamon caramel sauce (recipe follows)

Combine the milk and cream (if using) and rice in a heavy-bottomed medium saucepan. Split the vanilla bean in half and scrape in the seeds into the liquid, drop in the pod as well. Bring the milk to a boil, then reduce the heat to medium. Simmer until the rice is tender, stirring frequently, about 20-25 minutes. Discard the vanilla bean. Add the sugar, Calvados and heavy cream (if using), stirring well to dissolve. Cook until the mixture thickens to your desired consistency, about 5 to 10 minutes longer.

Spoon the rice pudding into bowls. Cover and refrigerate until cold (preferably overnight if you can wait that long, but 3-4 hours should suffice). Serve with the warm caramel sauce.

Cinnamon caramel sauce

Caramel sauce
1/4 teaspoon cinnamon (or to taste)

Reduce the vanilla in the recipe to 1/2 teaspoon. Make the sauce as per instructions, adding the cinnamon at the same stage as the vanilla. If the cinnamon is added too soon, the heat from the caramel will toast the spice, adding a slightly bitter note.

Notes:
• Alternatively, omit the caramel sauce entirely and simply sprinkle the pudding with a bit of cinnamon sugar (Demerara works especially well here). To gild the lily so to speak, you can lightly torch the cinnamon sugar for a brûléed effect – I love the contrast between the crisp spiced sugar and the almost custard-like pudding below.
• Other flavour and spice combinations work well in the method, such as Grand Marnier and ginger.
• To prevent a skin from forming while chilling, make sure to press down a layer of cling film against the top of the rice pudding.