Instagram Instagram

Entries in snack (26)

Monday
Sep292008

Almost better than pencils


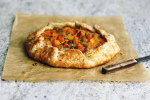
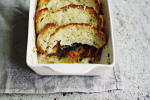
A warm nibble for the cooler days ahead; spiced pumpkin scones. Photos courtesy of Deep Media.

“Don't you love New York in the fall? It makes me wanna buy school supplies. I would send you a bouquet of newly sharpened pencils ..."

Sometimes I think I would really like to go back to school.

I could say that it was because I wanted to be surrounded by knowledge, or that I long for the daily exchange of ideas or that I crave an opportunity to stretch my mental boundaries. But, while all of that is well and good, I must be honest.

The thing that would most excite me about back-to-school would most likely be the stationery.

My love of lists is old news, I know. But it is a continuing, relentless habit. What you might not realize though is that the quirk is even deeper-rooted than the itemized collection of things to do; in fact, lists only scratch the surface of my fondness for writing things down, getting organized, and the supplies associated with both.

The whir of a label maker makes me happy. I have spread sheets detailing gifts given for holidays over the last five years. I was recently miffed to find out that Ikea had discontinued the glass jars I like for pantry storage. I have been known to colour code paper clips to best suit the subject matter they clamp. Seriously. And yes, I got made fun of for that one.

As you can well imagine, my level of commitment to eccentricity has led me down many an aisle of a stationery store. And so then you can imagine, I have bought enough stationery to be particular in my purchases. Rollerball, not ball point pens please. A mechanical pencil with no more than a 0.5 millimetre lead, thank you.

But back to the lists. My incessant scribbles need a home, and this brings me to my greatest love of school supplies - notebooks. Oh, how I adore a brand-new notebook. Whether tiny or fat, simple in its decoration or elaborate, a notebook smacks of promise and new beginnings. Some notebooks seem to make ideas flow easier; inspiring one to sit down and put thoughts to paper.

Throughout our house, our car and in my purse, you will find notebooks. Teeny tiny scratch pads for quick reminders are tucked in the junk drawer in the kitchen. On the desk is a thin, spiral bound notepad of my father's, containing a story about a squirrel I wrote in elementary school. A collection of journals line a shelf in the den, their contents spanning years of our lives. Innumerable recipes and food thoughts are jotted down on scraps of paper and tucked into random books and magazines, or take up books of their own.

It was in one of these (many) notebooks that I came upon a recipe for Spiced Pumpkin Scones and, as a bonus, a mystery. Reading it over, I realized that I had absolutely no recognition of the words whatsoever. Though in my handwriting, with notes and substitutions in the margin, I have absolutely no remembrance of where the recipe came from, or when I heard of it.

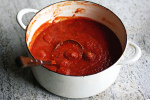
Mysterious provenance aside, I was charmed by prospect of lightly-spiced scones; perfect for the cooler weather forecast for the weekend. They were quick work through the use of a stand mixer. Butter is blended into dry ingredients, then liquids are added to that. Dump everything out onto a work surface, knead lightly, and you're done. All that is left is to cut the dough into the desired size and bake.

A scant 15 minutes later a tray full of proudly-puffed scones are yours to be enjoyed. The addition of cake flour helps to keep them tender, while the pumpkin purée adds moisture and pleasing saffron yellowness. Lovely on their own, even better with a smear of butter and a cup of tea. Simply delicious.

Wherever this recipe came from, I am so glad I had someplace to write it down.

Some of my favourite stationery sources are:
Russel + Hazel, See Jane Work, Etsy, and of course the classic, Moleskine.

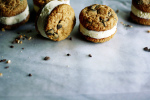
Spontaneous moments often end up overshadowing the most stylized effort. While enjoying these little bites outside, the cooling rack was momentarily placed amongst the stones. I was so taken by the texture of the crumbly, crackled scones against the gravel, I felt compelled to include the image here.

Spiced pumpkin scones
Of unknown origin, but so tasty that I am tempted to claim them as my own.

Ingredients
2 cups cake flour
2 1/2 cups all-purpose flour
1/2 cup light brown sugar, packed
1 1/2 tablespoons baking powder
1/2 teaspoon baking soda
1/2 teaspoon salt
1 1/2 teaspoons ground cinnamon
3/4 teaspoon ground ginger
1/2 teaspoon ground nutmeg
1/8 teaspoon ground clove
1 cup (1/2 pound, 2 sticks) chilled unsalted butter, diced
2 eggs, beaten
1 cup canned pumpkin purée (unsweetened)
2/3 cup 18% (table, coffee) cream, chilled
1 egg beaten with 2 tablespoons of milk or cream, for egg wash
Granulated or sanding sugar, for garnish

Preheat oven to 400°F (200°C). Use parchment paper to line a standard baking sheet and set aside.

In the bowl of a stand mixer with the paddle attachment, combine the flours, sugar, baking powder, baking soda, salt and spices. On the machine's lowest setting, cut in the chilled butter until the mixture resembles course meal. The butter should be in small pieces approximately the size of peas.

Lightly whisk together the eggs, pumpkin purée and cream. With the machine running still on low (or stir), pour the liquids slowly into the flour and butter mixture, stirring until just combined. Small bits of butter should still be visible, but almost all the flour should be incorporated.

Turn the dough out onto a lightly floured surface. Working quickly, gently knead the dough, folding and pressing gently until fairly smooth. Divide the dough into four, and shape each ball of dough into a 4" round about 3/4"-1" thick. Cut each round into six wedges, and place on the prepared baking sheet. Once finished, brush each scone with the egg wash and sprinkle with granulated or sanding sugar.

Bake in preheated oven for about 15 minutes, or until the the tops are lightly golden and the cut sides look flaky and dry. When fully cooked, they should feel light for their size and sound almost hollow when tapped underneath. Cool on a wire rack for at least 5 minutes. Best served warm.

Makes 24 medium scones.

Notes:

• 1 tablespoon of pumpkin pie spice can be substituted for the individual spices.
• The scones can be frozen before baking. After cutting them out, place them on a parchment-lined baking sheet and freeze uncovered. Once firm to the touch, remove to an airtight container or a freezer bag and store. To bake, take the scones from the freezer and preheat the oven. Wait 10 extra minutes after your oven has reached temperature, then egg wash and sugar the scones. Bake for 15-18 minutes, until cooked through.
• These can be made without the aid of a stand mixer. Use a pastry cutter or two knives to cut the butter into the flour, then stir in the wet ingredients. Do not over mix, stir until just blended. From here, the method remains the same.
• If your kitchen is very warm, chill the cut scones for 15 minutes before baking for best results.

Tuesday
Jul292008

Present imperfect

It just so happened that I was watching Heston Blumenthal's "In Search of Perfection" on the same day that my dear Sean requested some peanut butter cookies. For those not familiar with the show, it follows the Michelin-starred chef as he seeks out the quintessential recipe for various dishes. Whether it be Peking duck or risotto, Mr. Blumenthal looks to understand every aspect of the recipe, studying (in great detail) the importance and contribution of each ingredient, preparation and cooking method.

In this episode he tackled trifle. He examined its historical origins, researched the way tastes move around the human palate, and considered the effects of temperature on textural perception. A fascinating half hour later he presented his final imagining of the dessert - complete with saffron syllabub, strawberry jelly and a sweetened olive pureé.

Throughout the exercise, I could not help but compare his to the "standard" trifle that appears on our holiday table; a base of fluffy lemon-scented sponge, then scarlet-red raspberries staining layers of creamy custard and mascarpone cream, all topped off with bronzed shards of almond brittle. A far cry from Mr. Blumenthal's version, but my family will settle for nothing less.

And although this trifle has been deemed "perfect", I am still one to tweak things a little, depending on the fruit available, the audience I am serving or to better suit my whims.

Now I was thinking about the search for perfection, and the infinite possibilities when it comes to food. Every person perceives things differently, every person responds to flavours and textures in their own way. Every person has their own set of memories that are conjured by a smell or a taste. Each of us has a different set of criteria to satisfy; the journey towards finding the definitive form of any dish really is, well, endless.

But I digress. Back to Sean's request. While he had provided me with a recipe for his cookies (from Martha Stewart's cookie book) I could not help but delve a little deeper. When I asked him what kind of peanut butter cookie he was looking for, Sean immediately replied "soft and chewy." The Martha recipe sounded perfectly delicious, but the photo showed a cookie that looked more crisp than tender. After that, I consulted Dorie Greenspan's book for her advice, but came away empty handed.

In the end, I combined a few recipes, and drew upon my experience with baking. Albeit a bit unorthodox in measurements, I patched together a recipe that uses brown sugar for tenderness and caramel tones, granulated sugar for body and a bit of crispness, salt for added depth, and crunchy peanut butter for texture. Upon first bite, Sean declared these the best he'd ever had. Not too bad for a first try.

I am already thinking about what to change on my next attempt.

Soft and chewy peanut butter cookies
Living up to their title, these cookies are unbelievably tender. A great candidate for ice cream sandwiches - with a dulce de leche filling perhaps? Although I specify chunky peanut butter, that was only for personal preference. This recipe would work perfectly well with smooth.

Ingredients

1 cup plus 1 tablespoon all-purpose flour
1/4 teaspoon kosher salt (up to 1/2 teaspoon if you particularly like savoury sweets)
3/4 teaspoon baking soda
1/2 cup (8 tablespoons/1 stick) unsalted butter, at room temperature
3/4 cup chunky peanut butter
1/2 cup plus 2 tablespoons packed golden or dark brown sugar
1/4 cup plus 2 tablespoons granulated sugar
1 large egg
1/2 teaspoon vanilla extract
sea salt, optional, for sprinkling

Preheat oven to 350°F (175°C). Use parchment paper to line several standard baking sheets and set aside.

In a bowl, sift together the flour, salt and baking soda. Set aside.

In the bowl of a stand mixer with the paddle attachment, or with a hand mixer, cream together the butter and peanut butter until light and fluffy. Add the sugars and beat on high for three minutes, scraping down the sides of the bowl as needed.

Add the egg and vanilla, then mix on medium speed until well blended.

Add the dry ingredients to the bowl and stir to just combine. Refrigerate the batter for 10-15 minutes to set up and chill thoroughly.

Using a 1 1/4" ice cream scoop dish out mounds of dough onto the prepared baking sheet (alternatively, use a generous 2 tablespoons of batter for each cookie), spacing them about 2 inches apart. Dip a fork into warm water and use the tines to press the dough balls lightly; you only want to slightly flatten their shape and leave the imprint of the fork. Freshly dip the fork between pressing each cookie. Sprinkle with sea salt, if desired.

Bake in the preheated oven for 18 minutes, rotating the sheets once during baking. Cool on pan for two minutes, then remove to a baking rack to cool completely.

Makes 18.

Notes:
• For a crisper cookie, bake for 20 minutes.
• Toffee bits, chopped peanuts or chocolate chips would all be great additions to this cookie.

Tuesday
Apr292008

Martha, Martha, Martha; a review of Martha Stewart's Cookies

As of late, Martha Stewart, baking and food blogs seem to go hand in hand. With Sunday's launch of the cookie-centric contest at marthastewart.com, it is an appropriate opportunity to take a closer look at the prize up for grabs; copies of Martha Stewart's Cookies (Clarkson Potter, 2008). The latest cookbook from the editors of Martha Stewart Living, it is a comprehensive collection of 175 their most versatile and tempting treats.

With its ingenious imaged-based table of contents, coupled with chapter headings organized by cookie texture, this book speaks directly to cravings and their indulgence. I have read some recipes delightfully described as "everyday", a phrase that evokes idyllic notions of an overfilled cookie jar; these are chocolate chip cookies in a myriad of variations, fudgy brownies, delicate sugar cookies and shortbread. Other recipes range from the festive (from Crumbly and Sandy: Vanilla-Bean Spritz Wreaths) to the elegant (from Crisp and Crunchy: Sweet Cardamom Crackers) to the downright decadent (from Rich and Dense: Chocolate Pistachio Cookies).

In regards to content it should be noted that some of these recipes have been previously published in various publications under the Martha Stewart mantle, specifically the special edition Holiday Cookie series. Some readers could be frustrated by this repetition, while others may appreciate having their best-loved favourites in a trade paperback version.

The layout of the recipes is clear and concise, each featuring a photo of the finished product. Although some follow the expected Martha Stewart aesthetic of colourful but simple styling, others depart from this look entirely. These shots are mid-range to close up photographs against a white background which, in comparison to the charm of the former, do seem a bit austere. That said, the minimalist approach does highlight the characteristic textures of the cookies quite well.

Two appendices, one on packaging and the other with information on techniques and cook's tools, are helpful additions. Inspired presentation ideas show off the cookies beautifully for giving, and the instructions frequently include step-by-step photos. The baking notes serve as a useful introduction to the novice baker and as helpful reminders to those more experienced.

In the name of research, the Peanut Butter and Jelly Bars (above and below) were the first to be made from this book. The luscious batter inspired nostalgic thoughts of childhood. Its rich scent reminiscent of the best peanut butter cookie crossed with Reese Pieces; the sort that has greedy fingers fighting over rights to lick the bowl. The finished cookie lived up to the charms of the dough, with tender cookie underneath, a layer of tangy-sweet jam in between and the salty crunch of peanuts and crisp crumble as a crowning crust. Perfect for a lunchbox or after-school treat, these cookies will surely become a household classic.

Peanut Butter and Jelly Bars
From Martha Stewart Holiday Cookies 2001.

The recipe featured in the book is subject to copyright but is quite similar to this version.

Notes:

• I used a combination of mixed berry jam and homemade mixed berry compote for the filling as I wanted a bit of tartness to offset the buttery-rich cookie layer.

• Toffee bits, coconut, honey-roasted nuts or white chocolate chips would be a wonderful substitution or addition to the peanut topping. For those looking for true excess, a chocolate spread or dulce de leche could be used instead of jam filling.

Monday
Sep102007

Baking, Sunday style

After weeks of a heat that turned once-lush lawns to straw, this past Sunday dawned misty and gray. A constant drizzle pattered its way through the leaves, and the mercifully cool air smelled of damp earth.

It was a day to spend indoors, in the comfortable routine of business about the house, getting bits and pieces in order and lazily flipping through the weekend newspapers. By far, my favourite sort of day.

As far as food went, our menu was decided by consensus - following only our inclinations without worry of schedules or agenda. Immediate and extended family members stopped by for a cup of of tea, a chat or general diversion.

Some time in the early afternoon I caught wind of collected whispers, mentioned cravings for something as a snack, a cake perhaps. Nothing decadent, just a nibble of something a bit sweet.

Banana bread; this old fashioned loaf seemed the perfect fit for a rain-soaked Sunday afternoon. Studded with moist chunks of banana, their richness undercut by the acid twang of yogurt, this was the sort of loaf that sits on the counter with a knife nearby. For the remainder of the day we snacked, coming back for another slice, another crumb, whenever temptation arose.

Yogurt banana bread
This recipe yields a meltingly moist loaf with a cake-like texture. However it may look though, do not be fooled. This bread is not the overly sweet, dessert variety. The perfect partner to coffee, it is much more subtle in its charm.

Ingredients
1 cup all purpose flour
1/2 cup whole wheat flour
1 1/4 teaspoons salt
1 teaspoon baking powder
1/4 teaspoon baking soda
1/4 teaspoon ground cinnamon
1/4 teaspoon ground nutmeg
3 large, ripe bananas, mashed
1/2 cup well-drained yogurt (see note)
4 1/2 ounces unsalted butter at room temperature, plus more for greasing the pan
3/4 cup granulated sugar
1/4 cup firmly-packed brown sugar
2 eggs
1/2 teaspoon vanilla extract

Preheat oven to 350°F (175°C). Lightly butter a standard, 9"x5"x3" loaf pan.

In a medium bowl, sift together the flours, salt, baking powder and spices.

In another bowl, mix the yogurt and banana together until well blended. Set aside.

In the bowl of a stand mixer fitted with the flat beater, beat the butter and sugar on medium speed, scraping down the sides of the bowl, until light and fluffy. It should take 3 to 4 minutes. Add the eggs, one at a time, with the mixer on medium speed and beating well after each addition. Add the vanilla and beat to combine.

Add half the flour mixture to the butter, beating on medium-low until blended. Scrape down the sides of the bowl, add the bananas and sour cream, beating until distributed. Add in the remaining flour, still stirring on medium-low until just combined. Transfer the batter to the prepared pan.

Bake in a preheated oven for about 1 hour and 10-15 minutes, until a cake tester inserted in the centre comes out clean the bread pulls away from the side of the pan. Cool in tin for 10 minutes, then turn out to a rack to cool completely.

Makes 1 loaf.

Notes:

• I used well-drained 1% yogurt.
• For the loaf pictured, the pan was the darker metal kind. For that reason, I reduced the oven temperature by about 15 degrees F to keep the exterior tender and golden. If this is the case with yours, you may need to adjust the cooking time accordingly.

Sunday
Jul082007

To enjoyable excess

I am passionate about a lot of things. Food, fashion, family and film are all consuming pleasures of mine. But there is something I'm equally fanatical about which might seem somewhat unexpected. I love words.

Language, jargon, definitions - I find all of these simply fascinating, and have for as long as I can remember. Back in school, in Linguistics and Latin classes, lectures on morphology and derivatives were red letter days on the calendar.

Yes, I know. I'm a geek.

But I cannot help myself. I adore nuanced meanings, the way that one right word can say so much more than paragraphs and paragraphs of the wrong ones. A well-chosen phrase can be a study in succinct economy or art itself.

Mellifluous is as poetic as its definition. While lush is lovely, verdant is all the more exuberant in its profusion.

Lately though, one word has been (excuse the pun) on our lips most often - surfeit. With the local trees and fields heavy with fruit, the early summer harvests of berries, currants, sweet peas and cherries are gracing our table. Truly nothing less than luxuriant abundance, we're most often seen feasting on this bounty of beautiful produce out of hand.

However, when recently bestowed with not one, not two, but three baskets of garnet-hued cherries, I felt the little jewels deserved a bed of buttery cake to fully appreciate their depth and colour. Sweet and plump, the gorgeous orbs almost melt, turning luscious and silky while staining the almond-rich batter with their juices.

One taste, and even words aren't necessary - just enjoy.

Almond butter cake with cherries

Ingredients

1 1/2 sticks (12 tablespoons) unsalted butter, at room temperature, plus extra for greasing the pan
1 1/2 cups of granulated sugar, plus extra for preparing the pan
4 large eggs
2/3 cup sour cream
1 teaspoon pure vanilla extract
1/2 teaspoon grated lemon zest
1 cup ground almonds
1 1/4 cups all-purpose flour
1 teaspoon baking powder
1/2 teaspoon salt
2 cups fresh cherries, pitted and split in half
1/3 cup flaked almonds
1 1/2 tablespoons Demerara sugar (optional)

Preheat oven to 350°F (175°C). Generously butter a 10" springform pan, and set aside (see note).

In the bowl of a stand mixer with the paddle attachment, or with a hand beater, cream together the butter and sugar until light and fluffy. Lower the speed and add the eggs, one at a time, beating until fully incorporated. Scrape down the sides of the bowl as needed.

In a small bowl, combine the sour cream, vanilla extract and lemon zest.

In another bowl, sift together the almonds, flour, baking powder and salt.

Add half the flour to the butter mixture, beating until blended. Add the sour cream mixture, beating again and scraping down the sides of the bowl. Finish with the remaining flour and stir until just combined.

Spread the batter evenly in the prepared pan. Sprinkle over the cut cherries, the almonds and the Demerara sugar (if using). Bake for approximately 40 minutes, or until lightly golden and a cake tester comes out clean.

Notes:

• For the photograph, I used two 11"x8"x1" removable bottom tart pans. The cakes took about 30 minutes to bake.
• Alternatively, lightly toast the almonds in a dry pan before topping the tart.
• Other fruits, plums and apricots for example, can be substituted.