Instagram Instagram

Entries in snack (26)

Thursday
Sep102009

To be prepared

When I first begin to get sick, I begin to clean. Ambitiously.

It's not just scrubbing dishes or sweeping the floors or folding the laundry. It's cleaning the windows and flipping the mattresses and vacuuming under the fridge. When my mind is fuzzy with sickness, I can't stand a similar feeling of clutter in my surroundings.

It drives me bonkers. But at least, in the best of circumstances, my fits of crazy result in cookies.

Last Tuesday I organized the closets. Most specifically, the Closet We Dare Not Open. That's the closet in our little den, a stash and dash repository, the closet that still had sealed boxes from when we moved to this house two years ago.

Yes, you heard me right. Sealed boxes. And yes, it has been two years.

Don't look at me like that. You try moving with a toddler when you're already expecting your next and let's see how well you do in getting all your boxes unpacked.

Ahem. Now that we've thrown open the quite literal door on my secret shame, back to the present. And those boxes. These were the boxes of nonessentials - the last boxes we'd packed from our previous house, thrown together as we made our way out the door.

In one I found a storage container (empty) for CDs, an unopened package of paper, a sketchpad and some dice. In another, pictureless fames and ice cube trays. And in another, I found my recipe notebooks.

The pair of books, pale slate with Prussian blue trim, date back even further than the move to this house. They are from A Time Before; the time before a ring had ever been put upon my finger and before my child had ever been placed in my arms. A time before I started writing here.

My Mum had recipe folders when I was growing up. She'd snip out and tack in recipes from magazines and newspapers, these interspersed with handwritten cards bearing the bosom-held secret recipes of family and friends. Hers were fat and full with both the memory and the promise of delicious meals.

When I decided I it was time to become an adult, I started my own recipe notebooks. It seemed the Thing to Do. I'm a gatherer by nature, and had a considerable stockpile of magazines and notepads full of material ready and waiting. I remember stacking the clippings into neat little piles, considering my methods of categorization. I had Breakfasts, Soups, Salads, Breads, Sides, Vegetarian Mains, Meat, Poultry, Cakes, Pies, Frozen Desserts and Sweets. (All of this compulsion fell neatly in line with my established addiction to stationery.)

I was ready, at least recipe-wise, for Sort of Life I was Going to Lead. My books were as much a compilation of tried recipes as it was of the recipes I wanted to try in that future. I was going to be prepared.

Prepared for everything except baking cookies. In curating these books, I overlooked cookies entirely. Filled anticipation for future dinner parties that would surely require an elegant sweets course, I hopped, skipped, and jumped my way past biscuits and wafers and biscotti. The closest I come to a cookie is the solitary mention of brownies.

I think I thought that cookies were dull. I know. I was young and stupid. Cookies were one of the first things I'd learned to bake, due in large part to Mrs. Wakefield and those bags of morsels, and I believe I had the fool idea that adulthood was the time to move on from such childish pursuits.

Thank goodness for being lazy. And in love. I started those books years ago, but I never finished them. They went into the back of a closet, moved from apartment to apartment to house to house, untouched. Instead of collecting, I started cooking, and the next thing I knew I was here.

And the person that is here is a mum who bakes cookies. Often.

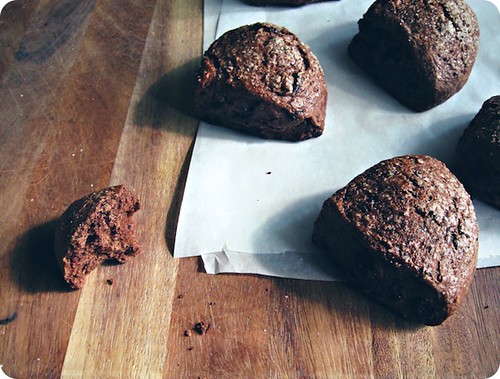
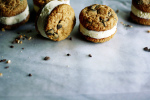
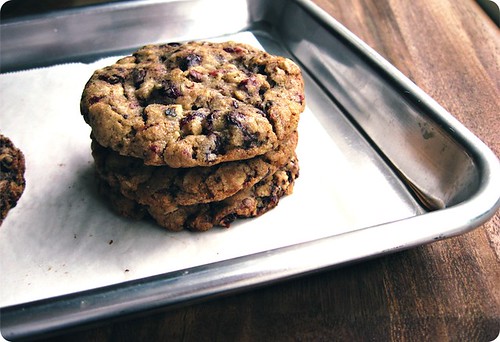
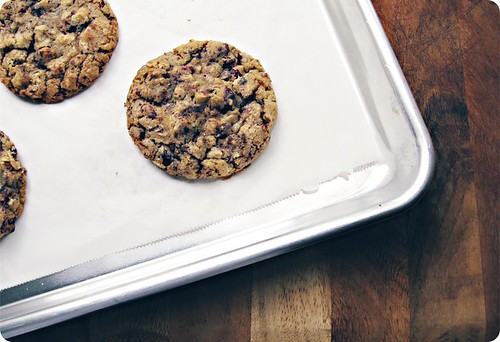
A move to rectify the lapse in those books' the cookie section is long overdue, and I have already got my choice for the first one in. These Chocolate-chunk Oatmeal Cookies with Pecans and Dried Cherries are sigh-inducing balance of sweet, salty and subtly sour. They are speckled and nubbly, with a crisp rim and a soft centre, and deep cracks that travel their surface. And oh my stars, they are perfectly delicious. So delicious that they deserve a fan club.

We can have the meetings at my place. Once I'm done cleaning.

Chocolate-chunk Oatmeal Cookies with Pecans and Dried Cherries
From Cooks Illustrated published May 2005.

Ingredients
1 1/4 cups unbleached all-purpose flour
3/4 teaspoon baking powder
1/2 teaspoon baking soda
1/2 teaspoon salt
1 1/4 cups old-fashioned rolled oats
1 cup pecans, toasted and chopped
1 cup dried sour cherries or cranberries, chopped coarse
4 ounces bittersweet chocolate, chopped into small pieces about the size of chocolate chips
3/4 cup (12 tablespoons, 1 1/2 sticks) unsalted butter, softened but still cool
1 1/2 cups packed dark brown sugar
1 large egg
1 teaspoon vanilla extract

Preheat oven to 350°F (175°C), with racks on the top and bottom thirds. Use parchment paper to line several standard baking sheets and set aside.

In a bowl, sift together the flour, baking powder, baking soda and salt. Set aside.

In another bowl combine the oats, pecans, dried cherries and chocolate.

In the bowl of a stand mixer with the paddle attachment, or with a hand mixer, cream together the butter and sugar on medium speed until light and fluffy, scraping down the sides of the bowl as needed. With the mixer on medium-low, add the egg and beat until incorporated.

Scrape down the sides of the bowl, turn the mixer down to low, and add the flour mixture to the bowl. Stir until just combined. Finally incorporate the oats, nuts, fruit and chocolate. Do not overmix. Turn off the mixer and use a rubber spatula to give the dough a final stir and make sure that all the ingredients are incorporated.

Using an ice cream scoop to measure 1/4 cup portions of dough. Roll these portions lightly between your hands, then place 8 on each baking sheet, spaced evenly. Wet your hands and lightly press the dough to a 1-inch thickness. Bake the cookies, two trays at a time, in a preheated oven for 12 minutes. Rotate the trays top to bottom and back to front and bake for another 8 minutes or until the cookies are uniformly golden, but still wet in the middle. You might think that they're undercooked, but you're wrong - resist the urge to overbake, they will set up further as they cool.

Remove from the oven and cool on the baking sheets for 5 minutes before transferring to a wire rack. Store cooled cookies in an airtight container at room temperature.

Makes 16.

Notes:
• Although the original recipe specifies table salt, I used kosher salt instead; I enjoy the uneven saltiness of kosher in cookies, but that is only a personal preference.
• Continuing on the topic of salt, I sprinkled the pecans with some fine grained sea salt when they were toasted. This subtle salinity hummed steadily beneath the complexity of the chocolate and cherries.
• Wanting a slightly more modest cookie, I divided the dough into 24 and reduced my cooking time accordingly.

Thursday
Aug062009

In their dusky depth

The other day, I met a chair. It is solid walnut, and exceedingly handsome, with four sturdy legs and a softly-curved back that cradles the body and encourages the spine to recline. It is worn in places, with dings and nicks from days upon years spent in service.

It is a chair that should belong to a studious sort, one predisposed to a woolen wardrobe, layers upon layers of gray and black. The sort of owner that bears the weight of a long scarf wound endlessly about the neck.

One that would ponder in this chair. Consider. Discuss obscure literature and drink very strong coffee. By candlelight, most likely, or at most an antiquated fixture that would offer the dimmest circle of golden light.

It is a chair that encourages me to change my name, to cast off the trappings of the world, to instead choose to "live in a garret and eat black bread". It would be quite theatrical. And I would be quite comfortable.

That is, as long as you understand that by garret I mean our den, and by black bread I mean bittersweet chocolate scones. This chair inspires scones. Demands them, even.

Slightly austere in their sweetness, and comparitively meager in their fat, these scones revel in their dusky depth. The tenderness of their crumb is mitigated by the edge of cocoa and shot through with bitter chocolate.

You can call me Nina if you'd like.

Bittersweet Chocolate Scones
Think of these as the biscotti of the scone world; slightly sandy textured and subtle in their sweetness, and pair well with coffee and tea.

Ingredients
2 cups all purpose flour
1/3 cup unsweetened cocoa powder
1/3 cup granulated sugar, plus additional for sprinkling
2 teaspoons baking powder
1/4 teaspoon salt
8 tablespoons (1 stick) cold unsalted butter, diced
1 large egg plus one egg white for glazing
3/4 cup 18% cream, chilled
1 teaspoon vanilla extract
4 ounces bittersweet chocolate, chopped

Preheat oven to 400°F (200°C). Use parchment paper to line a standard baking sheet and set aside.

In the bowl of a stand mixer with the paddle attachment, combine the flour, cocoa powder, sugar, baking powder and salt. On the machine's lowest setting, cut in the chilled butter until the mixture resembles course meal. The butter should be in small pieces approximately the size of peas. Alternatively, sift together the dry ingredients in a medium bowl, then cut in the chilled butter with two knives or a pastry cutter. As before, the blend should be rough, with uneven pieces of butter still visible.

Lightly whisk together the whole egg, cream and vanilla. With the machine running still on low (or stir), pour the liquids slowly into the flour and butter mixture, stirring until just combined. Small bits of butter should still be visible, but almost all the flour should be incorporated. With the mixer still on low, stir in the chocolate. If proceeding by hand, use a wooden spoon or silicone spatula to fold and turn the flour mixture to incorporate the liquids, then stir in the chocolate. Do not overmix.

Turn the dough out onto a lightly floured surface. Working quickly, gently knead the dough, folding and pressing gently until fairly smooth. Divide the dough into three, and shape each ball of dough into a 4" round about 3/4"-1" thick. Cut each round into four wedges, and place on the prepared baking sheet. Once finished, brush each scone with the egg white and sprinkle with extra granulated sugar.

Bake in preheated oven for about 15 minutes, or until the tops are matte and the cut sides look flaky and dry. When fully cooked, scones should feel light for their size and sound almost hollow when tapped underneath. Cool on a wire rack for at least 5 minutes. Best served warm.

Makes 12 smallish scones.

Notes:

• As mentioned, these scones are only modestly sweet. For a more indulgent treat, substitute the bittersweet chocolate for a semisweet or even a milk chocolate. I encourage cutting up bar chocolate rather than morsels as bar chocolate is free from the stabilizers in chips that help them keep their shape. The uneven shards of chocolate will slightly melt into the dough, turning into little puddles of oozing darkness.
• For added richness, substitute 1/2 cup heavy cream for the 18% and use 2 large eggs instead of 1. In this variation you may need more flour for the dough to come together. Add it sparingly, a bit of stickiness to the dough is good.

Friday
Jul032009

Worse things I could do

I have something to say, but I am unsure as to how I should feel about it. Should I be proud? Ashamed? A bit sheepish, maybe?

Luckily, I think we're all friends here, and I can be honest with you. Here goes.

We bought a deep fryer.

There, I said it. It's out in the open. There's no turning back now. We've stepped up from a deep-sided pot on the stove, we're in the big leagues now. We've gone Pro. We have purchased an appliance, a unitasker at that, designed for the sole purpose of deep-frying food. Scandalous!

What is it about the notion of a deep fryer that sends hands clutching for the proverbial pearls? I nary blink an eye at baking cake after cake, or cupcake or cookie, but speak of a deep fat thermometer and I feel as though my ladylike self should swoon at the thought.

I should, but I don't.

Instead, I am giddy. On Canada Day there were donuts. The day after, there were fries. Alas, even as I happily plunged the slivered fingerlings into the depths of the fryer, I could hear the imagined whispers of a hundred judgements.

"Sure, she started with fries. But they were just a gateway."
"Next thing you know there will be churros. Or maybe even beignets."
"From there it is a slippery slope into the hard stuff. Corndogs."
"Mark my words, shel'll be battering Twinkies within a month and buying bulk packs of chicken wings on the sly."
"You know, I wouldn't put it past her."

Not to worry, I can handle my deep-frying. I promise. So what if I get a bit of a thrill when I shake the chip basket? A little golden-fried perfection never hurt anyone. There are worse things I could do.

Now if you will excuse me, I have to get back to my fryer.

Garlic Fries with Mustard and Horseradish Mayonnaise
For the fries, prepare them how you like to - fat, thin, shoestring, chips, whatever (see below for links to recipes). Make enough for the size of your crowd or your appetite. This recipe is for about a standard quantity of fries for 4 people. Any leftover mayonnaise should be refrigerated immediately, and can be used as a sauce, a dip or sandwich spread.

Ingredients
1/2 cup mayonnaise
2 teaspoons fresh lemon juice, or a good squeeze, optional
1 tablespoon prepared horseradish
2 teaspoons grainy Dijon mustard
1 teaspoon prepared English mustard
Kosher salt and freshly cracked black pepper to taste

Fries (see above)
1-2 cloves garlic, minced
1/4-1/2 teaspoon dried red chili flakes, optional
1/2 cup fresh flat leaf parsley, chopped
Kosher salt to taste

Prepare the mayonnaise first. In a bowl, stir together the first five ingredients. Taste, and adjust for seasoning with kosher salt and freshly-cracked black pepper to taste. If the sauce is to thick, thin with additional lemon juice or some warm water. Cover and refrigerate for at least 30 minutes to allow the flavours to mellow and blend.

When the fries are hot and crisp, toss through with the minced garlic, dried red chili flakes (if using) and almost all of the parsley, reserving some for garnish. Season with kosher salt. Tumble the fries out onto a platter, with the mayonnaise alongside. Sprinkle with the reserved chopped parsley.

Recipes for French Fries:
Easier French Fries from Cook's Illustrated, cold oil fried (via their site, requires login). Sticky Crows likes this method, and has some step-by-step photos.
Twice-Cooked French Fries (via Epicurious)
Oven-Baked Fat Chips with Rosemary Salt by Jamie Oliver (via the Food Network)
Definitive Fries (from here, ages ago)

Notes:
• I used the Cook's Illustrated recipe for these, which use a technique also attributed to Joël Robuchon. You start your potatoes in cold oil, turn the heat to medium-high, then leave them be. Once they start turning golden, you stir the fries about a bit to prevent sticking, then cook until crisp. Details and specifics are available in through the links provided. I had feared that the fries would be greasy, poking at them suspiciously now and again, but they were surprisingly not so. According to the accompanying article, this method yields a result with less oil absorption than traditional double-fry methods.

• Homemade mayonnaise is my preference, but if you are at all unsure on the freshness of your eggs, your favourite store-bought brand is more than fine. If using homemade, less lemon juice might be needed, depending on the recipe.

Thursday
Jun182009

Truly, deeply, madly obsessed

picnic on the porch

With all the cupcakes we've been making lately (and cakes, there were two cakes too, but that's another story), you would think I would be done with treats. You would think I'd be happy to leave my baking cupboard closed for few days and give the mixer a rest. You would think that would be sensible of me.

If you think that, you're thinking wrong.

It isn't my offense though, this return to sugar and sweets. I didn't mean to become truly, deeply, madly obsessed with the thought of gingersnaps for two weeks straight. I blame it on the Grandparents.

I know it sounds cruel that I would place blame squarely on the well-intentioned shoulders of my children's grandparents, but I call them like I seem them.

It's totally their fault.

Benjamin came home with a cookie from Grandma. Not surprising, of course, as Grandmas are made of cookies (and Grandpas of candy, don't you know). Being the sweet little man he is, Ben was prompt to share his snack with me as soon as he walked through the door. His sweetness may have been slightly influenced by his inability to open the wrapper the cookie was presented in, but really that is neither here nor there.

Crinkle, rip, crunch.

Half for him, half for me. I popped my share in my mouth distractedly. I wasn't really even in the mood for a cookie. Benjamin is deeply offended if you do not immediately enjoy the treat that has been shared, so I obliged.

Munch, munch, munch. Drat.

This cookie was really very good. Really especially good. And gone. My mind raced to tack down its characteristics; a thin biscuity, wafery cookie. Not cakey in the least. Not crumbly, not delicate, but crisp. Spice, yes, there was spice involved. Where's that wrapper? Think, think, think. Cinnamon, definitely. And ... something else. Ginger? Yes! Ginger was it.

Now I needed to make gingersnaps.

I am proud to say my restraint won out, momentarily at least. I exercised the utmost self-control and waited until the flour had settled and the candle smoke had cleared from our birthday celebrations before I did what I had to do.

I Googled.

After a few search modifications, and a few pages I struck gold. Well, sugar dusted bronze, to be exact. David Lebovitz. Chez Panisse. Gingersnaps. Done.

Chez Panisse Gingersnaps
Unsurprisingly, considering their origin, these are some of the best gingersnaps I have tried. They are spicy without being claustrophobically so. The cinnamon and pepper add deeper dimensions of heat, complimenting the bright fire of ground ginger.

Recipe (via DavidLebovtiz.com)

Notes:

• The dough is quite soft, so I used this method to form the logs prior to chilling: wrap loosely-formed dough on the centre of a piece of parchment paper, fold the paper over. Then, holding the two edges of the parchment parallel to the dough together, press a ruler against the log to compress.
• I preferred my cookies on the smaller size, rolling the log out to a 1-inch diameter. The cooking time ran about 8 minutes. I also experimented with different thicknesses of cookies, some whisper-thin and crackling, others fat and tender. All were delicious.
• I regard to baking times, these cookies do brown quickly, going from deeply-golden to overly-toasted in a matter of moments. Keep an eye on them.
• On a particularly-vulnerable evening, I may have taken two of the thicker, softer cookies and sandwiched them with vanilla bean ice cream in between. And on another night, there may have been peaches too. And it may have been nothing short of wonderful.

Help! I am also looking to contact Dor, one of the winners of the Martha Stewart Cupcakes giveaway; please e-mail me at tara [at] sevenspoons [dot] net to claim your prize by Thursday, June 25th, 2009. After that date, an alternate winner will be selected.

Thursday
May142009

As often as I should

If I close my eyes, I can conjure up the memory of my father sharing dried figs with my brother and me when we were little.

I cannot see Dad but I know he's there. We are rather young, as the image in my head is of our childhood home and not the house we moved to in later years. The edges of are a bit fuzzy, and the details are not all there. It is a moment tied to nothing specific, really. For all I know, it is not just one moment, but instead the layered culmination of the countless times we snacked on the honey-sweet fruit. But when I think of dried figs, I think of back then.

Those figs were plump hockey pucks, squat with fat, golden cheeks. Slightly flattened on top and bulging at the sides, speared through their centres and strung together like a wreath. You had to pry them apart from their neighbours, each bearing the impression of the next. Their skin was wrinkled and tough, resistant to be bitten, but giving way to the jammy pulp, gritty with seeds in the most delicious way. Sugary sand. They were toothsome, and as far as I was concerned, the only way one ate a fig.

It sounds silly to say, but I do not think of dried figs as often as I should. More often than not I am distracted by the lures of the fresh variety. Fresh figs are foxy little minxes. On the outside, they are mysterious and musky, with soft skin ranging from the palest green to the deepest black. On the inside, they reveal a flesh that can boast a strawberry blush or a claret stain. They are tempestuous, with only a brief window when they're are at their glorious, ripe peak. After that, it is a steep decline into decay, and the utmost despair.

To be frank, fresh figs are sexier; tearing one open feels like an act of abandon.

But dried figs are making a comeback around here. You see, dear reader, I am wholly besotted with figs that (for the sake of clarity) could be called semi-dried. They were labelled dried in the market, but are a whole other personality than those that I remember from years ago. These tawny darlings retain their flat-bottomed teardrop shape, but their taste is more concentrated than fresh; a deeply resiny, sticky sweetness is found beneath the only-slightly leathered skin. Truly figgy, through and through.

When I came across a recipe for Rosemary Raisin Pecan Crisps, my first thought was "yum!" as it is no secret that I am known to snack now and again. My second thought was "FIGS" all uppercase and grand, as I set about the task of integrating my new crush into the cobblestoned crackers. Swapping out walnuts for pecans as that was what was on hand, and thyme for the rosemary, the crisps were easily adapted to my fancy. The method is simple, requiring pretty much one bowl and a double-bake process similar to biscotti.

The result, a golden stack of crisps as beautiful as Moroccan tiles, each a mosaic of nuts, seeds and fruit. Unforgettably good.

Fig and Walnut Crisps

Adapted from Julie, with thanks.

Ingredients
softened butter for greasing pans, or nonstick spray
1/2 cup chopped walnuts
1/4 cup pepitas (green pumpkin seeds)
1 1/2 cups all-purpose flour
1/2 cup whole wheat flour
2 teaspoons baking soda
1 1/2 teaspoons salt
2 cups buttermilk
1/4 cup brown sugar
1/4 cup honey
1 cup coarsely-chopped dried figs
1/4 cup shelled sunflower seeds
1/4 cup sesame seeds
1/4 cup flax seed, bashed about in a mortar and pestle or pulsed in a spice grinder
2 teaspoons fresh thyme, chopped

Preheat oven to 350° F. Lightly grease two 8-by-4-inch loaf pans, or spray with a nonstick spray.

Spread the walnuts and pumpkin seeds on a baking sheet. Roast in the oven, stirring occasionally, for about 7-10 minutes until fragrant but without much colour. Remove from the baking sheet and into a bowl, then set aside to cool.

In a large bowl, sift together the flour, baking soda and salt. Add the buttermilk, brown sugar and honey and stir until combined. Add the reserved nuts and remaining ingredients and stir until just blended.

Pour the batter into the prepared pans. Bake until golden and puffed, about 45 minutes. When touched, the loaves should spring back immediately. Turn the loaves out of their pans to cool completely, right side up, on a wire rack.

The bread is easiest to slice when fully-cooled. Leave the loaves to rest at room temperate for a few hours or, following Julie's suggestion, once cooled wrap them well in clingfilm and pop them in the freezer. Once frozen, slice the loaves as thin as you can and place the slices in a single layer on an ungreased cookie sheet.

Reduce the oven heat to 300° F and bake them for about 15 minutes, then flip them over and bake for another 10 minutes, until crisp and deep golden. Cool completely on a wire rack, then store in an airtight container.

Makes about 8 dozen crackers.

Notes:

• I used a particularly robust dark honey, which caused the loaves to brown a bit quicker than expected. This was not a problem, but something to keep in mind. In the future, I think I will use a lighter honey, not only for the browning but also for a more subtle taste.
• Next time I make these (and there will most definitely be a next time), I am planning on using miniature loaf pans for a two-bite size.