Instagram Instagram

Entries in recipe (119)

Thursday
Aug062009

In their dusky depth

The other day, I met a chair. It is solid walnut, and exceedingly handsome, with four sturdy legs and a softly-curved back that cradles the body and encourages the spine to recline. It is worn in places, with dings and nicks from days upon years spent in service.

It is a chair that should belong to a studious sort, one predisposed to a woolen wardrobe, layers upon layers of gray and black. The sort of owner that bears the weight of a long scarf wound endlessly about the neck.

One that would ponder in this chair. Consider. Discuss obscure literature and drink very strong coffee. By candlelight, most likely, or at most an antiquated fixture that would offer the dimmest circle of golden light.

It is a chair that encourages me to change my name, to cast off the trappings of the world, to instead choose to "live in a garret and eat black bread". It would be quite theatrical. And I would be quite comfortable.

That is, as long as you understand that by garret I mean our den, and by black bread I mean bittersweet chocolate scones. This chair inspires scones. Demands them, even.

Slightly austere in their sweetness, and comparitively meager in their fat, these scones revel in their dusky depth. The tenderness of their crumb is mitigated by the edge of cocoa and shot through with bitter chocolate.

You can call me Nina if you'd like.

Bittersweet Chocolate Scones
Think of these as the biscotti of the scone world; slightly sandy textured and subtle in their sweetness, and pair well with coffee and tea.

Ingredients
2 cups all purpose flour
1/3 cup unsweetened cocoa powder
1/3 cup granulated sugar, plus additional for sprinkling
2 teaspoons baking powder
1/4 teaspoon salt
8 tablespoons (1 stick) cold unsalted butter, diced
1 large egg plus one egg white for glazing
3/4 cup 18% cream, chilled
1 teaspoon vanilla extract
4 ounces bittersweet chocolate, chopped

Preheat oven to 400°F (200°C). Use parchment paper to line a standard baking sheet and set aside.

In the bowl of a stand mixer with the paddle attachment, combine the flour, cocoa powder, sugar, baking powder and salt. On the machine's lowest setting, cut in the chilled butter until the mixture resembles course meal. The butter should be in small pieces approximately the size of peas. Alternatively, sift together the dry ingredients in a medium bowl, then cut in the chilled butter with two knives or a pastry cutter. As before, the blend should be rough, with uneven pieces of butter still visible.

Lightly whisk together the whole egg, cream and vanilla. With the machine running still on low (or stir), pour the liquids slowly into the flour and butter mixture, stirring until just combined. Small bits of butter should still be visible, but almost all the flour should be incorporated. With the mixer still on low, stir in the chocolate. If proceeding by hand, use a wooden spoon or silicone spatula to fold and turn the flour mixture to incorporate the liquids, then stir in the chocolate. Do not overmix.

Turn the dough out onto a lightly floured surface. Working quickly, gently knead the dough, folding and pressing gently until fairly smooth. Divide the dough into three, and shape each ball of dough into a 4" round about 3/4"-1" thick. Cut each round into four wedges, and place on the prepared baking sheet. Once finished, brush each scone with the egg white and sprinkle with extra granulated sugar.

Bake in preheated oven for about 15 minutes, or until the tops are matte and the cut sides look flaky and dry. When fully cooked, scones should feel light for their size and sound almost hollow when tapped underneath. Cool on a wire rack for at least 5 minutes. Best served warm.

Makes 12 smallish scones.

Notes:

• As mentioned, these scones are only modestly sweet. For a more indulgent treat, substitute the bittersweet chocolate for a semisweet or even a milk chocolate. I encourage cutting up bar chocolate rather than morsels as bar chocolate is free from the stabilizers in chips that help them keep their shape. The uneven shards of chocolate will slightly melt into the dough, turning into little puddles of oozing darkness.
• For added richness, substitute 1/2 cup heavy cream for the 18% and use 2 large eggs instead of 1. In this variation you may need more flour for the dough to come together. Add it sparingly, a bit of stickiness to the dough is good.

Thursday
Jul302009

Loudly quiet

I was sitting in the front room yesterday, my head bent over a book and my back to the open window. I was preoccupied with the words on the page, and did not fully note the gaining volume of the wind through the trees. What pulled me out of my concentration was a feeling against my neck. It was raining. With that rain had come a cool that entered the house like a spirit, slipping past the windowsill and settling in.

In our part of Ontario, and from what I hear of the Northeastern United States, it has been one wet summer. In fact, we've had rain of every character.

We were prey to fierce thunderstorms. They felt dramatic and enticingly-wild at first, but gathered with such quick extremity that they more than approached threatening. Lightning lit up the sky with violent fireworks. Thunder rattled nerves and set the mind on edge. The house creaked and groaned with the impact of a thousand million blows.

There was the rain that seemed without beginning or end. It was gloomy weather, and the world seemed perpetually sodden. The rain dripped dispiritedly. Damp, dismal, dreary, and just about any other depressing (another one!) d-beginning adjective you could think of.

There came the rain that wasn't rain at all, but something in between humidity and a low-flying cloud. Wetter than fog, the air was full with suspended moisture that slicked all surfaces, both inside and out.

The moments of sunshine we've seen have been fleeting. Most days there has been rain, or the threat of impending rain, with foreboding clouds looming on the horizon, all around.

What with all of our watery forecasts, the smile that tugged at my lips that stormy afternoon might seem unexpected. But despite all the woebegone times of pressing our foreheads to the windowpanes and watching rain fall down, I still fall hard for the moments of enchantment those same rains can bring.

Take yesterday, with its unnatural midday darkness. All was loudly quiet as I moved from room to room, the constant patter of plump drops muffling most other noises. Now and again I could hear children, the little girls from down the street I think, dancing in puddles. Splashes then squeals. Their giggles sharp and joyful, cutting through the din. The street shone wet, gleaming black as the streetlights flickered on.

It was magic. And it was the perfect time for some baking.

Although fruit desserts reign supreme come summertime, I usually think of crisps as the ideal for cooler months. With their slowly-stewed bottoms and buttery crusts, they feel best suited to autumn evenings curled up by the fire. But with the rain we've had, the decidedly unfussy nature of a crisp fit in beautifully with my afternoon plans of busying myself indoors. And as that rain brought cool as its travelling companion, I didn't mind the idea of turning on the oven.

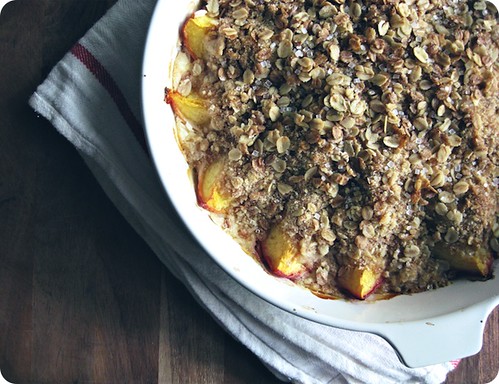
This peach crisp is gloriously uncluttered with nothing else but the essentials. Nothing taxing to muddle about with, only a layer of sweet cream cushioning plump, honeyed crescents of peach, buried beneath an oaten rubble. When baked, the fruit is exceedingly voluptuous, its flesh supple and its juices seeping out.

Each bite of golden peach was soaked heavy with the memory of sunshine. The rain doesn't seem so bad after all.

Sour Cream and Peach Crisp
My own thrown-together interpretation of a variety of sources, so I'll send credit to Deb for reminding me of the combination.

Ingredients
2/3 cup all purpose flour
1/3 cup whole wheat flour
1/3 cup old-fashioned, large flake oats (not instant)
1/3 cup brown sugar
4 tablespoons granulated sugar, divided
1-2 teaspoons crystalized ginger, finely minced (optional)
1/4 teaspoon salt
1/2 cup (1 stick, 8 tablespoons) cold, unsalted butter, cut into cubes
8 ounces sour cream
1 teaspoon vanilla extract
1 1/2 pounds peaches, cut into quarters
Coarse or sanding sugar for sprinkling (optional)

Preheat oven to 400°F (200°C).

In a large bowl, or in the bowl of a stand mixer with a paddle attachment, combine flours, oats, brown sugar, 2 tablespoons granulated sugar, ginger and salt. Using a pastry cutter, or the mixer on its lowest speed, cut the butter into the dry ingredients until the mixture resembles a coarse, uneven meal. Set aside.

In a medium bowl, stir the remaining 2 tablespoons of granulated sugar with the sour cream and vanilla until dissolved.

Take a few scant handfuls of the oat mixture and sprinkle it in the bottom of a 9-inch pie plate or shallow dish. Spoon over the sour cream, spreading to cover completely. Arrange the peach slices, cut side up, on top of the cream. Sprinkle the remaining oat mixture over the fruit, leaving a bit of fruit peaking out of the edges. Sprinkle with coarse sugar.

Bake in the preheated oven for 35-40 minutes, or until the cream is set, the peaches are tender and the topping is golden brown. Allow to cool on a rack for a few minutes, serving warm or cold.

Makes one 9-inch crisp.

Notes:

• I used a five-grain rolled cereal instead of oats alone.
• I leave the skin on the peaches, as it helps them retain their shape and I like the prettiness of their scarlet-stained tips. If you prefer to blanch the skins and remove them, feel free to do so.
• This crisp is best when the peaches truly juicy; it is their moisture that helps set the cream into a layer akin to a custard, rather than becoming stodgy and dry. If you have any concerns, you can follow Sean's suggestion of adding a handful or two of berries (blackberries or raspberries would be particularly good).

Thursday
Jul232009

Just you wait

I know that I am more than late for our usual Thursday chat, but please forgive my tardiness. Due to an oversight on my part, our guest of honour was not ready for their debut. But finally, the wait is over.

The pickles have arrived. And what pickles they are. But before I tell you about their end, let me tell you of how they came to be.

At the market last weekend, I overheard a farmer describing the progress of his crop. Speaking in glowing tones that were more than tinged with pride, he detailed the specific traits of each of his vegetables; how they grew, their likes and dislikes, their particular qualities. He had a quiet intensity about the way he spoke, an enthusiasm that shone through his words. It was evident that the subject matter was of the utmost importance - more than a livelihood, but a passion as well.

There's just one of the many reasons why he's our Regular Vegetable Man.

On that same weekend his summer squash was especially fine, slender and small, with delicate, taut skin that was perfectly blemish-free. I do not know what it was that sparked my idea of pickling these little darlings, but a pickle was my particular plan. It was a surprising choice, as my usual tendency is to grill, griddle, or roast. But a pickle seemed the order of the day, the promise of crisp, cold slices of squash, puckery and astringent had me salivating. As a good pickle should.

Five days after salting, boiling and sealing the jars tight, I opened the fridge with fork in hand and anticipation in my heart.

That's the thing about pickles, they require faith. Commitment. They take their own sweet time. You do what you can to set things in motion, but that is where your influence ends.

What you put in the jar is as acrid and overblown, eye-twitchingly sour. But wait, just you wait, this is only the beginning. From there, the pickle really takes care of itself. The wait is transformative, and what happens inside that glass coccoon is entirely out of your hands. But your patience will be duly rewarded.

And rewarded I was. After those days, the vinegars had mellowed and muted, now balanced with a sweetness that is first to the tongue. The heat follows, with the indisputable zing of acid to finish.

I wonder if our Vegetable Man might like a jar.

Bread and Butter Pickled Summer Squash
Inspired by a recipe from Simply Recipes. As these are meant as a refrigerator (chilled) pickle, they are not processed after being canned. Please see the link above for valuable tips on sterilizing and, if you so choose, how to process pickles so that they are shelf-stable.

Ingredients
2 pounds mixed summer squash, cut into 1/8-inch slices (I used yellow summer squash and zucchini)
1 medium white onion (about 8 ounces), halved and thinly sliced
2 heaping tablespoons kosher or pickling salt
2 cups ice cubes
2 cups cider vinegar
1 cup white vinegar
2 1/4 cups sugar
2 teaspoons whole mustard seeds
3/4 teaspoon celery seed
3/4 teaspoon whole black peppercorns
1/4 teaspoon turmeric
1/2 teaspoon crushed red pepper flakes
1/8 teaspoon or a good pinch of ground cloves

Toss squash and onion with salt in a large colander set over a bowl. Add ice, toss again. Refrigerate, tossing occasionally for 3 hours. This process will increase the crunch of the pickles by drawing out excess water. Once the 3 hours have passed, drain the squash, picking out any ice cubes that might remain. Rinse well and drain again.

Bring vinegars, sugar, mustard and celery seeds, peppercorns, turmeric, red pepper flakes and ground clove to a boil in a saucepan. Add the drained squash and onion. Ladle into 4 hot sterilized pint jars, leaving about 1/2 inch below each jar's neck. Carefully wipe rims of jars with a clean, damp cloth. Cover tightly with new, sterilized lids and screw tops. Cool to room temperature, then store in the fridge for 3-5 days before opening.

Makes 4 1-pint jars, to be eaten within weeks of making.

Thursday
Jul162009

Not a moment's hesitation

I am not one to make quick decisions. I never have been. My paralizing inability to make snap judgements is a periodic subject of (loving) mockery amongst those who know me best.

When going out to dinner, I might be inclined to sneak a glance at menu in advance, just to be well-versed in my options. (But then, my best-laid plans are frequently set aside as soon as the specials are announced). Suffice it to say, I am a planner, a ponderer. A girl who likes to know her options.

But in regards to certain things, special things, passion overrules reason and I have my answer ready before you've finished the question. Unsurprisingly, considering my fixation with breads, bagels are one of those things.

In my mind there is but one city that can claim the crown of bagel-making supremacy, and that is Montreal, Quebec, Canada. Full stop. No equivocation. Not a moment's hesitation.

Montreal is home to the best bagels around. There, I said it.

Bring it on New York. I'm ready for you, Toronto. As far as I am concerned, Montreal's bagels are a thing unto themselves, a whole other (perfect) incarnation of bagel. And although I hasten to mention I've not had many bagels overseas, I'm nonetheless willing to cross my heart and raise my right hand to pledge my allegiance to those from the town where I was born. And no, I will not admit a trace of bias there.

I cannot overstate the lure of a freshly-baked bagel from one of the many storied shops in Montreal. To truly understand their greatness, I implore you, get thyself to la belle province as soon as possible and experience them firsthand. You'll thank me later.

In the off chance that you are not willing to take me at my word, let me count the ways that Montreal's bagels are the so divine.

They inspire devotion. Example; I used to know someone whose job would take him from Toronto to Montreal on a fairly-regular basis. On those glorious days when he would return, those waiting for his arrival would set upon him almost immediately, hungry for their fix. Setting upon the nondescript brown bags he held in his clenched fists, they would tear them open, their contents would spill across out, sesame seeds scattering everywhere.

I was one of those people. Sometimes I would stash an extra bagel in my purse to take home. I'm not proud of that fact, but it is true.

The inspire gluttony. Even though nobody, save myself, was "much in the mood for bagels" when I set about baking, our batch of 24 was gone in 48 hours.

You see, Montreal bagels are not the billowing cotton-ball, bite-down-on-a-pillow, overgrown mass of tasteless fluff that so many bagels are these days. These bagels are ropey and irregular in their looks, skinny limbed and gorgeously misshapen. Before baking, the bagels are dipped in a honey-laced bath, the sweetness reinforcing the trace of malt syrup in the dough. They are studded with seeds, sesame or poppy, before being torched in requisite wood-fired ovens. Those seeds get scorched in spots, turning gold and brown, their nuttiness brought forth by the flames full throttle. The interiors are tightly crumbed, dense and chewy. There is no mistaking a these for a glorified roll.

Now which bagel shop in Montreal gets my heart? Don't get me started.
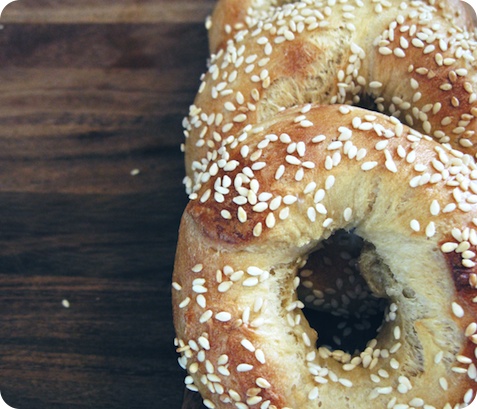
Montreal Bagels
While I do not have a wood-fired oven at home, these bagels are a close approximation of those from Montreal. From HomeBaking: The Artful Mix of Flour and Tradition Around the World by Jeffrey Alford and Naomi Duguid (Random House Canada, 2003). The ingredient list below is theirs, while the method is my interpretation of their instruction.

As the boiling and baking of bagels is a bit of a procedure, it is best to have all equipment at hand . When ready to begin, have a slotted spoon and baking peel (or a baking sheet to use as a peel) at the ready. Put the sesame seeds or poppy seeds on a large, shallow dish, and have a cooling rack nearby.

Ingredients for dough
2 teaspoons granulated sugar
1 cup lukewarm water
1 tablespoons active dry yeast
2 tablespoons wheat malt syrup (see note)
1/2 cup warm water
1 large egg, room temperature
1 tablespoon vegetable oil
2 teaspoons salt
About 4 cups all-purpose flour

Ingredients for shaping and topping
3 tablespoons honey
About 1 cup hulled sesame seeds or black poppy seeds or some of each

In a medium bowl, or the bowl of a stand mixer with the dough hook attached, dissolve the sugar in the lukewarm water. Stir in the yeast. In a small bowl, dissolve the wheat malt syrup into the 1/2 cup warm water. Stir in the egg, oil, and salt. Set aside.

If proceeding by hand, add 1 cup of the flour to the yeast mixture and stir to combine. Add the wheat malt mixture and then 2 more cups of flour and stir, always in the same direction, until a smooth dough forms. It will be quite moist. Add the remaining 1 cup of flour and stir to incorporate. The dough will be quite stiff. Turn the dough out onto a lightly-floured work surface and knead for 5-10 minutes, until it becomes smooth and elastic.

If using a stand mixer, add 2 cups of flour to the yeast mixture and mix on low speed for about 1 minute. Add the wheat malt mixture and the remaining 2 cups of flour, and stir on the lowest speed for 3 to 4 minutes. Turn out onto a lightly-floured work surface and knead briefly, until the dough is smooth and elastic.

Place the dough in a clean medium bowl and cover with plastic wrap. Let rise for 1 3/4 to 2 hours, until the dough has doubled in volume and is soft. Punch down the dough gently, recover and let rise for another 1 to 1 1/2 hours.

If you have one, place a baking stone or unglazed quarry tile (see note) on a rack in the upper third of the oven. Preheat oven to 450°F (230°C).

Cut the dough into quarters, working with one piece at a time and covering the remaining in plastic wrap. Divide the piece of dough into 6 equal pieces (weighing approximately 2 ounces each). Roll each small piece out into a skinny rope, around 10 to 12 inches long. Press down on the rope, rolling it back and forth under your palms against the work surface, pushing out and gently towards the ends. The dough is very elastic, shrinking back if overworked. It is easiest to work two ropes at a time, alternating between the two and allow each to rest in between.

When the rope is to the appropriate length, lay the dough over one hand, with one end across your palm and the other hanging free. Bring this second end across the back of your hand to form a loop, and bring the two ends together, overlapping by about an inch. Pinch the ends together, then bring them down under your hand against the work surface, rolling them together gently. Place bagel on a parchment-lined baking sheet and repeat the process with the remaining 5 pieces of dough. Cover with a cotton cloth and let stand for 15 minutes.

Meanwhile, bring 8 cups of water to a gentle boil in a wide 4-to-6-quart pot. Add the honey and stir to dissolve. Gently slide 3 bagels into the boiling water; they may sink for a moment, but should break the surface within 10 seconds. Use the back of the slotted spoon to gently press the bagels back under the water now and again, letting them boil for a total of 45 seconds. The should be slightly puffed. Remove the bagels using the slotted spoon and move them directly to the sesame or poppy seeds. Roll and press the bagels into the seeds, coating well, then place them on your baking peel or a parchment-lined baking sheet, leaving about an inch between them. Repeat the process with the remaining 3, placing them beside the first 3.

Bake for about 8 minutes on the baking stone or parchment-lined baking sheet, then use a long-handled spatula to turn them over and bake for another 5 to 7 minutes, until golden brown.

As soon as you put the bagels in to bake, start shaping the next batch of 6. Remove the baked bagels from the oven to a cooling rack, allow the stone to recover for a couple of minutes, then bake the second batch. Repeat until all of the bagels have been shaped, boiled and baked.

Makes 24. Best eaten the day they are made, or can be split and frozen in a well-sealed freezer bag.

Notes:

• I do deviate from Alford and Duguid's direction regarding size, upsizing their bagels slightly from (when raw) 1 1/2 ounces to 2 full ounces. To follow their lead, cut the quarters of dough into 8 pieces instead of 6, resulting in 32 finished bagels.
• For those who do not have a baking stone, I remembered a tip from ages ago regarding the use of cast iron pans for pizzas. I tried the method, using my basic 10-inch skillet, to particularly fine results. Michael Ruhlman suggests inverting the pan, but I didn't. A flat top cast-iron griddle would be ideal.
• Wheat malt syrup is a grain product used in bread dough to assist in rising and to develop a deeper, more complex taste. Wheat malt syrup is available at specialty and natural food stores.
• A thorough discussion of Montreal's bagels can be found at Tasting Menu.

Monday
Jul132009

There were fireflies

People are already starting to talk about summer in the past tense. And it makes me want to weep.

I am evidently the vulnerable sort. Or just a trifle prone to the dramatic. Either way, its making me a bit emotional. We're only just barely two weeks into the month of July, and I've heard the hushed mention of back-to-school. Really?

A few days ago I was innocently flicking through a clothing catalogue and noticed sleeves were getting longer than those shown a month before. And while I might have gazed longingly at a particularly-tweedy ensemble for a nanosecond, I rallied myself against that affection. Surely the season cannot be over already, before it has even really begun?

We've only had one carnival, the tomatoes are still green and I have not had nearly enough time in the pool. And the other night, there were fireflies. There is still so much of summer left.

I hope that there are days to come with time for walks on warm evenings, the sort that lead you to meander through neighborhoods until the last of the light. For strong coffee in the quiet of the early morning, when the air is already thick with heat. And opportunity to savour sunwarmed peaches, and raspberries picked by eager hands, brought home in baskets stained purple with juice.

And picnics. Days and days for picnics, please and thank you. Did I tell you? We've become the sort to picnic. Picnic folk, if you will. Give me a tree, a patch of grass, even a rock and a box of takeout, I am blissful to sit and while away a minute or an hour or an afternoon. I will find each and every possible excuse to pack up our boys, pack up some nibbles, and make our way to the great outdoors - even if that just means the backyard.

I consider this cake, this raspberry-rippled marvel you see before you, to be my sticking point, my line drawn in the sand against all of those eager to write off the season and look forward to fall.

A buttery base is drowned in an ocean of blue-black raspberries, dolloped with more batter, then covered in a nut-flecked crumble. It is a cake full of berries and peaches and it is ideal for a picnic. Pretty as it is, it is a sturdy sort of beauty. It is a cake as easily eaten out of hand as it is with a knife and fork, and truth be told, I prefer the former method. It makes for effortless picnic-ery.

No siree Summer, I'm not letting go of you yet.

Raspberry Peach Crumb Cake
Adapted from a Better Homes and Gardens recipe, via Inn Cuisine. It is a fine dessert, a grand snack, and I'm sure nobody would sneer if it was offered alongside that aforementioned early-hour coffee. My wonderful (and super cool) nephews, ages 5 and 10, were kind enough to pick these for us - bringing in not one, but two generous harvests. Thanks to you both for your enthusiasm and stained knees.

Ingredients
6 ounces raspberries, fresh or frozen, I used fresh wild black ones
2 medium peaches, peeled and sliced into chunks
1 tablespoon cornstarch
1/4 cup granulated sugar
1 egg
1/2 cup sour cream
1/2 cup milk
1 teaspoon pure vanilla extract
2 1/4 cups all-purpose flour
3/4 cup granulated sugar
3/4 cup butter, cold and diced
1/3 cup sliced (flaked) almonds
1/2 teaspoon baking powder
1/2 teaspoon baking soda
1/8 teaspoon salt
coarse sugar for dusting

Preheat an oven to 350°F (175°C). Butter and flour a 10-inch tart pan with a removable bottom, or a 10-inch springform pan.

In a medium saucepan, toss the raspberries and peaches with the cornstarch to coat. Stir in the sugar and cook over medium heat until bubbling and thick. Remove from the heat and mash the berries and peaches slightly. Take approximately 1/3 of the mashed fruit and transfer to a medium bowl. Set a sieve over the same bowl, and a little at a time, push the remaining fruit through the mesh to remove any seeds and large pulp. Remove the sieve, discard the seeds and pulp, then stir the purée to combine with the reserved fruit. Set aside to cool slightly.

For the cake, in a medium bowl stir together the sour cream, milk, egg and vanilla. Set aside.

Combine the flour and sugar in a large bowl. Using fingers, two knives or a pastry cutter, cut the cold butter into the flour mixture until you have a texture that resembles coarse meal. Remove 1/2 cup of the crumb mixture to a small bowl and stir through the almonds. Set aside.

To the remaining flour mixture, whisk in the baking powder, baking soda and salt. Make a well in the centre of the dry ingredients and pour in the liquids. Using light, quick strokes, stir until only just combined. The batter should be thick, but smooth.

Take about 2/3 of the batter and spread it across the bottom and up 1-inch of the sides of the prepared pan. Damp fingers or a wet palette knife make easy work of this. Spoon the reserved raspberry filling over the batter, gently spreading to cover and leaving a 1/2-inch border at the edge. Dollop irregular mounds of the remaining dough over the fruit layer, again using damp fingers or a wet palette knife to coax the batter to almost cover - some gaps are good. Top with the crumb topping over all and then sprinkle with a couple of teaspoons or so of coarse sugar.

Place on a sheet pan and bake in a preheated oven for 30-35 minutes or until a cake tester inserted in the centre comes out clean and the cake starts to pull away from the sides of the pan. Cool, in pan on a rack, for 15 minutes. Remove from the tart pan and serve at warm or at room temperature.

Makes one 10-inch cake.

Notes:

• Although I have not tried it, I am certain another berry or fruit could be substituted in the filling. The original recipe asked for all raspberries, with all the pulp and seeds removed. I am one who believes that sometimes a bit of seeds is a good thing, somehow making the berries taste all the more like themselves, and so I kept some seeds for texture. By all means though, follow what is your preference.

Page 1 ... 4 5 6 7 8 ... 24 Next 5 Entries »