Instagram Instagram

Entries in bread (10)

Thursday
Jul162009

Not a moment's hesitation

I am not one to make quick decisions. I never have been. My paralizing inability to make snap judgements is a periodic subject of (loving) mockery amongst those who know me best.

When going out to dinner, I might be inclined to sneak a glance at menu in advance, just to be well-versed in my options. (But then, my best-laid plans are frequently set aside as soon as the specials are announced). Suffice it to say, I am a planner, a ponderer. A girl who likes to know her options.

But in regards to certain things, special things, passion overrules reason and I have my answer ready before you've finished the question. Unsurprisingly, considering my fixation with breads, bagels are one of those things.

In my mind there is but one city that can claim the crown of bagel-making supremacy, and that is Montreal, Quebec, Canada. Full stop. No equivocation. Not a moment's hesitation.

Montreal is home to the best bagels around. There, I said it.

Bring it on New York. I'm ready for you, Toronto. As far as I am concerned, Montreal's bagels are a thing unto themselves, a whole other (perfect) incarnation of bagel. And although I hasten to mention I've not had many bagels overseas, I'm nonetheless willing to cross my heart and raise my right hand to pledge my allegiance to those from the town where I was born. And no, I will not admit a trace of bias there.

I cannot overstate the lure of a freshly-baked bagel from one of the many storied shops in Montreal. To truly understand their greatness, I implore you, get thyself to la belle province as soon as possible and experience them firsthand. You'll thank me later.

In the off chance that you are not willing to take me at my word, let me count the ways that Montreal's bagels are the so divine.

They inspire devotion. Example; I used to know someone whose job would take him from Toronto to Montreal on a fairly-regular basis. On those glorious days when he would return, those waiting for his arrival would set upon him almost immediately, hungry for their fix. Setting upon the nondescript brown bags he held in his clenched fists, they would tear them open, their contents would spill across out, sesame seeds scattering everywhere.

I was one of those people. Sometimes I would stash an extra bagel in my purse to take home. I'm not proud of that fact, but it is true.

The inspire gluttony. Even though nobody, save myself, was "much in the mood for bagels" when I set about baking, our batch of 24 was gone in 48 hours.

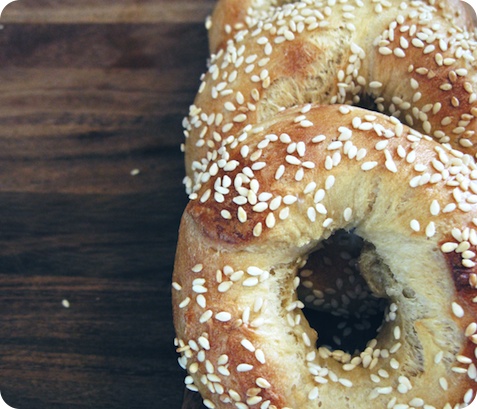
You see, Montreal bagels are not the billowing cotton-ball, bite-down-on-a-pillow, overgrown mass of tasteless fluff that so many bagels are these days. These bagels are ropey and irregular in their looks, skinny limbed and gorgeously misshapen. Before baking, the bagels are dipped in a honey-laced bath, the sweetness reinforcing the trace of malt syrup in the dough. They are studded with seeds, sesame or poppy, before being torched in requisite wood-fired ovens. Those seeds get scorched in spots, turning gold and brown, their nuttiness brought forth by the flames full throttle. The interiors are tightly crumbed, dense and chewy. There is no mistaking a these for a glorified roll.

Now which bagel shop in Montreal gets my heart? Don't get me started.

Montreal Bagels
While I do not have a wood-fired oven at home, these bagels are a close approximation of those from Montreal. From HomeBaking: The Artful Mix of Flour and Tradition Around the World by Jeffrey Alford and Naomi Duguid (Random House Canada, 2003). The ingredient list below is theirs, while the method is my interpretation of their instruction.

As the boiling and baking of bagels is a bit of a procedure, it is best to have all equipment at hand . When ready to begin, have a slotted spoon and baking peel (or a baking sheet to use as a peel) at the ready. Put the sesame seeds or poppy seeds on a large, shallow dish, and have a cooling rack nearby.

Ingredients for dough
2 teaspoons granulated sugar
1 cup lukewarm water
1 tablespoons active dry yeast
2 tablespoons wheat malt syrup (see note)
1/2 cup warm water
1 large egg, room temperature
1 tablespoon vegetable oil
2 teaspoons salt
About 4 cups all-purpose flour

Ingredients for shaping and topping
3 tablespoons honey
About 1 cup hulled sesame seeds or black poppy seeds or some of each

In a medium bowl, or the bowl of a stand mixer with the dough hook attached, dissolve the sugar in the lukewarm water. Stir in the yeast. In a small bowl, dissolve the wheat malt syrup into the 1/2 cup warm water. Stir in the egg, oil, and salt. Set aside.

If proceeding by hand, add 1 cup of the flour to the yeast mixture and stir to combine. Add the wheat malt mixture and then 2 more cups of flour and stir, always in the same direction, until a smooth dough forms. It will be quite moist. Add the remaining 1 cup of flour and stir to incorporate. The dough will be quite stiff. Turn the dough out onto a lightly-floured work surface and knead for 5-10 minutes, until it becomes smooth and elastic.

If using a stand mixer, add 2 cups of flour to the yeast mixture and mix on low speed for about 1 minute. Add the wheat malt mixture and the remaining 2 cups of flour, and stir on the lowest speed for 3 to 4 minutes. Turn out onto a lightly-floured work surface and knead briefly, until the dough is smooth and elastic.

Place the dough in a clean medium bowl and cover with plastic wrap. Let rise for 1 3/4 to 2 hours, until the dough has doubled in volume and is soft. Punch down the dough gently, recover and let rise for another 1 to 1 1/2 hours.

If you have one, place a baking stone or unglazed quarry tile (see note) on a rack in the upper third of the oven. Preheat oven to 450°F (230°C).

Cut the dough into quarters, working with one piece at a time and covering the remaining in plastic wrap. Divide the piece of dough into 6 equal pieces (weighing approximately 2 ounces each). Roll each small piece out into a skinny rope, around 10 to 12 inches long. Press down on the rope, rolling it back and forth under your palms against the work surface, pushing out and gently towards the ends. The dough is very elastic, shrinking back if overworked. It is easiest to work two ropes at a time, alternating between the two and allow each to rest in between.

When the rope is to the appropriate length, lay the dough over one hand, with one end across your palm and the other hanging free. Bring this second end across the back of your hand to form a loop, and bring the two ends together, overlapping by about an inch. Pinch the ends together, then bring them down under your hand against the work surface, rolling them together gently. Place bagel on a parchment-lined baking sheet and repeat the process with the remaining 5 pieces of dough. Cover with a cotton cloth and let stand for 15 minutes.

Meanwhile, bring 8 cups of water to a gentle boil in a wide 4-to-6-quart pot. Add the honey and stir to dissolve. Gently slide 3 bagels into the boiling water; they may sink for a moment, but should break the surface within 10 seconds. Use the back of the slotted spoon to gently press the bagels back under the water now and again, letting them boil for a total of 45 seconds. The should be slightly puffed. Remove the bagels using the slotted spoon and move them directly to the sesame or poppy seeds. Roll and press the bagels into the seeds, coating well, then place them on your baking peel or a parchment-lined baking sheet, leaving about an inch between them. Repeat the process with the remaining 3, placing them beside the first 3.

Bake for about 8 minutes on the baking stone or parchment-lined baking sheet, then use a long-handled spatula to turn them over and bake for another 5 to 7 minutes, until golden brown.

As soon as you put the bagels in to bake, start shaping the next batch of 6. Remove the baked bagels from the oven to a cooling rack, allow the stone to recover for a couple of minutes, then bake the second batch. Repeat until all of the bagels have been shaped, boiled and baked.

Makes 24. Best eaten the day they are made, or can be split and frozen in a well-sealed freezer bag.

Notes:

• I do deviate from Alford and Duguid's direction regarding size, upsizing their bagels slightly from (when raw) 1 1/2 ounces to 2 full ounces. To follow their lead, cut the quarters of dough into 8 pieces instead of 6, resulting in 32 finished bagels.
• For those who do not have a baking stone, I remembered a tip from ages ago regarding the use of cast iron pans for pizzas. I tried the method, using my basic 10-inch skillet, to particularly fine results. Michael Ruhlman suggests inverting the pan, but I didn't. A flat top cast-iron griddle would be ideal.
• Wheat malt syrup is a grain product used in bread dough to assist in rising and to develop a deeper, more complex taste. Wheat malt syrup is available at specialty and natural food stores.
• A thorough discussion of Montreal's bagels can be found at Tasting Menu.

Thursday
May072009

Almost there

I love a good backyard.

Don't get me wrong, a front yard is a wonderful thing. A front yard, and specifically a good front porch, is the place to watch the world go by. It is see and be seen territory, the perfect vantage point to watch the life of your neighbourhood play out in front of you.

In childhood, a front yard is where you meet your friends. Its the soccer field and the skate park. And, in my personal experience, the backdrop for Barbie-related-dramas.

In University the front yard was home to the living room couch, yanked from its indoor confines and released to the great outdoors. It was the spot to lounge away the first sunny days of the season, preferably with beverage in hand.

After that, my front yard was first a fire escape and then a modest balcony, where we sat drinking "classy" wines and pretended to be worldly.

Now, I survey the front yards on our quiet street, with chalk drawings that tattoo the pavement, the toys and bikes and soccer balls left out on the lawns. Gardening tools are nestled by the front door. A watering can sits, stainless steel and gleaming, jewel-bright. Artifacts of the day's adventures and plans for the days ahead.

From our front step I nod to the neighbours, and Benjamin's own technicolour hieroglyphs decorate the pavement.

But a backyard is a whole other world. Even though it is outside, it feels more intimate, more like an extension of your home. The front yard is about show and the backyard is about substance. It is where we really live out of doors, and where others must be invited to gain entry.

This is only our second summer with our backyard, and were becoming fast friends. Last summer we were occupied with the business of having a baby, so this feels like our first opportunity to truly understand its rhythms; the way the light falls throughout the day, the cycle of plants we've inherited, and the time to revisit the haphazardly-laid plans we made a year ago.

It's got good bones, our backyard does, but is in need of a bit of a facelift. If our yard were in a movie, it would be cast as the "plain" girl who has a messy ponytail and always keeps her head down, the one that is suddenly altogether gorgeous once someone takes the time to look.

Its there. I am sure of it. The possibility of specialness, the promise of nooks and crannies for little boys to find magic, a home for a little vegetable patch, and most surely a hammock. We're almost there, our heads full of plans and with days circled on the calendar devoted to the endeavour.

All of that will come in time, and right now I am more than happy with this space outside we have all to ourselves. The lilac is in bloom, and the leaves that form our summertime roof are slowly beginning to unfurl. There is space to run and crawl and cook and dig and plant. And there is my spot, just a beeline out the back door, four strides at most, at the top of the two stairs that lead down from the deck. Sit down with a snack, and suddenly its a picnic. Stretch out, and your toes can reach the grass.

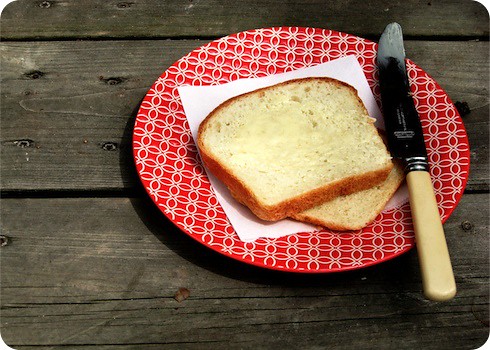
Julia Child's Homemade White Bread Our Way
Another thing that is almost there is my attempts at making the perfect sandwich bread at home. I have been experimenting away, fiddling with yeast and rising times, with quantities of butter and sugar. Sorry about the wait, but one family can only eat so much bread at a time, and we're not a one bread sort of household.

I have realized that we like our bread plain enough not to overshadow what's put on it, but with enough personality that it is not merely a mode of transport for other ingredients. Right now, this variation on Julia Child's recipe is our usual as far as sandwich-style goes. The longer rise gives more substantial texture, and the reduced amount of yeast is preferable to our tastes. Previous columns regarding sandwich bread are here and here.

Recipe (via Slashfood)

Current changes:
• Use only 1 teaspoon of active dry yeast, allowing the dough to rise for about 2-2 1/2 hours for first rise, or until doubled in size. The second rise time will also be longer, about 90 minutes to 2 hours.
• Use 2 teaspoons of sugar instead of 1 tablespoon.
• Use 6 tablespoons of butter instead of 4 tablespoons.
• I usually dust the tops of the loaves with a bit of flour before baking, and sometimes melt 1 tablespoon of butter to brush on the loaves after the flour.

Wednesday
Jan142009

Tales from the breadbox, chapter two


Honey-hued and tender, Soft American-style Sandwich Bread, from the book Artisan Bread in Five Minutes a Day.

Here I go. Again.

It started with chocolate cake, then it was peanut butter cookies. Now, it's sandwich bread.

You see, I'm not one to leave well enough alone. I have fidgety digits, hands that almost twitch at the prospect of fiddling with an idea. An idea will capture my attention, and I find it nearly impossible to let go; even if I attempt to shove it aside to deal with the matter at hand, the idea it will remain, incessantly tugging at the edge of my attention.

Lest I begin a nervous tick, or start yelling at my own brain, I invariably give in to my impulses.

After asking for direction on soft sandwich bread recipes to try, I was offered a myriad of helpful suggestions. Wonderful help, and to be sure there was no way I was going to let the guidance go to waste. So I began baking, first Julia Child's Classic White Bread from Baking with Julia (William Morrow Cookbooks, 1996), then the Soft American-style Sandwich Bread (pictured above) from the fantastic Artisan Bread in Five Minutes a Day (Thomas Dunne Books, 2007). Both were delicious, each in their own way (more on that in a moment).

What these breads solidified for me was my criticism of Ina Garten's Honey White Bread; too sweet and too eggy. I simply do not like eggs in my sandwich loaves. I like eggs in some breads, Egg Breads to be specific, but those breads I consider a whole other food entirely.

In my standby everyday sandwich breads, I want something milder, subtle but with flavour, appropriate for both savoury and sweet uses and without too much richness. Egged breads have their own place, but in my mind that place is not alongside tuna fish at lunchtime. Your mileage may vary.

Back to the recipes I did like. The Soft American-style Sandwich Bread from Jeff Hertzberg and Zoe Francois, authors of Artisan Bread in Five Minutes a Day. With a more modest amount of yeast than some other recipes I have seen, and a longer resting time, this bread had a remarkably deep flavour. The inclusion of melted butter resulted in a crumb that was substantial yet light, yielding but still hearty enough to be sliced cleanly and well-suited as the base for even Dagwood-esque creations. The recipe yields three loaves, I sent some dough home with an especially-cherished friend, and she found it exactly the sort of bread she likes.

My heart, however, was not wholly won over. The aforementioned butter was delicious, but almost too much of a good thing (perish the thought). While I have never been one to shy away from full fat in all its glory, the quantity of fat was again a distraction. It became about the butter, and not about the bread as a whole.

The other strike against this loaf was that I'd made Julia Child's Classic White Bread earlier in the week and I was already rather smitten. I should have known America's grand-dame of gastronomy would have the (almost) perfect recipe. The dough was gorgeous to work with, laminated with less softened butter than the Soft American-style, and sublimely silky. The loaves rose to impressive heights when baked, cresting well over the edge of the pan and sporting a burnished-gold tan. Their texture was spot-on; soft and tender, and slightly springy to the tongue. Most probably attributed to the thorough kneading the dough requires, it was this texture that made this loaf truly exceptional.

But even as I was deeply mired in a blissful state of carbohydrate-induced languor, I had a nagging impulse. An annoying little idea of how I could take this great recipe and (possibly, hopefully) make it better.

After years of eating breads with minimal leaveners and slow rises, I have come to prefer their flavour to that of quicker-risen loaves. Even in my flour-dusted stupor of bready goodness, I could not get past the fact that I could taste the yeast in Child's bread. As such, while I favoued the overall results from her recipe, I still found the longer-rested breads from Hertzberg and Francois, and Jeffrey Alford and Naomi Duigud (HomeBaking, Random House Canada, 2003) appealing. Simply put, they had an understated complexity that is lacking in heavily-yeasted breads.

So what to do? Well, although I am no expert on the matter, I am going to attempt an experiment. I am going to combine the elements of all three recipes, to see if I can manage to capture the best traits of each. Possibly this will end in utter disaster, possibly in delicious bread. I'll be sure to share the results.

Oh, and did I mention that I have found the excuse to bake two chocolate cakes for Benjamin's upcoming birthday, just so I can try out another side-by-side comparison?

Neurotic behaviour? Yes. Delicious dividends? Oh yes, very. So how can I complain about that?

Happy baking.

Wednesday
Oct152008

Happenstance

Wednesday; before and after.

A Year of Mornings and simply breakfast.

I am an avid fan of both of these works. While there is, admittedly, something slightly voyeuristic about the intimate glimpses of the every day, what is truly charming is the quiet beauty in them. These unstructured vignettes of domesticity are peaceful, restrained, and somehow elegant all at once.

Inspired by their efforts, I am starting a little project. Outside of my regular columns, for a week I will post a photo (maybe more) of compositions that spontaneously come together; moments as I come upon them, meals as we serve them. No styling, all in a standard format, minimal (if any) post production. No fidgeting or fussing.

It is a bit of whimsy on my part, but I hope you enjoy the peek nonetheless.

Maria and Stephanie's current project; a year of evenings, is already well underway.

Monday
Sep102007

Baking, Sunday style

After weeks of a heat that turned once-lush lawns to straw, this past Sunday dawned misty and gray. A constant drizzle pattered its way through the leaves, and the mercifully cool air smelled of damp earth.

It was a day to spend indoors, in the comfortable routine of business about the house, getting bits and pieces in order and lazily flipping through the weekend newspapers. By far, my favourite sort of day.

As far as food went, our menu was decided by consensus - following only our inclinations without worry of schedules or agenda. Immediate and extended family members stopped by for a cup of of tea, a chat or general diversion.

Some time in the early afternoon I caught wind of collected whispers, mentioned cravings for something as a snack, a cake perhaps. Nothing decadent, just a nibble of something a bit sweet.

Banana bread; this old fashioned loaf seemed the perfect fit for a rain-soaked Sunday afternoon. Studded with moist chunks of banana, their richness undercut by the acid twang of yogurt, this was the sort of loaf that sits on the counter with a knife nearby. For the remainder of the day we snacked, coming back for another slice, another crumb, whenever temptation arose.

Yogurt banana bread
This recipe yields a meltingly moist loaf with a cake-like texture. However it may look though, do not be fooled. This bread is not the overly sweet, dessert variety. The perfect partner to coffee, it is much more subtle in its charm.

Ingredients
1 cup all purpose flour
1/2 cup whole wheat flour
1 1/4 teaspoons salt
1 teaspoon baking powder
1/4 teaspoon baking soda
1/4 teaspoon ground cinnamon
1/4 teaspoon ground nutmeg
3 large, ripe bananas, mashed
1/2 cup well-drained yogurt (see note)
4 1/2 ounces unsalted butter at room temperature, plus more for greasing the pan
3/4 cup granulated sugar
1/4 cup firmly-packed brown sugar
2 eggs
1/2 teaspoon vanilla extract

Preheat oven to 350°F (175°C). Lightly butter a standard, 9"x5"x3" loaf pan.

In a medium bowl, sift together the flours, salt, baking powder and spices.

In another bowl, mix the yogurt and banana together until well blended. Set aside.

In the bowl of a stand mixer fitted with the flat beater, beat the butter and sugar on medium speed, scraping down the sides of the bowl, until light and fluffy. It should take 3 to 4 minutes. Add the eggs, one at a time, with the mixer on medium speed and beating well after each addition. Add the vanilla and beat to combine.

Add half the flour mixture to the butter, beating on medium-low until blended. Scrape down the sides of the bowl, add the bananas and sour cream, beating until distributed. Add in the remaining flour, still stirring on medium-low until just combined. Transfer the batter to the prepared pan.

Bake in a preheated oven for about 1 hour and 10-15 minutes, until a cake tester inserted in the centre comes out clean the bread pulls away from the side of the pan. Cool in tin for 10 minutes, then turn out to a rack to cool completely.

Makes 1 loaf.

Notes:

• I used well-drained 1% yogurt.
• For the loaf pictured, the pan was the darker metal kind. For that reason, I reduced the oven temperature by about 15 degrees F to keep the exterior tender and golden. If this is the case with yours, you may need to adjust the cooking time accordingly.

Page 1 2