Instagram Instagram

Entries in baking (10)

Thursday
Jun302011

Every last bit I could

crust

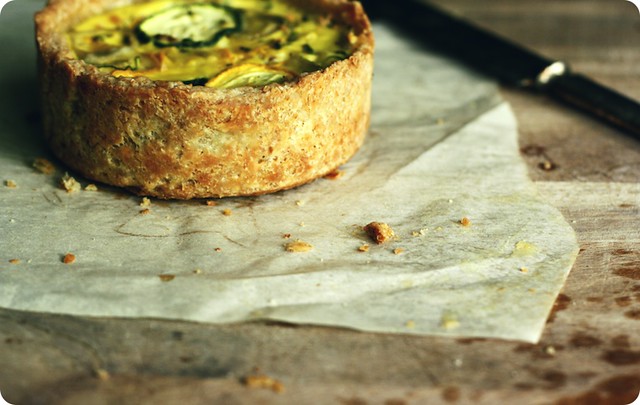
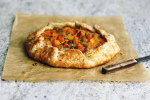
This was the leftover. The stand in, the understudy that usually never gets the spotlight. I made two tarts, one with a pretty, fluted edge, the other roughly, haphazardly patched together with the remaining scraps of dough.

This was, to reiterate, the latter. The afterthought.

Yet, I'm fond of it. I'd even say that its imperfection is its charm. Its saved grace is really through no talent of mine, but rather owed to the recipe for the crust. It's the Whole Wheat Pastry Dough from the book The Sweeter Side of Amy's Bread (Wiley, 2008), and it's one to keep handy. My quiche thanks my friend for sending it in my direction.

I'll interrupt myself for a moment, as I can't make, eat, or even consider quiches without mention of her remembrance, that the introduction of quiches and tarts into my life is something I want to attribute to an aunt of mine. The instinct is possibly incorrect, but she has the nostalgic credit.

She wasn't an aunt by blood, but by friendship, one of those people in your life that was simply there, from the very beginning. A thought of her brings the smell of Yardley's English Rose perfume, the particular accent of her voice, and the time she let me dictate from memory a recipe for double chocolate cookies. By that I mean, I was five years old and most assuredly making it up as I went along, but she made the biscuits just as I said, and even pretended them a triumph, even though they were stuck irrevocably to the pan.

That aunt, she made quiches. Sausage rolls too, and we'll get there someday. Her quiches were always the same, or at least in my memory they were, eggs and cream with bacon. Nothing fancy. We'd eat them cold, straight out of the fridge or soon after. Then there would be tea, and maybe a butter biscuit from the navy tin she kept on the kitchen table.

So when I made our lunch, there was bacon involved, with thin rounds of squash and a sweet tangle of shallot, some grated Parmesan for resonant salinity to balance the lull of cream and egg, all poured into a whole wheat crust. We're back to that.

This pastry, unlike those cookies, is an actual triumph; heavy with butter, granted a freshness from cream cheese well matched to the whole wheat flour's gentle nuttiness. The dough goes supple and is quite forgiving as it's worked, which was, beyond my frugality, one of the reasons I thought to cobble together the scraps and use every last bit I could. 

I'm glad I did, because after lunch I found myself chasing the last of the crumbs off my plate with the tines of my fork. Plucking up those evasive fragments with the tips of my fingers as needed. The pastry is afternoon-nap-dream-worthy, the kind I think the best of dreams, as this is one of the best of pastries. I liked it for its subtlety and substance, for its structure of alternating tender and crisp. I liked how it baked up golden with speckles of brown still visible. 

It's a good dough to know. 


******

A few newsy things to pass along, while we're chatting:

A piece I did for Saveur.com, on cakes and decorating. It was such fun to do, and I hope you enjoy it.

I'm rather lucky to have collaborated with someone pretty darn special for the inaugral issue of Kinfolk Magazine. It launches July 15.

UPPERCASE's summer issue will be out soon; Janine put together a slideshow of some of the content, including a glimpse of my contribution - a story on Peach Melba Ice Pops

Here's to happy days, friends!

*******


Whole Wheat Pastry Crust
From the book The Sweeter Side of Amy's Bread by Amy Scherber and Toy Kim Dupree (Wiley, 2008). Though I've only talked about the pastry today, the book is a wealth of homey, welcoming recipes. The Pecan Sticky Buns are already famous around here.

From the authors: The whole wheat flour and cream cheese give this pastry a special flavour and texture that area perfect complement to our Spinach and Mushroom Quiche filling. This crust is surprisingly light, rich, and tender, so you might want to use the remaining dough scraps to make savory turnovers with any meat and/or vegetable scraps that are hiding in the refrigerator.

Ingredients
146 g / 5.15 oz / 2/3 cup Unsalted butter, cut into 3/4-inch dice
112 g / 4.0 oz / 3/8 cup + 1 tablespoon Cream Cheese, cut into 1/2-inch dice
52 g / 1.83 oz / 4 tablespoons Ice Water
2 1/2 teaspoons Apple cider vinegar
158 g / 5.60 oz / 1 cup + 1 1/2 tablespoons Unbleached all-purpose flour
86 g / 3.0 oz / 1/2 cup Whole wheat flour
3/4 teaspoon Kosher salt
1/8 teaspoon Baking powder

Freeze the diced butter and cream cheese for at least 30 minutes. In a small cup or bowl, combine the ice water and the vinegar.

In a food processor fitted with the metal blade, combine the 2 flours, salt and baking powder and process them until they are just combined. Add the frozen chunks of cream cheese and process again for 15 seconds or until the mixture looks like coarse meal. Add the butter chunks and process again for 10 to 15 seconds, until the largest pieces of butter are about the size of peas. Transfer the mixture to a large bowl and sprinkle it with the ice water mixture. (If you don't have a food processor, mix the dry ingredients in a large bowl with a wire whisk and rub very cold, not frozen, cream cheese into the flour with your fingers until it looks like coarse meal. Repeat the process with the very cold, not frozen, butter chunks until the largest pieces of butter are about the size of peas. If the butter starts to feel soft, freeze the mixture for 10 minutes before continuing. Sprinkle the ice water mixture over the flour.) Using your hands, stir the mixture, pressing it together firmly until it becomes a cohesive ball of dough. There shout not be any pockets of dry crumbs remaining. If necessary sprinkle in another 1 or 2 teaspoons of ice water. Place the ball of dough on a large piece of plastic wrap, seal the wrap around the dough, and flatten the ball to make a round 3/4-inch disk. Refrigerate for at least 30 minutes before rolling it out. This dough may be kept refrigerated for up to 2 days or frozen up to 6 months.

Yield: pastry for six 4 1/2-inch quiches or one 9- or 10-inch quiche.


Monday
Apr252011

Most ideally

toasted confetti

How many times, do you think, does it take for something to become a tradition? We're at year three of making icebox cakes every third week in April, and it's starting to feel like it's been our way since forever.

I'm liking it. A whole lot.

After the cakes of everyone else's days of revelry, when we end up on my birthday, this is what we do.

It requires a box of graham crackers, a carton of cream, and this year, a half dozen eggs. A whole half carton, yes, I mean it, because we made coconut pastry cream and it's what took our usual and made it the all-time favourite. The cake is, to all intents, coconut cream pie without the bother of crust and turning on the oven. And despite those subtractions the sum we are left with is the whole shebang of all the its best parts.

It's a step added to past versions, but the pastry cream is a breeze to manage I promise. It's custard that's thickened with a starch in addition to the egg's yolks. It is thick and glossy, and here coconut milk brings flavour and fragrance. Coconut milk has a clean sweetness to its scent, and since there's not too much sugar to muck it up, that elusive essence remains.

Still, I wanted to up the coconut ante so to speak, and my hand settled upon the lid of our jar of shredded coconut. My thought was to not only to further infuse the cream, but I was also thinking of its texture, because I find it difficult to conjure the flavour of coconut without a thought of its chew; most specifically, most ideally, the damp, toothsome centre of a coconut macaroon. And we've got it here in spades.

I had planned on chocolate to pair with the coconut, however a long story, a confusing grocery list, an impending holiday weekend following a weekend of possibly too much of good things, meant I was without the chocolate I wanted, but stumbled upon something even better instead.

Blackberry jam.

A few weeks ago, in a fit of unseasonality, I made blackberry jam in the midst of March. We had frozen berries stocked in our freezer from last season, and in a burst of positive thinking that if I used the icy berries then fresh ones would soon follow at our market, I set about using them up. The jam had sugar, lemon and nothing else besides the fruit.

Now my hand set upon the lid to that jar. I heated a few spoonfuls, added a teacup's worth of fresh (frozen) ones to the thickly bubbling jam, and stirred it all through. Once the fruit squished and softened, barely cooked, I pressed it all through a sieve. Seedless, smooth and glistening, the sauce had body with the direct brightness of fresh fruit. It was the match we needed for our coconut cream - without it the cake would have been too much of the same, all cream and sweet; the jam's the standout, more than chocolate could have been.

It's not often I'll say fruit over chocolate, for the record.

Essential variables sorted, the remaining preparation was as per well-tread habit. Benjamin dealt out graham crackers, our card sharp's getting quite good at Crazy Eights and happy put his skills to culinary use; he lined each up neatly to make a layer in the bottom of the pan. With William's assitance we spread on cream, then jam, and repeated the routine until everything was used up. Overnight, in the cold of the fridge, the crackers turned to cake - puffing up, leveling out, absorbing some of the moisture from the cream so that the filling goes that much more sumptuous. The cake got turned out, slipped into a coat of whipped vanilla cream, and it was ready for the party.

Hooray.

Coconut Cream Icebox Cake
The instructions are for a square cake, which is easier and neater than our attempt at a round. But, if you decide to aim for circular, these amounts will be about right. The cake can also be served, trifle style, in the dish it was made. In that case, you'll only need about 1/2 cup of cream, whipped, to cover the top.

For the Coconut Pastry Cream
1 cup coconut milk
1 cup milk
1 vanilla bean, split
6 egg yolks
3 tablespoons cornstarch
1/3 cup granulated sugar
1/8 teaspoon salt
1/2 cup shredded coconut, see note

For the Blackberry Sauce (makes approximately 1 cup)
1 pound blackberries, hulled and roughly chopped
1/3 cup caster sugar, or thereabouts
1 tablespoon freshly-squeezed lemon juice
A pinch of salt

For the cake
2 cups whipping cream, divided
Coconut pastry cream
1/4 cup confectioner's sugar or thereabouts
A pinch of salt
45 honey graham crackers, the single kind
One recipe blackberry sauce, divided


Make the pastry cream. In a medium saucepan heat the coconut milk and milk. Scrape the seeds from the vanilla pod, stir those into the milks, then pop the pod in too. Bring the mixture to a simmer, then set aside to steep for a few minutes. Remove the vanilla bean.

In a medium bowl, whisk the egg yolks, sugar, cornstarch until smooth, pale and fluffy. Slowly and in a thin stream, pour the hot milks into the egg yolks while whisking constantly. Continue whisking until completely combined. Add in the salt and whisk again.

Strain the mixture back into the saucepan, and bring to a boil over medium heat, whisking constantly. Cook until thickened and the custard boils at its centre. Continue to cook, still whisking well, for another minute.

Off the heat, stir in the shredded coconut. Transfer to a bowl, pressing a piece of clingfilm directly onto the surface to prevent a skin from forming as the pastry cools. Refrigerate until well chilled and firm, around 2 hours.

To make the sauce, put three-quarters of the berries in medium saucepan with 2 tablespoons of the sugar, the salt and 2 teaspoons of the lemon juice. Bring to a boil over medium heat, then reduce to a simmer. Cook, stirring, until the fruit becomes soft and the juices begin to thicken, around 7-10 minutes.

Carefully remove the blackberries to a blender (or use an immersion style), and process until smooth. Push the puréed sauce through a sieve, back into the saucepan. Return to the heat and bring again to a simmer, stirring often. Cook the sauce until it becomes truly thick, with a clear, glossy look, around 10 minutes. At this point you want it on the verge of jammy-ness, close to the texture of hot fudge sauce.

Tumble in the reserved berries, give them a few turns in the pan and cook for another minute or so.

Again with care, remove the blackberries to that blender of yours and whirr them around. Sieve again, this time to a clean container, and set the sauce aside to cool. It should be about the consistency of chocolate syrup, rather than fudge, and will coat the back of a spoon thickly, but not heavily. Once it has cooled to a non-molten level, taste for balance and stir in the rest of the sugar and lemon if need be.

To assemble the cake. Line an 8-by-8-inch metal cake pan with a cross of clingfilm, leaving an overhang on all sides. Set aside.

In the bowl of a stand mixer with the whisk attachment, or in a medium bowl with a hand blender or whisk, begin to whip 3/4 cup of well-chilled heavy cream until the cream begins to hold soft peaks. Take the coconut pastry cream, give it a stir or two to make sure it's smooth, then fold the whipped cream into the pastry cream.

Spread a small amount of the coconut cream on the bottom of the prepared cake pan. Lay 9 crackers, in a 3-by-3 grid, on top of the cream. Spoon one-quarter of the cream on top of the crackers. Then, using an offset spatula, gently spread the cream to cover the crackers entirely. Drizzle a few tablespoons of the blackberry sauce over the cream, spreading to form an even layer if desired. (You will use a generous 1/2 cup of the sauce for the entire cake.)

Top with another layer of graham crackers, continuing the layering until you have 5 layers of crackers and 4 of the pastry cream and blackberry. Make sure to reserve a small amount of cream to cover the last layer of crackers (no sauce on this one).

Cover loosely with a piece of clingfilm, then draw the overhanging clingfilm from the sides up to cover the edges. Refrigerate for at least 8 hours and up to 2 days.

About 1 hour before serving, remove the cake from the fridge and peel back the clingfilm. Invert the cake onto a serving plate, removing the remaining clingfilm from the top and sides. Smooth out the sides with an offset spatula if needed. Place the cake in the freezer, uncovered, to chill for 30 minutes.

In the bowl of a stand mixer with the whisk attachment, or in a medium bowl with a hand blender or whisk, begin to whip the remaining 1 1/4 cup of well-chilled heavy cream. When the cream begins to thicken, sift in the 1/4 cup confectioner's sugar. With the machine set to medium-high, whip the cream until holds a firm peak, but being careful not to over beat.

Take the cake out of the refrigerator and gently spread a thin layer of the whipped cream to cover. Chill the finished cake in the refrigerator for 30 minutes, then serve with the remaining blackberry sauce passed alongside.

Makes one 8-inch square cake.

Notes:

  • Sweetened or unsweetened shredded coconut can be used, depending on your taste. The granulated sugar may need to be adjusted accordingly.
  • In the case you do not have both jam and fresh fruit on hand, this recipe was written with a from-scratch berry sauce. If you do, then simply heat around a 1/4 cup of blackberry jam in a saucepan over medium heat. When it at a simmer, add 1/2 cup fresh blackberries to the pot. Stir, cooking the fruit briefly, then proceed with the blending and straining of the sauce as detailed above. 
  • The thing about fruit sauces is that so much will depend on the fruit itself. You might need more or less sugar than I've suggested. This recipe will make around 1 cup, but it might be more or less depending on the juiciness of the fruit and how thick your final sauce ends up. Any leftover sauce can be used over to drizzle over ice cream or stirred into yogurt. It's also rather good as the base of a berried champagne cocktail (which gets my vote).
  • Previous icebox cakes can be seen here and here


Tuesday
Mar222011

A familiar sense of ease

golden

These scones, these knobby specimens far removed from any thought of dainty, came to be through the generosity of an aunt by way of my parents. It started with their cranberries.

My folks had returned home from a recent trip and, not ones to come back empty handed, I was handed a bag of dried cranberries. They'd been to British Columbia, they'd seen my aunt and uncle, who, I'm told, have these local cranberries with their breakfast most mornings. The berries were large and not particularly dry; less like raisins and more like large, flattened rounds, slightly cupped. The first comparison that came to mind was a berry version of orecchiette, the concave pasta with a fingertip-sized indent, but imagine them bright crimson and  made of fruit. These were were plump and full of juice, and as they were only barely sweetened, the tart, lip twisting sharpness of the cranberry remained. 

I ate a handful on the spot. Benjamin did too. 

IMG_18632

Then Mum and I got talking and we settled on making scones. Scones aren't new. Scones aren't innovative. Or trendy. Scones are a soft spot for me though, and my Dad and Mum too. Scones are herehere and here already. And so, if I start nattering on about scones, you'll most likely know what I'm going to say because we've talked scones before - about their tender substance, the intricacies of their crumb - but there's a familiar sense of ease in that, in those known phrases and anticipated tastes. 

I will say, at their most rustic as these are, scones involve straightforward skills and little more. Bring together your flours; a mix of flours here to bring a subtle interest, but nothing too challenging for a Sunday morning. Cut butter into that flour with knives or fingertips, then add the buttermilk with the most indolent of stirring - lumps are fine, and long as the flour is pretty much dampened and beginning to clump together. Bring in the cranberries and nuts with a few turns of the spoon.

If even that level of industry feels monumental, and I don't blame you as this is the route I took, use a stand mixer instead. On its lowest setting the mixer will gently distribute the butter and incorporate the buttermilk; freeing you to sip your coffee leisurely, with no greater task than occasional peek into the bowl to make sure things are progressing nicely.

Either way, the ramshackle dough gets tipped out onto a board, kneaded briefly and patted together into rough and tumble disks. Slice the rounds into triangles and they're ready to bake.

For those looking for extra credit, stir together a spoonful of sugar with the same amount of fresh lemon juice and, there, you've made a syrupy glaze to brush atop the par-baked scones. In the oven, this scant gilding will go from sticky to glistening, seeping in some cracks but mostly giving the scone's surface a crystalline makeover. It's an edge of sugared tang before the nutty, mellow wheaten sweetness of the crumb beneath. It's not necessary, but it's a nice bit of fuss.

this one was mine

I made these the morning after our visit with Mum and Dad, in the sober quietness of the cool, blue hours before light touches the windowsill. That muted glow cast by the day's beginning felt the natural companion to a scone that was homey, reassuring. 

A feeling not unlike a good conversation with those you missed, after a time apart.


*******


There's a pair of links to share today. First, a heartfelt thank you to Babble.com for selecting this site as one of their Top 100 Mom Food Blogs for 2011. It is an honour to be in such company.

And my friend Jess wrote this poignant post on her site, Sweet Amandine. It's a special one. She's got a restrained honesty as she figures out "what feels right" for right now. I thought I'd point you in her direction as I think it's not one to miss.

A happy day to you all.


******* 


Mixed Flour Buttermilk Scones with Cranberries and Almonds
Our dried cranberries were markedly less sweet than the raisin-like ones sold in many grocery stores. Using the latter style might warrant reducing the granulated sugar to a 1/3 cup. With inspiration from the Buttermilk Scones from Susan Fenniger and Mary Sue Milliken.


Ingredients

For the scones
2 cups all-purpose flour
3/4 cup whole wheat flour or oat flour, see note
¼ cup flaxseed meal
½ cup granulated sugar
1 teaspoon salt
1 tablespoon baking powder
½ teaspoon baking soda
Finely grated zest from one lemon
¾ cup (1 ½ sticks) unsalted butter, chilled and cut into small dice
1 cup dried sweetened cranberries, see headnote
3/4 cup flaked almonds, toasted and then chopped
1 cup well-shaken buttermilk, plus more if needed

For glaze (optional)
1 tablespoon granulated sugar
1 tablespoon lemon juice

To make the glaze, stir together the sugar and lemon juice in a small bowl. Set aside.

Preheat oven to 400°F (200°C). Use parchment paper to line a standard baking sheet and set aside.

In the bowl of a stand mixer with the paddle attachment, combine the flours, sugar, baking powder, baking soda, salt and lemon zest. On the machine's lowest setting, cut in the chilled butter until the mixture resembles course meal. The butter should be in small pieces approximately the size of peas. Mix in the cranberries and almonds. 

With the machine still on low, slowly pour the buttermilk into the flour and butter mixture in a thin stream, stirring until just combined. Use only as much buttermilk as needed to bring the dough together - don’t worry if you don’t use it all, or if you need to add a tablespoon or more. Small bits of butter should still be visible, but almost all the flour should be incorporated. 

Turn the dough out onto a lightly floured surface. Working quickly, gently knead the dough, folding and pressing gently until it just holds together. Divide the dough into two, and shape each ball of dough into a 6-inch round about 1-inch thick. Cut each round into six wedges, and place on the prepared baking sheet. 

Bake scones in the preheated oven for about 12 minutes, then carefully pull them out and brush the top of each lightly with the glaze, if using. Return the scones to the oven and continue to bake until the the tops are lightly golden and the cut sides look flaky and dry, around 5-8 minutes more. When fully cooked, the scones should feel light for their size and sound almost hollow when tapped underneath. 

Cool on a wire rack for at least 5 minutes. Best served warm the day they are made, but can be toasted or rewarmed in a low oven. Store in an airtight container at room temperature.

Makes 12 medium scones.


Notes:

  • In lieu of whole wheat flour, toasted oat flour also works quite well. To make your own, spread 3/4 cup of rolled oats on a baking sheet and bake in a 375°F oven until lightly golden, stirring occassionaly, around 7 minutes. Allow to cool, then grind in a food processor into fine meal.
  • I would like to try these using whole wheat pastry flour and 1/2 cup of butter. I'll be sure to report back.
  • This recipe can, of course, be done by hand using a pastry cutter or a pair of knives and a spoon. I've also had great success using a food processor for scones; the method for both is here.


Monday
Feb072011

Geography

stacked and sliced

I thought I’d tell you about where I grew up. I don’t think I have before, which is a shame, as it really was a fine place to be. 

I was born here in Canada, in Montréal, Québec to be specific. We moved to southern Ontario when I was a toddler, and it’s where I did almost all of my growing up. When I think of this place, I think of its geography.

On one side we had Lake Ontario. It is broad and blue, and, depending on where you stand, without end on the horizon. The escarpment, a rocky outcropping that carves a jagged, irregular zigzag across the map, is to its opposite. In between and all around were fields, orchards and vineyards, with their imposed geometry of pattern and crops on the landscape.

Then there was the river.

The Niagara River flows between Lakes Erie and Ontario, over its eponymous waterfalls and a breath-stealing gorge. Over that river, across that expanse that feels so big the air between feels solid, is a whole other world; a whole other country, in fact.

That’s the thing about living in a border-ish town. There’s the false familiarity of proximity with the simultaneous awareness of difference. The feeling of sameness although not quite there.

We share a lot with the United States; television stations travelled the airwaves without minding the division between us, same goes for radio. With Buffalo, New York a short drive away, I grew up with an adopted local pride (and accompanying expertise) for the distinguishing aspects of the classic hot chicken wing.

There were, of course, differences. And to a six-year-old, these were important ones. They had Apple Jacks and Cinnamon Toast Crunch cereals, for starters. And Jiff peanut butter. We had ketchup-flavoured potato chips and (sometimes) poured gravy on our fries.

Many of these disparities have disappeared in the years passed from my childhood and now, but we still spell colour and favourite with a “u”, call it Zed and not Zee for the last letter in the alphabet, our packet of ketchup-flavoured chips is emblazoned with both English and French, and we’ve got Butter Tarts. Nanaimo Bars, too.

For those who don’t know, butter tarts are basically miniature pecan pies without the pecans. Gooey, dark and the antithesis of subtle in its sweetness, the filling may include raisins or walnuts, but the inclusion of either is the subject of impassioned debate.

Nanaimo Bars, a bar cookie named after a city three time zones and 4,500 kilometers away in British Columbia, are more difficult to describe and, as far as I know, without compatriot in definition. In the way I learned to make them, you make a crust out of cocoa powder, butter, egg, graham crumbs, shredded coconut and chopped nuts (walnuts or almonds being the most trad). It’s baked until just firm and slightly crisp. I’ve recently found that other recipes cook the mixture on the stove top, with it then pressed into a pan and chilled to set.

Whatever way you make the crust, upon it you spread a concoction that’s often mistakenly-described as a custard filling. What it is, in actual fact, is a custard-flavoured icing - thanks to the brilliance of powdered vanilla custard powder. It sounds strange, and maybe it is one of those things you have to grow up with to understand, but frosting, rather than the smooth eggy tenderness of custard, is imperative for its grittyness. It is all about the specific feel of sugar and powdered custard creamed into butter.

You see, there’s ganache yet to be poured over the whole pan, and it is the texture of the custard icing that stands up to that of the chocolate. Their consistencies almost match, so that when bitten, the chocolate gives way to the filling without clear definition against the tooth.

Not to fear, the stick-to-your teeth quality of those two components is cleanly cleared by the coarse crust below. Really, they thought of everything.

It has been a long while since I’ve had a Nanaimo Bar; they went through a popularity boost in the mid-90s right when everyone was watching Friends and drinking lattes at coffee shops. Around then, you’d find Nanaimo Bars on the counters at said coffee shops, with radical frosting flavours like Irish cream, cappuccino and mocha.

But then along came Justin. Justin Schwartz, if you don’t know already, a singularly-swell individual who shares my affection for Alice Medrich’s recent book, Chewy Gooey Crispy Crunchy Melt-in-Your-Mouth Cookies. He’s been baking from it, and we’ve been chatting about it, and we got on the subject of the No-No Nanaimo Bars found, fittingly, in the Gooey chapter.

He’d not heard of Nanaimo Bars, and I of course had but was curious about the cheesecake-ish filling Medrich offers in lieu of my trashy-but-beloved custard powder. He made a pan and deemed them a revelation, which was just about all the encouragement I needed to do the same.

Justin is right, these were intensely good. I’ll add the asterisk that they're especially so straight out of the freezer - they won’t freeze solid, and so end up with a good share of the charms of an ice cream sandwich.

But, I will say, with allegiance and fidelity held firm, and as both Justin and Medrich herself note, these are not Nanaimo Bars. The cream cheese adds a new dimension, a refined edge of sharp dairy, that is a departure from the original. Dare I say, the dowdy bar is elevated to a place verging on elegant.

While something special in its own right, and with great respect to all those involved, I’ll hold tight to the false-yellow stripe of frosting between my chocolate and crust. I've got a predisposed allegiance to uphold.

Custard powder in our cookies might be a Canadian thing. As far as traditions go, I'll stand on guard for thee.

*******

The latest issue of UPPERCASE magazine is out! Here's a preview of what you'll find in the Sweet column for winter; we're extolling the virtues of the small and making mini doughnuts. 

There's also been some exciting news that has had me grinning for days. The first annual Canadian Food Blogger Awards were announced last week, and was wonderful to see so many friends on the list of nominees and winners! The judges saw fit to include me on that list, nominated for photography, and winning in the categories of writing and recipes. It is an honour and my gratitude goes out to all those involved.

I feel a wee bit of stage fright on the mention of this one - a week ago I was on CBC Radio One's Metro Morning talking food and blogs. If you'd like to take a listen (be kind!) the podcast can be found here, with our segment beginning at around the 13:30 mark, and I first speak about a minute later.

It's been a good week. I hope yours has been too. Thanks for sharing all of this with me.

*******

Maya's No-No Nanaimo Bars
Named after the city in British Columbia, the traditional Nanaimo bar is a no-bake layered affair with a crumb crust and layers of sweet vanilla filling crowned with chocolate. These here — with a coconut pecan crust, vanilla cream cheese filling, and dark chocolate ganache — are for people who like the idea of the Nanaimo bar but wish it were different: less sweet, more grown-up, a bit modern. Oh, and these are baked. Thus, no claims to authenticity…only a very good bar created by a very good friend, Portland food maven Maya Klein.

Excerpted from Chewy Gooey Crispy Crunchy Melt-in-Your-Mouth Cookies by Alice Medrich (Artisan Books, 2010).

Ingredients
1 1/2 cups (5 ounces) chocolate cookie crumbs (from 9 chocolate graham crackers)
1/2 cup (1.5 ounces) unsweetened dried shredded coconut
1/2 cup (2 ounces) finely chopped pecans
8 tablespoons (1 stick) unsalted butter, melted
1/2 cup plus 2 tablespoons (4.375 ounces) granulated sugar
8 ounces cream cheese, at room temperature
2 tablespoons (0.875 ounce) packed brown sugar
1/2 teaspoon pure vanilla extract
1 large egg
1/2 cup heavy cream
7 ounces semisweet or bittersweet chocolate with 55% to 60% cacao

Equipment
A 9-inch square metal baking pan, the bottom and all 4 sides lined with foil

Preheat the oven to 350°F.

Mix the crumbs, coconut, pecans, butter, and 1/4 cup of the granulated sugar and pat it very firmly into the lined pan. Bake the crust for 10 to 12 minutes, or until it looks slightly darker at the edges and smells toasted.

While the crust is baking, mix the filling. In a large bowl, beat the softened cream cheese, brown sugar, and 1/4 cup of the remaining granulated sugar until smooth. Beat in the vanilla and then the egg. When the crust is baked, dollop the filling onto the hot crust and spread gently with the back of a spoon. Bake the bars until the edges are slightly puffed, about 10 minutes. Cool on a rack for 30 minutes. Chill for at least 2 hours.

Dissolve the remaining 2 tablespoons granulated sugar in the cream. Bring 1/2 inch water to a simmer in a medium skillet. Coarsely chop the chocolate and combine with the cream in a medium metal bowl. Place the bowl directly in the skillet of hot water and turn off the heat. Let rest for 5 minutes and whisk until smooth. Set aside until needed.

Pour the warm ganache onto the bars, spread, and chill for at least 30 minutes before serving. Lift the bars out of the pan by using the edges of the foil liner. Cut into 16 or 25 squares, wiping the knife between cuts. May be stored in an airtight container in the refrigerator for 3 to 4 days.

Makes 16 large (2 1/4—inch) bars or 25 smaller bars.


Thursday
Sep172009

Munched, gleefully


I failed. F-a-i-l-e-d. It was epic.

It was gnocchi.

Had you walked into my kitchen in the late-afternoon hours of Wednesday, September 16, 2009, you would have found me covered from hand-to-elbow with dough and in near exasperated tears, with every viable work surface buried under the detritus of my humiliation, my father at my side in a valiant effort to salvage the day, my husband on the phone patiently talking me down from my fit of pique and, in calm, even tones, assuring me that takeout would be more than fine for dinner.

I tell you, I can make gnocchi. Honestly. While not regularly enough to say often, I've made it enough times to consider myself passably adept. But this, this was a new, devil of a recipe. A recipe that wanted to take me down.

And boy, did it ever.

It went straight for the knees, pinned me to the mat and had me calling for Daddy. I won't go into too many details or point any flour-encrusted fingers, since I'm not entirely sure that the fault is that of the recipe or my own. Or a combination of the two. The blame may lie with the potatoes. Who knows.

I will tell you that the dough refused to come together in any semblance of a workable substance. I had a languid blob lounging smugly on my kitchen counter. No matter how much flour I fed it it would not be sated; it was still boundless, still a slowly-oozing, formless mass.

That's when I called in reinforcements.

We rallied, we prevailed. Somewhat. My father and I managed a handful of successful dumplings, those few sent into the boiling water, then tossed with softened butter and a handfuls of Parmesan. Optimistically, we each tried one.

It was a joyless mouthful. They tasted of defeat. Defeat and cheese.

So abject was I, I was tempted board up the kitchen and declare it all a lost cause. If it weren't for the Fig and Walnut Bread we had made earlier in the day, I might have scrapped any tattered remnants of faith I had in my culinary ability.

The bread was a riff on Julia Child's white bread that we make quite often, a fruit-filled version based on a combination of flavours I have done before. Enriched with milk and fragrant with honey, the sturdy crumb is the ideal sort to be wrapped around a swirl of dried figs, walnuts and the subtle, savoury presence of thyme. It is a bread to be cut into thick slices, toasted enough that you hear the fruit sizzle ever so slightly, slathered with sweet butter in lavish proportion and then munched, gleefully.

And we did exactly that, while we waited for the delivery man.

Fig and Walnut Bread with Thyme
Adapted from Julia Child's Homemade White Bread.

More than just saving my pride, the bread saved today - if it wasn't for the bread, I'd be here empty handed. And I hate to do that. So while this may have not been my intended offering, please accept it, with the admission that since this was an unplanned debut, I did not take notes as conscientiously as my usual. But we are all good enough friends that I hope that my best guess will suffice for now.

The loaf in question is already a thing of the past, and there has been another petitioned for the weekend; I will retry the recipe then, to double-check my recollection.

Saturday, September 19, 2009: I tested the recipe again last night, and made two changes - both pertaining to butter. I added the 2 tablespoons of butter to the milk/water mixture to reduce the number of steps, with no ill effects to the final bread. Surprisingly, I also decided it is better to forgo the smear of butter in the swirl since the fat causes the layers to separate, leading to loss of filling when the bread is sliced. Without the butter the dough gripped the figs and walnuts more firmly.

Ingredients
3/4 cup chopped walnuts
1/4-1/2 teaspoon fresh thyme leaves, chopped
fine grain sea salt, optional
1 cup water
1 1/4 cup milk
1/4 cup honey
2 tablespoons unsalted butter
1 teaspoon active dry yeast
6 cups all-purpose flour (or thereabouts)
2 teaspoons kosher salt
1/2 cup muscovado sugar or dark brown sugar
1 cup chopped dried figs
2 tablespoons unsalted butter, melted and cooled

In a medium skillet over medium heat, toast the walnuts for about 5 minutes, stirring often. Once the nuts are lightly-golden and fragrant remove immediately from the heat and into a bowl. Toss through with a sprinkling of fine sea salt, if using, and the chopped thyme. Set aside to cool.

In a small saucepan over medium-low heat, gently warm the water and milk. Add the honey, stirring to dissolve. Stir in the butter, heating gently until melted. The mixture should be warm, around 105-110°F. Pour liquids into the bowl of a stand mixer or a large bowl. Stir in the yeast and allow to stand for five minutes.

To the yeast, add 3 cups of the flour and the salt. With the dough hook attachment or by hand, mix to combine (if using a mixer, proceed on medium speed). Continuing to stir, add the remaining flour a little at a time, until the dough begins to pull away cleanly from the sides of the bowl; it should still be slightly sticky.

Turn the dough out onto a lightly-floured work surface and knead until smooth and elastic. The amount of time will depend on if you used a mixer or worked by hand, anywhere from 2-10 minutes. Place the dough in a large, lightly-greased bowl, turning the dough over to coat. Turn the dough right side up and cover loosely with plastic wrap or a tea towel. Set bowl in a warm, draft-free spot to rise until doubled in bulk, around 2 hours.

Butter two 8-by-4-inch loaf pans and set aside. Punch the dough down gently, then divide into two equal portions on a lightly-floured work surface. Taking one ball, roll out to a rectangle around 9-by-12-inches. Sprinkle half the sugar over the dough, leaving a thin border at all sides. Repeat with half of the figs and half of the toasted walnuts.

Start rolling the dough from the short end, forming a tight cylinder, pinching the seam together to seal. Bring just the edge of the ends of the roll up to enclose the sides and pinch to seal. Place the dough into one of the prepared pans. Repeat process with the second ball of dough.

Cover loaves loosely with plastic wrap or with tea towels, and allow to rise in a warm spot until doubled again in bulk, around 45-60 minutes. Preheat an oven to 375°F (190°C).

Brush the loaves with the remaining melted butter, and bake in the preheated oven for 35-40 minutes. The bread is done when it is golden brown and sounds hollow when tapped from the bottom. Turn loaves out immediately onto a rack, turning them right side up to cool.

Makes 2 loaves.

Notes:

• It is best to use a mild honey here, nothing with so much presence that it overshadows the mellow sweetness of the figs.
• Raisins, dates or dried cranberries would all be good substitutes for the figs, and resh rosemary for the thyme.
• For a straightforwardly-sweet filling replace the thyme with a generous sprinkling of cinnamon. Feel free to be generous with the muscovado as well.
• I scatter the figs and walnuts somewhat erratically; I think the uneven distribution results in a more interesting loaf. If you want a perfect coil of filling, be more precise.
• Zoë has a helpful photographic step-by-step of how to roll such breads on her (lovely, inspiring) site. Any of the doughs she mentions would be a fine match for this filling.

Page 1 2