Instagram Instagram

Entries in nuts (14)

Thursday
Sep172009

Munched, gleefully


I failed. F-a-i-l-e-d. It was epic.

It was gnocchi.

Had you walked into my kitchen in the late-afternoon hours of Wednesday, September 16, 2009, you would have found me covered from hand-to-elbow with dough and in near exasperated tears, with every viable work surface buried under the detritus of my humiliation, my father at my side in a valiant effort to salvage the day, my husband on the phone patiently talking me down from my fit of pique and, in calm, even tones, assuring me that takeout would be more than fine for dinner.

I tell you, I can make gnocchi. Honestly. While not regularly enough to say often, I've made it enough times to consider myself passably adept. But this, this was a new, devil of a recipe. A recipe that wanted to take me down.

And boy, did it ever.

It went straight for the knees, pinned me to the mat and had me calling for Daddy. I won't go into too many details or point any flour-encrusted fingers, since I'm not entirely sure that the fault is that of the recipe or my own. Or a combination of the two. The blame may lie with the potatoes. Who knows.

I will tell you that the dough refused to come together in any semblance of a workable substance. I had a languid blob lounging smugly on my kitchen counter. No matter how much flour I fed it it would not be sated; it was still boundless, still a slowly-oozing, formless mass.

That's when I called in reinforcements.

We rallied, we prevailed. Somewhat. My father and I managed a handful of successful dumplings, those few sent into the boiling water, then tossed with softened butter and a handfuls of Parmesan. Optimistically, we each tried one.

It was a joyless mouthful. They tasted of defeat. Defeat and cheese.

So abject was I, I was tempted board up the kitchen and declare it all a lost cause. If it weren't for the Fig and Walnut Bread we had made earlier in the day, I might have scrapped any tattered remnants of faith I had in my culinary ability.

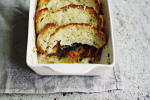
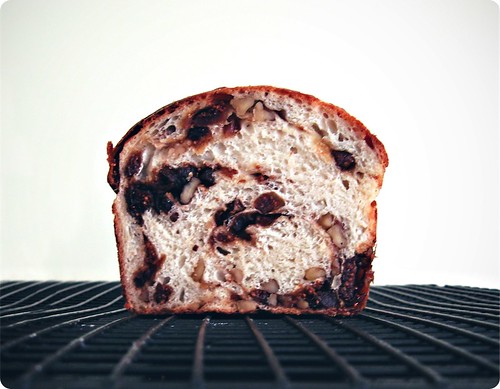
The bread was a riff on Julia Child's white bread that we make quite often, a fruit-filled version based on a combination of flavours I have done before. Enriched with milk and fragrant with honey, the sturdy crumb is the ideal sort to be wrapped around a swirl of dried figs, walnuts and the subtle, savoury presence of thyme. It is a bread to be cut into thick slices, toasted enough that you hear the fruit sizzle ever so slightly, slathered with sweet butter in lavish proportion and then munched, gleefully.

And we did exactly that, while we waited for the delivery man.

Fig and Walnut Bread with Thyme
Adapted from Julia Child's Homemade White Bread.

More than just saving my pride, the bread saved today - if it wasn't for the bread, I'd be here empty handed. And I hate to do that. So while this may have not been my intended offering, please accept it, with the admission that since this was an unplanned debut, I did not take notes as conscientiously as my usual. But we are all good enough friends that I hope that my best guess will suffice for now.

The loaf in question is already a thing of the past, and there has been another petitioned for the weekend; I will retry the recipe then, to double-check my recollection.

Saturday, September 19, 2009: I tested the recipe again last night, and made two changes - both pertaining to butter. I added the 2 tablespoons of butter to the milk/water mixture to reduce the number of steps, with no ill effects to the final bread. Surprisingly, I also decided it is better to forgo the smear of butter in the swirl since the fat causes the layers to separate, leading to loss of filling when the bread is sliced. Without the butter the dough gripped the figs and walnuts more firmly.

Ingredients
3/4 cup chopped walnuts
1/4-1/2 teaspoon fresh thyme leaves, chopped
fine grain sea salt, optional
1 cup water
1 1/4 cup milk
1/4 cup honey
2 tablespoons unsalted butter
1 teaspoon active dry yeast
6 cups all-purpose flour (or thereabouts)
2 teaspoons kosher salt
1/2 cup muscovado sugar or dark brown sugar
1 cup chopped dried figs
2 tablespoons unsalted butter, melted and cooled

In a medium skillet over medium heat, toast the walnuts for about 5 minutes, stirring often. Once the nuts are lightly-golden and fragrant remove immediately from the heat and into a bowl. Toss through with a sprinkling of fine sea salt, if using, and the chopped thyme. Set aside to cool.

In a small saucepan over medium-low heat, gently warm the water and milk. Add the honey, stirring to dissolve. Stir in the butter, heating gently until melted. The mixture should be warm, around 105-110°F. Pour liquids into the bowl of a stand mixer or a large bowl. Stir in the yeast and allow to stand for five minutes.

To the yeast, add 3 cups of the flour and the salt. With the dough hook attachment or by hand, mix to combine (if using a mixer, proceed on medium speed). Continuing to stir, add the remaining flour a little at a time, until the dough begins to pull away cleanly from the sides of the bowl; it should still be slightly sticky.

Turn the dough out onto a lightly-floured work surface and knead until smooth and elastic. The amount of time will depend on if you used a mixer or worked by hand, anywhere from 2-10 minutes. Place the dough in a large, lightly-greased bowl, turning the dough over to coat. Turn the dough right side up and cover loosely with plastic wrap or a tea towel. Set bowl in a warm, draft-free spot to rise until doubled in bulk, around 2 hours.

Butter two 8-by-4-inch loaf pans and set aside. Punch the dough down gently, then divide into two equal portions on a lightly-floured work surface. Taking one ball, roll out to a rectangle around 9-by-12-inches. Sprinkle half the sugar over the dough, leaving a thin border at all sides. Repeat with half of the figs and half of the toasted walnuts.

Start rolling the dough from the short end, forming a tight cylinder, pinching the seam together to seal. Bring just the edge of the ends of the roll up to enclose the sides and pinch to seal. Place the dough into one of the prepared pans. Repeat process with the second ball of dough.

Cover loaves loosely with plastic wrap or with tea towels, and allow to rise in a warm spot until doubled again in bulk, around 45-60 minutes. Preheat an oven to 375°F (190°C).

Brush the loaves with the remaining melted butter, and bake in the preheated oven for 35-40 minutes. The bread is done when it is golden brown and sounds hollow when tapped from the bottom. Turn loaves out immediately onto a rack, turning them right side up to cool.

Makes 2 loaves.

Notes:

• It is best to use a mild honey here, nothing with so much presence that it overshadows the mellow sweetness of the figs.
• Raisins, dates or dried cranberries would all be good substitutes for the figs, and resh rosemary for the thyme.
• For a straightforwardly-sweet filling replace the thyme with a generous sprinkling of cinnamon. Feel free to be generous with the muscovado as well.
• I scatter the figs and walnuts somewhat erratically; I think the uneven distribution results in a more interesting loaf. If you want a perfect coil of filling, be more precise.
• Zoë has a helpful photographic step-by-step of how to roll such breads on her (lovely, inspiring) site. Any of the doughs she mentions would be a fine match for this filling.

Thursday
Sep102009

To be prepared

When I first begin to get sick, I begin to clean. Ambitiously.

It's not just scrubbing dishes or sweeping the floors or folding the laundry. It's cleaning the windows and flipping the mattresses and vacuuming under the fridge. When my mind is fuzzy with sickness, I can't stand a similar feeling of clutter in my surroundings.

It drives me bonkers. But at least, in the best of circumstances, my fits of crazy result in cookies.

Last Tuesday I organized the closets. Most specifically, the Closet We Dare Not Open. That's the closet in our little den, a stash and dash repository, the closet that still had sealed boxes from when we moved to this house two years ago.

Yes, you heard me right. Sealed boxes. And yes, it has been two years.

Don't look at me like that. You try moving with a toddler when you're already expecting your next and let's see how well you do in getting all your boxes unpacked.

Ahem. Now that we've thrown open the quite literal door on my secret shame, back to the present. And those boxes. These were the boxes of nonessentials - the last boxes we'd packed from our previous house, thrown together as we made our way out the door.

In one I found a storage container (empty) for CDs, an unopened package of paper, a sketchpad and some dice. In another, pictureless fames and ice cube trays. And in another, I found my recipe notebooks.

The pair of books, pale slate with Prussian blue trim, date back even further than the move to this house. They are from A Time Before; the time before a ring had ever been put upon my finger and before my child had ever been placed in my arms. A time before I started writing here.

My Mum had recipe folders when I was growing up. She'd snip out and tack in recipes from magazines and newspapers, these interspersed with handwritten cards bearing the bosom-held secret recipes of family and friends. Hers were fat and full with both the memory and the promise of delicious meals.

When I decided I it was time to become an adult, I started my own recipe notebooks. It seemed the Thing to Do. I'm a gatherer by nature, and had a considerable stockpile of magazines and notepads full of material ready and waiting. I remember stacking the clippings into neat little piles, considering my methods of categorization. I had Breakfasts, Soups, Salads, Breads, Sides, Vegetarian Mains, Meat, Poultry, Cakes, Pies, Frozen Desserts and Sweets. (All of this compulsion fell neatly in line with my established addiction to stationery.)

I was ready, at least recipe-wise, for Sort of Life I was Going to Lead. My books were as much a compilation of tried recipes as it was of the recipes I wanted to try in that future. I was going to be prepared.

Prepared for everything except baking cookies. In curating these books, I overlooked cookies entirely. Filled anticipation for future dinner parties that would surely require an elegant sweets course, I hopped, skipped, and jumped my way past biscuits and wafers and biscotti. The closest I come to a cookie is the solitary mention of brownies.

I think I thought that cookies were dull. I know. I was young and stupid. Cookies were one of the first things I'd learned to bake, due in large part to Mrs. Wakefield and those bags of morsels, and I believe I had the fool idea that adulthood was the time to move on from such childish pursuits.

Thank goodness for being lazy. And in love. I started those books years ago, but I never finished them. They went into the back of a closet, moved from apartment to apartment to house to house, untouched. Instead of collecting, I started cooking, and the next thing I knew I was here.

And the person that is here is a mum who bakes cookies. Often.

A move to rectify the lapse in those books' the cookie section is long overdue, and I have already got my choice for the first one in. These Chocolate-chunk Oatmeal Cookies with Pecans and Dried Cherries are sigh-inducing balance of sweet, salty and subtly sour. They are speckled and nubbly, with a crisp rim and a soft centre, and deep cracks that travel their surface. And oh my stars, they are perfectly delicious. So delicious that they deserve a fan club.

We can have the meetings at my place. Once I'm done cleaning.

Chocolate-chunk Oatmeal Cookies with Pecans and Dried Cherries
From Cooks Illustrated published May 2005.

Ingredients
1 1/4 cups unbleached all-purpose flour
3/4 teaspoon baking powder
1/2 teaspoon baking soda
1/2 teaspoon salt
1 1/4 cups old-fashioned rolled oats
1 cup pecans, toasted and chopped
1 cup dried sour cherries or cranberries, chopped coarse
4 ounces bittersweet chocolate, chopped into small pieces about the size of chocolate chips
3/4 cup (12 tablespoons, 1 1/2 sticks) unsalted butter, softened but still cool
1 1/2 cups packed dark brown sugar
1 large egg
1 teaspoon vanilla extract

Preheat oven to 350°F (175°C), with racks on the top and bottom thirds. Use parchment paper to line several standard baking sheets and set aside.

In a bowl, sift together the flour, baking powder, baking soda and salt. Set aside.

In another bowl combine the oats, pecans, dried cherries and chocolate.

In the bowl of a stand mixer with the paddle attachment, or with a hand mixer, cream together the butter and sugar on medium speed until light and fluffy, scraping down the sides of the bowl as needed. With the mixer on medium-low, add the egg and beat until incorporated.

Scrape down the sides of the bowl, turn the mixer down to low, and add the flour mixture to the bowl. Stir until just combined. Finally incorporate the oats, nuts, fruit and chocolate. Do not overmix. Turn off the mixer and use a rubber spatula to give the dough a final stir and make sure that all the ingredients are incorporated.

Using an ice cream scoop to measure 1/4 cup portions of dough. Roll these portions lightly between your hands, then place 8 on each baking sheet, spaced evenly. Wet your hands and lightly press the dough to a 1-inch thickness. Bake the cookies, two trays at a time, in a preheated oven for 12 minutes. Rotate the trays top to bottom and back to front and bake for another 8 minutes or until the cookies are uniformly golden, but still wet in the middle. You might think that they're undercooked, but you're wrong - resist the urge to overbake, they will set up further as they cool.

Remove from the oven and cool on the baking sheets for 5 minutes before transferring to a wire rack. Store cooled cookies in an airtight container at room temperature.

Makes 16.

Notes:
• Although the original recipe specifies table salt, I used kosher salt instead; I enjoy the uneven saltiness of kosher in cookies, but that is only a personal preference.
• Continuing on the topic of salt, I sprinkled the pecans with some fine grained sea salt when they were toasted. This subtle salinity hummed steadily beneath the complexity of the chocolate and cherries.
• Wanting a slightly more modest cookie, I divided the dough into 24 and reduced my cooking time accordingly.

Monday
Nov242008

Kitchen aid; reviewing In the Kitchen with Anna by Anna Olson


These Chocolate Almond Toffee Bars look innocent enough, but are two bites of true, gooey indulgence. Photos courtesy of Deep Media.

Even though one may not mean to become caught up in things, sometimes it is unavoidable. Such was my case recently, as a (thankfully-mild) strain of the chicken pox made its way through our little ones, forcing our household into a state of quarantine and oatmeal baths for two weeks. This was followed closely by an infection that had Mummy curled up on the couch, slippers on and blanket pulled up tight, for another few days. Suddenly almost a month has gone by, and it seems all in a blur.

Now we are about ankle-deep in holiday preparations; events with family and friends are already scheduled, decorations are already being considered, and menu ideas are already floating around in my head. Where did this autumn go? It feels like Halloween was just yesterday.

Lucky for us, I had the book In the Kitchen with Anna: New ways with the Classics standing by at the ready. In it, chef Anna Olson offers up meals and menus that have a nostalgic appeal; a bit retro, a bit kitch sometimes, but always tasty. This is feel-good eating at its best, and just the sort of food one craves when life gets a bit hectic.

While the book does include entertaining-worthy recipes like unctuous Mushroom Potato Brie Tarts and an impressive Garlic Roasted Turkey Crown with Chardonnay Pan Sauce, it is the modern classics like the Contemporary Cobb Salad, Ultimate Cheese Fondue and Baja Fish Tacos, that are, in my mind, the real draw.

Through the craziness over the last few weeks, I found myself turning to this book numerous times for inspiration. And rarely did it disappoint.

I have pledged my allegiance to steel-cut oats, but I tried Olson's version using the rolled variety when I found my cupboard was bare of the former. Surprisingly light due to the addition of oat bran, the oatmeal was delicious. So good in fact, that when mornings dawned cold and grey, I reached for this breakfast again and again.

The Rockwell Bake, a savoury bread pudding that combines all the flavours of Thanksgiving dinner, was hearty and soul-satisfying. Anna's Pot Roast was fairly-standard comfort fare, brightened through a second addition of vegetables towards the end of cooking. While good, however, what stole the show that night was the recommended accompaniment of Fluffy Dumplings. True to their title, these dumplings were pillowy-light, and an ideal way to sop up the roast's beer-soused gravy.

For those visiting the Niagara Region, Olson's two specialty food shops sell dishes from In the Kitchen with Anna as some of their prepared foods. It is a wonderful opportunity to taste some of the food before purchasing the book and also a testament to Olson's confidence in standing behind these recipes - a true mark of quality.

It was at her St. David's, Ontario, location that we were able to try the Beef, Caramelized Onion and Smoked Cheddar on Foccacia sandwich. Hot off of the panini press, the exterior was shatteringly crisp, giving way to melt-in-your-mouth slices of beef, accented by sweet onions, a slathering of grainy mustard and subtly-smoked cheese.

Since Olson is famous for her desserts, far be it from me to ignore that chapter. The Lemon Cheesecake Mousse tarts had an beautifully light texture with the perfect sharp citrus note. They managed to be delicate but luscious, all at once. Dangerously-easy to make are the Chocolate Almond Toffee Bars (photographed above, please see recipe below); to call these rich would be a gross understatement. A sturdy crust of oats and graham is scattered with both toffee and chocolate, then almonds, and finally a blanketing of sweet condensed milk. This modest effort results in a bar cookie that is tender in its belly, but slightly burnished and crisp above. Ridiculously addicting stuff.

Only one recipe fell short of expectation; the Artichoke Asiago Squares. The appetizer, somewhat akin to crustless quiche, is billed to taste like the popular dip of the same name and readers are urged "if there is no other recipe you make from this book, please make it this one." With such an introduction, these were a definite must-try. But while the squares are good, none of my tasters thought them great. The consensus was that they were best served warm, but even then the texture was not a favourite and some found the asiago could have been more pronounced. I would not call this a failure, but I would say that there are stronger dishes in the book.

The book itself is bright and colourful. The food looks fresh, shot simply, but beautifully, by Ryan Szulc. Minimally styled by Olson, the images are homey and inviting, with little fuss marring our look at the the food.

I particularly enjoyed how the recipes were laid out. Accompanying each was not only general notes included in the header, but also a three-part footnote outlining the taste, technique and tale of that particular dish. This additional information included more in-depth information about the ingredients or preparation, and also were a peek into the personality of Olson herself; the chatty, convivial tone was charming to read.

From the every day to almost every celebration, for lazy weekends and when the weekdays are flying by, In the Kitchen with Anna: New Way with the Classics includes recipes that are excellent additions to any cook's repertoire. Showing us easy, accessible cooking with touches that make each dish feel special, Olson makes a lovely kitchen companion.

Chocolate almond toffee bars
This recipe is one of my most requested, so I'm happy to include it in this book.

Ingredients
1 1/2 cups (375 ml) rolled oats
1/2 cup (125 ml) graham cracker crumbs
1/4 tsp (1 ml) fine salt
1/2 cup (125 ml) unsalted butter, melted
1 cup (250 ml) Skor toffee bits
1 cup (250 ml) chocolate chips
1 cup (250 ml) sliced almonds
1 can sweetened condensed milk

Preheat the oven to 350°F (180°C). Grease and line an 8-inch (2 L) square pan with parchment paper so that the paper hangs over the sides of the pan.

Stir the oats, graham crumbs and salt in a bowl to combine, then stir in the melted butter. Press the crumbly oat mixture into the prepared pan. Sprinkle Skor bits evenly on top, followed by chocolate chips and sliced almonds. Pour condensed milk evenly over pan (it will sink in as it bakes) and bake for 30 to 40 minutes, or until the top is golden brown and the edges are bubbling. Cool to room temperature in the pan, then chill for at least 4 hours before slicing into bars.

Store toffee bars in the refrigerator for up to a week.

Makes one 8"x8" pan.

Taste
This is decadence in a pan. The sinful combination of chocolate, toffee and almonds enveloped in condensed milk that caramelizes as it bakes is irresistible. At least these have oats in them to redeem themselves, just a little bit.


Technique
This is a simple recipe to execute—you gather the ingredients and layer them, basically. The challenge is in waiting for them after they've finished baking!

Tale
My head pastry chef at Olson Foods + Bakery, Andrea, brought this recipe to my attention. She is an excellent baker, and we go way back. She started with me as a high school co-op student, while I was just picking up professional baking myself on the job, so we learned together. That was about 15 years ago, and after her stint at cooking school and gaining other work experience, I'm thrilled that we are working together again after all these years.


Additional recipes from In the Kitchen with Anna: New ways with the Classics

Huevos Rancheros
Pot Roast with Dumplings
Luncheon Sandwich Torte


Permission to print recipe and cover image courtesy Whitecap Books.

Monday
Oct062008

Mum in motion

Whew. I know it is just Monday, but I already feel as though I have had a marathon week. These last few weekends have flown by, more hectic than relaxed, and I am feeling the effect.

The busyness of it all is mostly with happy tasks, thank goodness; the sort of work that is wholly gratifying, but not always easy. Renovations, projects, an almost-four-month-old delight who believes that he is grown up enough to debut his first two teeth, a most wonderfully-mischievous toddler, friends, baking, cooking, planning, organizing, birthdays ... I'll say it again. Whew.

Tomorrow a dear, dear loved one will jet off for a faraway land for an extended trip. As exciting as that is, the last few days have been abuzz with expectant, frenetic energy as we all aid in preparations for departure and simultaneously prepare ourselves for three weeks of missing someone terribly.

I am looking ahead though; this weekend is Canadian Thanksgiving, and there is cooking to be done. Although this year we are not hosting the festivities, we are contributing to the celebration. I am thinking of doing David Lebovitz's showstopping Spiced Pumpkin Cheesecake with Caramel Bourbon Sauce. Jim Lahey's No Knead Bread has been requested, and I might pack a tin of Pecorino Crackers from Giada De Laurentiis (these are featured in De Laurentiis' new book; look out for my review next week). My only decision left is to settle on a cranberry sauce to make.

With all of this going on, I want something quick I can nibble while doing any number of other things through my day. And so, with a bit of time to throw together something, I turned to my favourite snack for these sort of days - granola bars.

Far from the overly-cloying packaged versions that verge on candy bar status, these little offer a bit of salty and sweet; as well-suited for breakfast with coffee as they are as a mid-afternoon bite all on their own. Delicious and portable, a balance of nutrition with a bit of treat, multitasking has never been as appealing than this.

Endnote: I feel compelled to mention that Thanksgiving is my favourite holiday; in fact, this time of year is my absolute, preferred season. All of this is a wonderful sort of busy, and though I might wish for more hours in the day sometimes, I would not wish away a second of it.

Apple Cranberry Granola Bars
My version of a base recipe from Alton Brown. By adding the cashews at the end their salt does not get fully mixed into the bars, resulting in little pockets of salty goodness.

Ingredients

8 ounces old-fashioned rolled oats
2 ounces wheat germ
1 1/2 ounce flax seed
2 ounces raw pumpkin seeds
3 ounces sliced almonds
1 1/2 ounces shredded coconut (sweetened or unsweetened)
4 ounces honey
2 ounces golden syrup
1 3/4 ounces light brown sugar (sometimes called yellow or golden)
1 ounce unsalted butter, plus extra for pan
1/2 teaspoon kosher salt
1 teaspoon vanilla extract
2 ounces dried apples, chopped
2 1/2 ounces dried cranberries, chopped
1 1/2 ounces salted cashews, roughly chopped

Directions

Butter a 9 by 9-inch baking dish and set aside. Preheat the oven to 350°F (175°C).

Spread the oats, wheat germ, flax seed, pumpkin seeds, almonds, and coconut onto a baking sheet. Place in the oven and toast for 15 minutes, tossing to toast evenly.

Meanwhile, combine the honey, golden syrup, brown sugar, and butter in a large, microwave-safe bowl. Heat, on a low setting, stirring occasionally. Once the sugar is completely dissolved, stir in the salt and vanilla extract.

When the oat mixture is lightly toasted, remove it from the oven and reduce the heat to 300°F (150°C). Quickly add the oat mixture to the sugars, then the dried fruit and nuts, stirring to fully combine and coat. Pour mixture into the prepared baking dish.

Using the back of a greased spatula, press and flatten the mixture until evenly distributed. Bake in the preheated oven for 25 minutes, rotating once during baking. Remove from the oven to a rack and allow to cool completely. Turn out onto a cutting board and slice into desired squares or bars. Store in an airtight container at room temperature for up to a week.

Makes one 9x9 inch pan.

Notes:

• I put a second baking dish of the same size on top of the bars as they come out of the oven, weighted down with cans. This extra compression makes for bars that will cut easily and hold their shape. For a crisp bar, allow the pan to completely cool before removing the weights. If you prefer a softer bar, you can do this for only part of the cooling time, or skip the step entirely.
• In my mind, the perfect portion of these is achieved by cutting the pan into 2 1/4" squares. This yields 16 small bars.
• It hardly needs saying, but this is a recipe that can easily be tailored to suit personal preferences; as long as the general ratio of liquids to solids remains, sensible substitutions are easily made.

Tuesday
Apr292008

Martha, Martha, Martha; a review of Martha Stewart's Cookies

As of late, Martha Stewart, baking and food blogs seem to go hand in hand. With Sunday's launch of the cookie-centric contest at marthastewart.com, it is an appropriate opportunity to take a closer look at the prize up for grabs; copies of Martha Stewart's Cookies (Clarkson Potter, 2008). The latest cookbook from the editors of Martha Stewart Living, it is a comprehensive collection of 175 their most versatile and tempting treats.

With its ingenious imaged-based table of contents, coupled with chapter headings organized by cookie texture, this book speaks directly to cravings and their indulgence. I have read some recipes delightfully described as "everyday", a phrase that evokes idyllic notions of an overfilled cookie jar; these are chocolate chip cookies in a myriad of variations, fudgy brownies, delicate sugar cookies and shortbread. Other recipes range from the festive (from Crumbly and Sandy: Vanilla-Bean Spritz Wreaths) to the elegant (from Crisp and Crunchy: Sweet Cardamom Crackers) to the downright decadent (from Rich and Dense: Chocolate Pistachio Cookies).

In regards to content it should be noted that some of these recipes have been previously published in various publications under the Martha Stewart mantle, specifically the special edition Holiday Cookie series. Some readers could be frustrated by this repetition, while others may appreciate having their best-loved favourites in a trade paperback version.

The layout of the recipes is clear and concise, each featuring a photo of the finished product. Although some follow the expected Martha Stewart aesthetic of colourful but simple styling, others depart from this look entirely. These shots are mid-range to close up photographs against a white background which, in comparison to the charm of the former, do seem a bit austere. That said, the minimalist approach does highlight the characteristic textures of the cookies quite well.

Two appendices, one on packaging and the other with information on techniques and cook's tools, are helpful additions. Inspired presentation ideas show off the cookies beautifully for giving, and the instructions frequently include step-by-step photos. The baking notes serve as a useful introduction to the novice baker and as helpful reminders to those more experienced.

In the name of research, the Peanut Butter and Jelly Bars (above and below) were the first to be made from this book. The luscious batter inspired nostalgic thoughts of childhood. Its rich scent reminiscent of the best peanut butter cookie crossed with Reese Pieces; the sort that has greedy fingers fighting over rights to lick the bowl. The finished cookie lived up to the charms of the dough, with tender cookie underneath, a layer of tangy-sweet jam in between and the salty crunch of peanuts and crisp crumble as a crowning crust. Perfect for a lunchbox or after-school treat, these cookies will surely become a household classic.

Peanut Butter and Jelly Bars
From Martha Stewart Holiday Cookies 2001.

The recipe featured in the book is subject to copyright but is quite similar to this version.

Notes:

• I used a combination of mixed berry jam and homemade mixed berry compote for the filling as I wanted a bit of tartness to offset the buttery-rich cookie layer.

• Toffee bits, coconut, honey-roasted nuts or white chocolate chips would be a wonderful substitution or addition to the peanut topping. For those looking for true excess, a chocolate spread or dulce de leche could be used instead of jam filling.