Instagram Instagram

Monday
Jan092006

The long winter's rest

I have only just begun to wake up from my holiday-induced hibernation. Never mind the early arrival of darkness, the cosy fires and inviting couch; it has been a blanket of sugar, butter and cream that has kept me in this sedative state.

As others seem to agree, this post-festive season lull allows for a bit of sensory recuperation; an opportunity to recharge after an onslaught of tinsel, twinkling lights and sheer gluttony.

It is during times like these I tend to crave immediacy of flavours - I have no patience for subtlety. I want to dispel this midwinter fog with the brightness of summer-hot chilies, the unapologetically verdant hit of cilantro and the acidic tang of limes. Each flavour distinct, no long-simmered blending to cloud their impact.

While I would love to be able to say that I had the energy and the wherewithal to tackle an authentically Thai or Chinese preparation, it is January and I’m still feeling slightly delicate. So instead I turn to an old friend and standby; my Mother’s vaguely Asian chicken-corn soup.

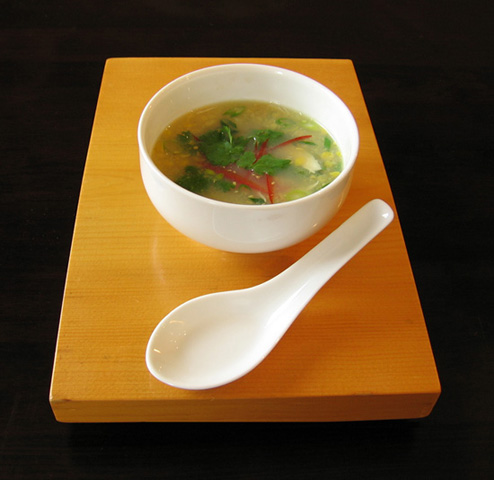
A taste directly transcribed from my childhood, this soup made an appearance whenever we had home-made chicken stock on hand. Served in small white bowls with a fluted edge and a rim of gold, it always felt like a special occasion. It is astoundingly simple to make, forgiving in its quantities and with great allowance for improvisation. Borrowing from various cuisines, this dish delivers the clarity of flavours I so crave, with minimal fuss.

Mother’s vaguely Asian chicken-corn soup
My variation on her creation, with thanks.

Ingredients
2 cups (500 ml) chicken stock
1/2 cup (125 ml) water
2 green onions/scallions, finely sliced, with white and green parts separated
Ginger (see note)
1/2 cup of shredded cooked chicken
1 1/2 cups (375 ml) cream-style corn
Chili oil/chili sauce (optional)
Sesame oil
1/4 cup of roughly-torn cilantro leaves
Salt and pepper, to taste
1-2 Thai bird chilies, with our without seeds, finely julienned
1 lime, cut into quarters

In a medium saucepan, over medium heat, combine stock, water, the white part of the green onion, ginger and garlic, if using. Bring to a simmer, and allow to steep for 5 minutes, until the broth is fragrant.

Add the shredded chicken, corn and chili sauce/oil, reduce the heat to medium-low and gently simmer for another 8-10 minutes.

Finish with the reserved green onion, a few drops of sesame oil and the cilantro leaves. Stir through to combine. Check for seasoning.

Serve with a sprinkling of julienned chili and a spritz of lime, if desired.

Serves 4.

Notes:
• Home-made chicken stock is my preference, but there are some excellent store-bought alternatives available. I would use a low-sodium variety.
• I’ve not included a quantity for the ginger, as it really depends on your taste and mood. When I am looking for assertiveness I will throw in a few 1 inch matchsticks, while I’ll simply grate in a hint when I want just a background earthy heat. Trust your own judgement.
• Canned cream-style corn is readily available (and another childhood favourite), but I highly recommend Alton Brown’s version, omitting the rosemary from his recipe.
• If you do not have chili sauce/oil on hand, I would add a few pieces of the julienned chili to the stock as it simmers, reserving some for garnish.
• My mother would always scramble an egg into the soup to finish - as one does with egg drop soup. She would bring the soup to a boil and then, in a thin, steady stream she would stir in the beaten egg.
• For a vegetarian variation, substitute the chicken stock with vegetable stock and omit the chicken. In this version, you could also use a can of baby corn instead, adding vegetable dumplings and/or Chinese greens.

Saturday
Dec242005

Thursday
Dec222005

Comfort comes in small packages

Recently at Seven Spoons:
Tara speaks from the depths of the couch, towers of magazines and cookbooks obscure her from view. Dear S is otherwise occupied with Ms. Billie, the feline mistress of the house, who is making quick work of the deconstruction of a bag of gift bows.

Tara: I’m torn. Florentines or tuiles? Both look lovely and would be perfect to package up for friends.
S: Uh huh, whatever you want, sweetie.
Tara: (opening another book, sending others flying) Take a look at these stunning cookies Martha’s made. Gingerbread snowflakes, piped with royal icing then dusted with sanding sugar. They sparkle so prettily - and you know I’m a sucker for anything with sparkles. I could do those, then some I saw in Gourmet ... I just need to find my copy ... (begins searching)
S: Do any of our friends like gingerbread? How about making the cookies from last year?
Tara: But that is boring.
S: But they were yummy. And I liked them.
Tara stops looking.

How can one not get excited to try new things come Holiday season? Bombarded with delectable images upon every magazine rack, bookshelf and television show, the season smacks of promise - there is always a new cookie to try, another way to roast a turkey, and this year’s penultimate side dish.

However, at least with my family, rarely do these new fangled recipes garner much praise. True they are well-received, but it is not often are they requested the year following. Not because they are not truly tasty, but because they are just not the tradition.

Take for example my father’s turkey. A few years ago he gallantly deboned an entire bird at our request, stuffed it with a savoury filling and then rolled into roulade - dark meat cradling the white meat inside. The turkey was perfect, moist throughout and utterly impressive.

Though it was, by far, the best bird I’ve ever eaten (and by my Mother’s command has been the only way we have celebrated the holidays for the last five seasons), there are still dissenters among the family. Since the turkey, no matter how beautifully tied, no longer resembles the classic image of a proper bronzed beast it is somehow considered inferior. My ever diplomatic Dad now roasts separate pieces of turkey to appease those souls.

It seems certain dishes are so firmly rooted in our sense of the season that we cannot be so foolhardy as to alter them. As we prepare the meal, going through the motions of making the brussels sprouts, stirring the gravy or getting out the same china we use every year - there is something inherent in these movements, in their ritual and rhythm that reminds us of years past and of memories shared. It is simply not Christmas without these tastes and smells and textures.

While I am all for innovation, I choose to spend this time looking forward and behind; taking note of now only where I am going but where I have been. There is comfort in the known, there is affection in tradition and there is pride in all that has stood up to the tests of time. Sometimes all that is needed are the tastes of home to assure us that there is still some right in the world.

These jam thumbprints are ridiculously easy and immediately invoke a sense of nostalgia, for a time we may or may not have known. Buttery shortbread, crowned with bronzed bits of coconut and gushing with a jam filling, you cannot get more classic than these.

Jam Thumbprints
Recipe published on Food TV.com courtesy of Ina Garten. Originally published in Barefoot Contessa Family Style. This recipe produces a fabulously rich shortbread base; experiment with different shapes and fillings to suit your tastes. I used Blackberry jam for my version, and upped the salt to 1/3 teaspoon.

Tuesday
Dec062005

I'm a sucker for a pretty face

The holidays have already started to catch up with me – and they’re not even here yet. It is not because I’m feeling rundown or because I’m overwhelmed (though I’ll cop to that as well), it is because I get easily distracted. I’ve mentioned this before, I know, but this time of year is truly a minefield for those of us with short attention spans.

It does not help that I can be terribly shallow. Pretty things always get me. Distractions abound. Winter Wonderlands full of sparkles, lights and glitter – every stereotypically girly impulse in me is awakened and I am left cooing over the window displays in Williams Sonoma.

I am every merchandising executive’s dream. Everything is so perfectly-package and so preciously presented, I am weak.

Such is the case with these darling little measuring cups from Nigella’s Home collection. A set of four ranging from 1/4 cup to a full cup, they have a beautiful eggshell finished exterior that begs to be touched. Brought to me after an interesting string of events, I could not say no to the generosity of the offer. And they’re just so pretty.

Taking them from their custom box and setting the little collection out on my counter I was immediately smitten. Not wanting to relegate these beauties to the baking cupboard, I checked their particulars and found that they are dishwasher, oven and microwave safe. Ah the joy of a new canvas to play upon.

Of course with their robin’s egg blue shade, the cup begged to be filled with something deep and dark to set off its looks. And truly, is there any other option than chocolate?

Though parading as a cup of steamy hot chocolate do not let looks beguile you, this tasty dish is more than it seems. Not satisfied with the flavours of chocolate and cream alone, it boasts a custard base – rich and creamy and perfectly tinged with a hint of espresso. Silkier and more sensual than mousse, chocolate pots de crème prove that sometimes depth can be found in a shallow attraction.

Chocolate pots de crème
A classic recipe, with some guidance from Williams-Sonoma and some inspiration from Nigella Lawson.

Ingredients
2 cups chilled whipping cream
2 teaspoons instant espresso powder
5 ounces bittersweet or semisweet chocolate, finely chopped
6 large eggs yolks
2 tablespoons sugar
1 teaspoon vanilla extract
pinch of salt

Garnish options
Sweetened whipped cream
Chocolate shavings
Chocolate covered espresso beans
Cinnamon
Candied pecans or other nuts
Orange zest

Preheat oven to 325º F (160º C) with rack in centre position.

In a medium, heavy-bottomed saucepan, combine the cream and espresso powder. Bring the mixture to a simmer while you whisking to dissolve the espresso powder. Once simmering, remove from the heat, add the chocolate and stir until it is melted and smooth. Set aside.

In a large bowl, whisk the egg yolks, sugar and vanilla, and salt until it the yolks lighten. Stir in the melted chocolate. Strain (you may want to strain into a measuring cup or a pitcher with a spout to ease in pouring).

Place 6 3/4 cup in a large roasting pan. Divide the mixture evenly between the ramekins. I usually transfer the pan to the oven at this point, as I tend to spill water in the next step. Prepare a Bain Marie by pouring water from a recently-boiled kettle around the ramekins, until it comes about halfway up the sides. Cover the entire pan with aluminium foil and bake until the custard is set around the edges – about 25 minutes. Alternatively, you can prepare the Bain Marie on a countertop and then transfer to the oven, but as I said I tend to spill.
When just set (they should still be wobbly in the centre), remove the baking pan from the oven and transfer to a rack to cool for 10 minutes. Remove the ramekins from the roasting dish and allow to come to room temperature. When cool, cover and chill for at least 3 hours, preferably overnight.

To serve, whip the cream with the sugar and garnish the custards. Can be served chilled or at room temperature, though I prefer somewhere in between. The custard seems to be at its silken best and fullest flavour when the chill is off the cup but not as far as being warm.

Notes:
• A dash of a liqueur like Grand Marnier, Crème de Cacao or Kaluha would be great seasonal additions to the whipped cream garnish.
• For a change of pace, omit the espresso and instead add 1 teaspoon of chilli powder (or to taste) for a spicy chocolate hit. Cinnamon and other spices can be similarly substituted.

Sunday
Nov272005

'Tis the season for good intentions

We all do it. There is really no point in attempting denial. Pretty much everyone is guilty as charged.

I challenge anyone to pretend that they have not, at some time or another, shirked a bit of Holiday responsibility. Nothing serious I’m sure, but maybe it was a case of promising to bring a gift for a Secret Santa (less than $25, please), and in your last minute haste you spent a whopping $27.99 at the store on the way.

Or maybe you went so far as to reach back into the closet, pull out that untouched gift Aunt Meg and Uncle Stan gave you last year, snipned off the tag and presented it as your own contribution to the festivities. Regifting never hurt anyone, has it?

Or maybe you had promised to bring a home baked treat along for the annual neighbourhood open house, and somewhere in the purchasing, packing and pandemonium of pre-holiday prep, it completely slipped your mind. So you’re faced with a dilemma - head to the party empty handed or stop over at a local bakery on the way and hope nobody notices the price tag on the box.

I was in a similar predicament this morning. I had said, weeks ago, that I would be thrilled to participate in a cookie swap. I could already imagine the smell of baking butter and sugar wafting through the house; I envisioned cookie perfection, rows upon rows of gorgeous treats all waiting to be enjoyed. I poured over recipe books and magazines, scoured baking supply stores for sanding sugar and dried egg whites.

And then I got distracted. I’m not sure by what exactly, all I know is that it was suddenly the morning of the 27th, and my cookie jar had nary a crumb. Old Mother Hubbard has my sympathies.

Not willing to give up so easily (and with the bakery not opening for another three hours), I looked to my frequent saviour - the freezer. Armed with the last sheet of puff pastry, I improvised a holiday variation on an old classic, palmiers. Flaky and crisp, and glazed with a combination of reduced jam and cinnamon sugar, these cookies belie how easy they are to make. A quick roll and 12 minutes in the oven later, you are left with a tray worthy of any cookie-swap.

Happy holidays, indeed.

Holiday palmiers

Ingredients
1/2 cup strawberry jam
1/2 teaspoon freshly squeezed lemon juice (or more, if desired)
1 inch piece of lemon zest (optional)
1 cup sugar
1/4 teaspoon salt
1/8 teaspoon cinnamon (or more, if desired)
1 sheet puff pastry, defrosted as per package instructions

Preheat oven to 450º F (230º C). Line two baking sheets with parchment paper.

In a small saucepan over medium-low heat, combine the jam, lemon juice and lemon zest (if using). Heat until the jam is melted but before it reaches a full boil. Remove from the heat and allow to cool for about 2 minutes. Using a small spoon, push the jam through a fine-meshed sieve, discarding any seeds and the lemon zest. I advise some care here, as the jam will still be rather warmå. Set aside.

In a small bowl, combine the sugar, cinnamon and salt. Spread one half of the mixture over your work surface and lay the puff pastry in the middle. Sprinkle the remaining sugar on top, and begin rolling. Turn and flip the pastry frequently, pushing the cinnamon sugar into the pastry - you want an even coating. Roll until you have a 13” by 13” square.

With a small offset spatula or butter knife and working quickly , spread the jam over the puff pastry. The jam should be in a thin layer, reaching all the way to the edges of the dough.

Fold the side of the dough halfway to the centre. Fold again, so that the two folded sides now meet in the centre. Fold one half over the other as though you are closing a book and the sides are now stacked on top of each other. Place pastry log on one of the prepared baking sheets and chill for 10 minutes in the freezer.

Remove from the freezer and slice the log into 3/4 inch slices. Place slices, cut side up back onto baking sheets and chill for an additional 5 minutes.

Bake cookies for approximately 6 minutes until the filling is bubbling and glazed and the pastry is starting to turn golden. Flip the cookies with a spatula and bake for additional 5 minutes, until caramelised and puffed. Wait a minute or so, then transfer to a baking rack to cool.

Makes about 24 cookies.

Notes:
• You can use whatever variety of jam or jelly you would like for this recipe. Reducing a clear juice (for example, cranberry) would also make a suitable filling. The jam may be omitted all together, and a coloured sanding sugar added instead for a colourful spiral design.
• The palmiers are quite delicate when they come out of the oven. For flipping and transferring to a wire rack, always use a spatula larger than the cookie to maintain its shape. A light spray of cooking oil on the spatula may also assist in transferring.
• The cut palmiers can be individually frozen on a cookie sheet, then transferred to a plastic freezer bag for storage. They should keep for approximately 2 weeks and do not need to be defrosted before baking. Cooking time may need adjustment, though.