Instagram Instagram

Thursday
May072009

Almost there

I love a good backyard.

Don't get me wrong, a front yard is a wonderful thing. A front yard, and specifically a good front porch, is the place to watch the world go by. It is see and be seen territory, the perfect vantage point to watch the life of your neighbourhood play out in front of you.

In childhood, a front yard is where you meet your friends. Its the soccer field and the skate park. And, in my personal experience, the backdrop for Barbie-related-dramas.

In University the front yard was home to the living room couch, yanked from its indoor confines and released to the great outdoors. It was the spot to lounge away the first sunny days of the season, preferably with beverage in hand.

After that, my front yard was first a fire escape and then a modest balcony, where we sat drinking "classy" wines and pretended to be worldly.

Now, I survey the front yards on our quiet street, with chalk drawings that tattoo the pavement, the toys and bikes and soccer balls left out on the lawns. Gardening tools are nestled by the front door. A watering can sits, stainless steel and gleaming, jewel-bright. Artifacts of the day's adventures and plans for the days ahead.

From our front step I nod to the neighbours, and Benjamin's own technicolour hieroglyphs decorate the pavement.

But a backyard is a whole other world. Even though it is outside, it feels more intimate, more like an extension of your home. The front yard is about show and the backyard is about substance. It is where we really live out of doors, and where others must be invited to gain entry.

This is only our second summer with our backyard, and were becoming fast friends. Last summer we were occupied with the business of having a baby, so this feels like our first opportunity to truly understand its rhythms; the way the light falls throughout the day, the cycle of plants we've inherited, and the time to revisit the haphazardly-laid plans we made a year ago.

It's got good bones, our backyard does, but is in need of a bit of a facelift. If our yard were in a movie, it would be cast as the "plain" girl who has a messy ponytail and always keeps her head down, the one that is suddenly altogether gorgeous once someone takes the time to look.

Its there. I am sure of it. The possibility of specialness, the promise of nooks and crannies for little boys to find magic, a home for a little vegetable patch, and most surely a hammock. We're almost there, our heads full of plans and with days circled on the calendar devoted to the endeavour.

All of that will come in time, and right now I am more than happy with this space outside we have all to ourselves. The lilac is in bloom, and the leaves that form our summertime roof are slowly beginning to unfurl. There is space to run and crawl and cook and dig and plant. And there is my spot, just a beeline out the back door, four strides at most, at the top of the two stairs that lead down from the deck. Sit down with a snack, and suddenly its a picnic. Stretch out, and your toes can reach the grass.

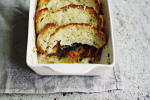
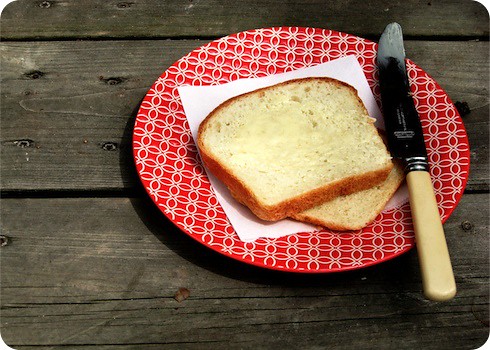
Julia Child's Homemade White Bread Our Way
Another thing that is almost there is my attempts at making the perfect sandwich bread at home. I have been experimenting away, fiddling with yeast and rising times, with quantities of butter and sugar. Sorry about the wait, but one family can only eat so much bread at a time, and we're not a one bread sort of household.

I have realized that we like our bread plain enough not to overshadow what's put on it, but with enough personality that it is not merely a mode of transport for other ingredients. Right now, this variation on Julia Child's recipe is our usual as far as sandwich-style goes. The longer rise gives more substantial texture, and the reduced amount of yeast is preferable to our tastes. Previous columns regarding sandwich bread are here and here.

Recipe (via Slashfood)

Current changes:
• Use only 1 teaspoon of active dry yeast, allowing the dough to rise for about 2-2 1/2 hours for first rise, or until doubled in size. The second rise time will also be longer, about 90 minutes to 2 hours.
• Use 2 teaspoons of sugar instead of 1 tablespoon.
• Use 6 tablespoons of butter instead of 4 tablespoons.
• I usually dust the tops of the loaves with a bit of flour before baking, and sometimes melt 1 tablespoon of butter to brush on the loaves after the flour.

Thursday
Apr302009

A nibbly sort

Since early Monday and up until last night, I was in quite a mood. By early, I mean truly very early. And by quite a mood, I mean a doozy of one.

It might have been the fresh start of a new week, or maybe it was my recent birthday, but whatever the reason I have been in a clean-out-the-closets-get-rid-of-the-clutter-oh!-should-I-start-the-flower-beds-there-is-laundry-to-be-folded-hey!-does-that-window-need-cleaning-air-out-the-curtains sort of mood. I felt like a squirrel riding the swell of a caffeine high, skittering between task to task, caught just between busy and absurdly frantic. More often that I would like to admit I veered recklessly into the latter category.

What finally brought this careening momentum to a halt was, to the surprise of no-one I'm sure, food. A nibbly sort of snack, the most modest of things really. Scorch-grilled bread, a mound of oven dried tomatoes, creamy bocconcini, and a healthy spoonful of lemony, herby, capery, chili-spiked olive oil was enough to stop me in my tracks.

All laid out on a big plate, it was the sort of thing to be lingered over.

A combination of flavours and textures well-suited to this in between time when Ms. Spring can still be a tad temperamental; substantial without being heavy. Rich and unctuous, creamy and mild, astringent and fresh - all piled together on top warm, crusty slice of garlicy bread.

True, I am one that would happily munch on my left shoe if it was topping a fat wodge of freshly-baked bread, but take my word, this is something rather good. Put down the to-do list and pass the wine.

Cheers.

Lemon and Parsley Sauce
A pared-down, rustic variation of the Italian classic, salsa verde. This recipe is for the amount I needed for our snack, but the (estimated) quantities are intended as only a guideline. You can also add some toasted pine nuts and plumped up raisins for a sauce to serve over griddled slices of salty haloumi.

Ingredients
3 tablespoons chopped flat leaf parsley
1 tablespoon capers, roughly chopped if large
1-2 anchovy fillets, minced (optional)
Zest of one lemon, cut in thin strands
2 tablespoons freshly-squeezed lemon juice
6 tablespoons extra virgin olive oil
1/8-1/4 teaspoon dried chili flakes
flaked sea salt and freshly ground black pepper

In a small bowl, combine the parsley, capers, anchovy fillets and lemon zest. Stir in the lemon juice. Slowly add the olive oil until you have a loose, chunky vinaigrette. Check for the balance of acid to oil, adjusting if needed. Season to taste with chili flakes, salt and pepper.

Makes around 1/2 cup.

Oven Dried Tomatoes

Making oven dried tomatoes is hardly new and not at all demanding, but the results are so rewarding it garners another mention. They are juicier than sundried, with a texture I far prefer. You can also control the level of roasting to best suit your needs, which is a bonus, and slow roasting coaxes a bit of summer sweetness from the hothouse varieties available to those of us waiting for local field tomatoes.

I basically use Nigella Lawson's recipe for Moonblush Tomatoes, with a few changes:

• I use fresh thyme instead of dried and add a few grinds of black pepper.
• More often than not I add a head's worth of unpeeled garlic cloves to the pan.
• Upon putting the tomatoes in to roast, I turn the oven down to 350°F (175°C). After about 10 minutes, I turn the oven off and leave the tomatoes to finish drying. Keep in mind that the total roasting time will depend on the size of tomatoes you use. Rarely do I leave them overnight.
• I often make these after baking bread, to take advantage of the already-heated oven.

Tuesday
Apr212009

One ribbon-tied package (and a winner!)

Thanks to my sis-in-law Rene, for not only hosting the dinner tonight, but also being our photographer. She's especially snazzy.

Sorry about this. Really.

I know, we were chatting about chocolate and coffee just a few days ago. And it seems as though I have had sweets on the brain for weeks now.

But, if ever was there a day when maybe, just maybe dear reader, you could cut me some slack for my repetitive ways, I hope it will be today. Because really, who would begrudge a birthday girl her chocolate wish?

That's right, today was my birthday.

Please excuse my sweet tooth and forgive me for being a trifle scatterbrained just now, but I wanted to stop in to share with you the dessert we chose to celebrate.

Our fancy-dress festivities are not for another few days, so today is all about a night just for family. And for me, if there is one dessert that ties together my thoughts of family and nostalgia all in one ribbon-tied package, it would be my Mum's Mocha Dessert.

When I was little, this Mocha Dessert was the often-requested sweet ending to my parents' dinner parties, parties I considered the height of elegance. Silver was polished to perfection, the good china was brought out, and the menu were planned days in advance. When the night arrived, the men were dapper and the ladies were always dressed to the nines; you can surely imagine how my six-year-old self loved the glamour of dark lipstick and dangling baubles.

I remember their conversations lasting into the night. The deep murmur of their voices, often punctuated by peals of sparkling laughter, made its way through the darkness, up the stairs and to my ears as I strained to catch what was surely exceptionally witty banter. I thought it all terribly romantic.

As an adult, I can appreciate why this simple recipe was the subject of such praise. Layers of graham crackers were sandwiched with coffee cream and drizzled with chocolate sauce. After a night's rest in the icebox, the formerly-disparate components relax into each other. The graham crackers loose all their crispness, the cream turns thick and luscious. In the end, everything is mousselike, with a delicate delineation of layers that yield to the slightest pressure from a spoon. A cross between an icebox cake and a tiramisù, I strongly believe that it was this ethereal confection that started my love affair with coffee.

This cake is ridiculously easy to make and decidedly old school. It is not about bells and whistles, or technique and the latest trend. Instead, like all fond memories, it simply makes me smile.

Of course I had a little bit of business to attend to today, and that is the announcement of the winner of the giveaway. I am happy to say that Random.org has selected Angela as the recipient of a one-year subscription to the food magazine of her choice. Angela, please contact me at tara [at] sevenspoons [dot] net with your contact information.

Thank you to everyone that entered and a here's wishing a happy day to each and every one of you!

Mocha Icebox Cake
Adapted, with thanks, from my Mum. Hers was made and served like a tiramisù, with more cream and less cookie, scooped out for serving. I have turned the dessert out on its head, and added some chocolate whipped cream.

Ingredients
3 1/2 cups heavy (whipping cream), divided
3/4 cup confectioner's sugar, divided
1 tablespoon instant coffee granules
a pinch of salt
1 teaspoon vanilla extract
45 honey graham crackers, the single kind
1/3 cup chocolate syrup, see note
1/3 cup cocoa powder, sifted

Line an 8-by-8-inch metal cake pan with a cross of clingfilm, leaving an overhang on all sides. Set aside.

In the bowl of a stand mixer with the whisk attachment, or in a medium bowl with a hand blender or whisk, begin to whip 2 cups of well-chilled heavy cream. Once the cream begins to thicken, sift in 1/2 cup confectioner's sugar, the coffee granules and salt. With the mixer on medium-high, whip until the cream begins to hold soft peaks. Add the vanilla, and beat until the cream just holds a stiff peak.

Spread a small amount of the cream on the bottom of the prepared cake pan. Lay 9 crackers, in a 3-by-3 grid, on top of the cream. Spoon 1/2 cup of the cream on top of the crackers. Then, using an offset spatula, gently spread the cream to cover the crackers entirely. Drizzle a few tablespoons of the chocolate syrup over the cream, spreading to form an even layer if desired.

Top with another layer of graham crackers, continuing the layering until you have 5 layers of crackers and 4 of the cream and chocolate. Make sure to reserve a small amount of cream to cover the last layer of crackers (no chocolate on this one).

Cover loosely with a piece of clingfilm, then draw the overhanging clingfilm from the sides up to cover the edges. Refrigerate for at least 6 hours and up to 2 days.

About 1 hour before serving, remove the cake from the fridge and peel back the clingfilm. Invert the cake onto a serving plate, removing the remaining clingfilm from the top and sides. Smooth out the sides with an offset spatula if needed. Place the cake in the freezer, uncovered, to chill for 30 minutes.

Prepare the cocoa cream. In the bowl of a stand mixer with the whisk attachment, or in a medium bowl with a hand blender or whisk, begin to whip 1 cup of well-chilled heavy cream. When the cream begins to thicken, sift in the reserved 1/2 cup confectioner's sugar and cocoa powder. With the machine set to medium-high, whip the cream until holds a firm peak, but being careful not to over beat.

Take the cake out of the refrigerator and gently spread a thin layer of the cocoa cream to cover. Once completely covered, use the remaining cream to decorate as desired. Chill the finished cake in the refrigerator for 30 minutes, then serve.

Notes:

• If you are going for authenticity, my Mum used Hershey's Chocolate Syrup (the dessert topping in the yellow tin, not the brown squeeze bottle). But if you are feeling posh you can make your own using one of these recipes.
• For the sake of honesty, I will say that maybe I went a little overboard and used a full 2 cups of cream for the cocoa frosting. The last 1/2 cup looked so sad in its carton, and heck, you only have one birthday a year. Totally not necessary to the cake, but enjoyably decadent. To follow suit, add a bit extra cocoa powder and confectioner's sugar, to taste.
• A pinch or two of instant coffee granules added to the cocoa cream is also a good thing.

Thursday
Apr162009

Brilliantly new


Images of a long weekend. Signs of spring; candy-coloured chocolate eggs and blooming red shoes.

I have my own little ritual to start the day.

Most mornings we get up just before the sun rises; we make our way downstairs in the dim predawn, drawn like moths to the glowing red eye of the coffee maker. My husband and I will chat quietly with pajamaed little boys cheerfully groggy, (relatively) quietly content to keep Mummy and Daddy company around the kitchen table.

But the day is not started yet.

My day truly begins about two hours after I get up. After coffee and orange juice and breakfast, we make our way back upstairs. This is when the day begins, as I move from room to room, pulling back the blinds which have hidden the sun from view. The windows, now unencumbered, welcome the light as it streams in.

Why, hello there World.

This is the most energetic light of the day, clear and true. Even in the winter, I anticipate this moment of revelation, this ceremony of bringing the day into our home. Now that spring has thankfully arrived on our doorstep, the morning light is even more radiant, growing increasingly-golden as the days go by.

It is a light that renders everything new, every day full of possibility.

There is a newness to childhood that I had forgotten. So many things that we grow to take for granted is bran-spankin-brilliantly new to a little one. William is in the thick of it, crawling and standing and exploring the boundaries of this new world of discoveries. There is glee in the discovery of the ability to clap, wonder at the skill of rolling a ball, unabashed joy at knocking down a block tower.

While our Benjamin has been through first teeth, first steps, first words already, he's not done yet discovering, not by a long shot. He's just getting started.

At three years of age, he has entered the world of reason. He asks questions. A lot of questions.

"Why do I need that?" (on wearing a coat)
"Who is that guy?" (in the grocery store)
"How does that work?" (too popular to pick one example)
"Where does this go?" (completing a puzzle)
"What is this?" (on oh-so-many things)

It is amazing to observe him as he considers his world. When Ben was very small, we were more concerned with the big picture, with labels like boy and dog and cat and apple. Now we also can consider the details, how he is a boy and a brother and a son and a Benjamin. And a bird can be brown and red and fat and a robin, too.

The same sort of diversity is explored in food. As much as we rely on our established recipes, variation is welcomed. Eggs can be fried and scrambled and poached and omelets and boiled; they need not be only one way.

Now and again I make it a particular point to seek out discoveries, just so I can see our boys process the new. I pretend to be casual, while slyly watching their expressions transform from curious to interested, then ponderous, and then finally wonder lights up their eyes - with this new thing, their world is forever changed. And it is marvelous.

Often, their grins match my own.

Lately we have been eating a lot of popcorn, since Benjamin declared it his favourite snack. We have always made it in relatively the same manner, with butter and salt, but sometimes with herbs and garlic or a grating of Parmesan. Curious to see his reaction, I thought I would try my hand at making caramel popcorn, one of my guilty pleasures and something he had never had before.

Pressing my luck, I chose a recipe outside the realm of the usual caramel corn - one that was salty sweet, with a hit of spice to add some interest. Last Halloween we roasted pumpkin seeds then tossed them in a heady mix of cumin, cinnamon and ground ginger. They were addicting, and Benjamin was a particular fan.

The result was more than I could have hoped for. At first the taste is sugary-sweet, then as the caramel dissolves the spices become evident. Each bite builds upon the savoury, but is never overpowering. My only trouble is, now that we've come upon this popcorn, I am not at all inclined to try another.

I might have to abandon my good intentions, at least as far as popcorn is concerned.

The publication in the photos is the ridiculously-brilliant Uppercase magazine, from the exceptional minds behind the Calgary-based gallery of the same name. It is, in a word, gorgeous. This is their inaugural issue, and I highly recommend picking up a copy. You can thank me later.

Speaking of magazines, have you entered your name in the giveaway yet?

Spicy sweet caramel corn
What you get when you mash up two recipes from Martha Stewart with a healthy dose of inspiration from David Lebovitz. Baking the popcorn makes for a thinner, crisper coating.

This recipe is technically a half batch; I find it an easy amount to handle, especially as there is only a modest amount of bubbling, scorchingly-hot sugar syrup to worry about. However, if you are making this for a crowd, or for any more than say two greedy adults and a toddler, I'd go ahead and double the quantities.

Ingredients
6 cups of popped popcorn (plain, without seasoning)
1/4 teaspoon kosher salt
1/4 teaspoon ground cumin
1/4 teaspoon ground cinnamon
1/4 teaspoon ground ginger
1/4 teaspoon baking soda
1/8 teaspoon red chili powder, or to taste
1/2 cup granulated sugar
1 tablespoon Demerara sugar (optional)
1/4 cup (1/2 stick) unsalted butter, room temperature
2 tablespoons light corn syrup
1 tablespoon water
sprinkling of fine salt (optional)

Preheat an oven to 250°F (120°C). Line a half sheet pan or baking pan with a nonstick baking mat (Silpat) and set aside. Have your popcorn standing by in a large, wide bowl.

In a small bowl, stir together the salt, cumin, cinnamon, ginger, baking soda and chili powder. Set aside.

In a medium, heavy-bottomed saucepan, combine the butter, sugars, corn syrup and water over medium heat. Cook, stirring occasionally, until the butter is melted and the sugar is dissolved. Without stirring, bring to a boil. If necessary, use a pastry brush dipped in water to wash down the sides of the pan and remove any crystallized sugar. Swirling the pot gently now and again, allow the sugar to cook until golden in colour, around 5 minutes. Remove saucepan from heat and, working quickly, use a heatproof spatula to stir in the prepared spice mixture. Note that the sugar will bubble up due to the baking soda. Allow the foaming to subside slightly, it will only take a few seconds, before proceeding.

Quickly (and carefully) pour the caramel over the popcorn, stirring and tossing to coat. Spread the popcorn as evenly as possible over the prepared baking sheet and bake in the preheated oven for 30 minutes. While baking, stir the popcorn occasionally, gently breaking up any large clumps and keeping the popcorn in an even layer. The last time you stir the popcorn, maybe about 5 minutes before taking the tray out of the oven, sprinkle with some fine-grained sea salt, if using.

Allow the popcorn to cool completely on the tray, then break up any remaining large clusters. Store in an airtight container for up to 1 week.

Makes around 6 cups.

Notes:

• If I had not been out of light brown sugar earlier this week, I would have followed David Lebovitz's suggestion of using it instead of granulated.
• I use Kashmiri chili powder.
• While I like my caramel corn unadorned, nuts would most likely be welcomed in this recipe.
• See the link above to the Martha Stewart recipe for notes on popping popcorn on a stovetop.

Thursday
Apr092009

Just that bit friendlier (and a giveaway!)

It was the loaf pans, I think. They were at the start of all of this.

When I set about baking homemade sandwich bread, I tried Julia Child's recipe. A recipe which specifies a 8-by-4-inch loaf pan, instead of the more common (and larger) 9-by-5-inch variety. After baking my loaves and admiring their modelesque proportions (slim, tall), I was smitten. I took to baking many of my breads and cakes in these pans, thinking there was no harm in my fondness for foods on a smaller scale.

But those pans served only as a gateway to increasingly-elfin baked goods.

When baking a pound cake, I brought out miniature tube pans and split it into six. Banana bread was divided into eight little loaves to be tucked into lunches. My super-secret recipe Chocolate Crunch Bars were made in individual squares, rather than a monstrous slab. And then, of course, there were those Valentine's Day cupcakes.

Somewhere along the way of this Lilliputian baking, I had two realizations. Well, one realization, and one moment's pause. First, I realized I have amassed more than a few baking pans. Second, I became somewhat self-conscious about my weakness for the wee.

You see, dear reader, there has been some recent criticism of diminutive cakes.

I can agree that some cupcakes are over-the-top sweet, with such an excessive helping of tooth-aching frosting that they are nearly impossible to enjoy. And I do think that some bakeries have gone a trifle mad in their pricing of these cakes.

But I cannot subscribe to the theory that lies at the root of much of the disapproval. The objection of the individuality of the single-serving cake, a trait seen as embodiment of the "mine-all-mine" mentality that represents all that is wrong with the world.

In the eyes of these critics, the small is associated with the sole, and that is seen as sad. Lonely, even isolated.

And so, if no man should be an island, should no cake be a cupcake? Has this predilection for the compact been the result of a larger trend of greed?

Pshaw.

Now lest I ignite a debate on whether or not there is room in this world for a moment to treat oneself (I am firmly in the "yes" camp on that one), I will instead consider the fact that most of these criticisms are aimed at the purchase of cupcakes. There is no mention of making cupcakes; making them is another thing entirely.

Making small cakes almost always ensures sharing. The sheer number of of treats made in a single batch encourages generosity. Sure, a large cake can be doled out in slices and wrapped for giving, but most often it is served to those who happen to attend a specific event. In contrast, an armada of cupcakes (baked right in their travelling clothes) are perfectly suited to be sent out into the world - event or not.

You see, small cakes can be more approachable than one behemoth beauty. A layer cake on its pedestal is lovely, but a bit standoff-ish. All-too-often I have been at a party, admired the cake perched prettily on its stand, and noticed that nary a crumb has been touched. Unless the host serves, rarely does a guest feel bold enough to "be the first" to mar its pristine completeness.

But set out a tray of cupcakes, or single-serving squares, and they are scooped up before you can bat an eye.

Little cakes are just that bit friendlier. They do not stand on occasion. While a slice of cake may seem like it requires a holiday, a small cake slips easily into the everyday.

While we are at it, small cakes are cute and neat. Sure it is shallow, but even though I love some messy fun in the kitchen, I do believe that the recipients of my efforts appreciate the clean edges that personally-portioned baked goods provide. I am routinely inept at cutting straight lines, and so perfect shapes would surely be preferred over my mangled efforts.

But, all said, there is one trouble with making petite treats. Miniature baking pans are truly infuriating to keep clean. I have a serious case of dishpan hands from scrubbing all those teeny-tiny nooks and crannies.

I blame Julia.

Bittersweet chocolate cake
Adapted from a recipe for Chocolate Chip Mascarpone Cupcakes by Giada de Laurentiis. A note on its flavour; despite its appearances, this cake is not overly rich. It is the sort that is best with a cup of tea in the afternoon, or as a simple dessert. Canadians (and some Americans), will find the taste of this cake is strikingly similar to the chocolate glazed doughnuts from well-known national chain.

Ingredients for the cake
3 ounces unsweetened chocolate, chopped
3 ounces bittersweet chocolate, chopped
1 cup water, room temperature
1/2 cup sour cream, room temperature
3 cups all-purpose flour
1 teaspoon baking soda
1 teaspoon fine sea salt
1/2 teaspoon baking powder
2 1/4 cups granulated sugar
1 cup vegetable oil
3 large eggs
2 teaspoons vanilla extract
3/4 cup mini semi-sweet chocolate chips

Ingredients for the glaze
1/2 cup granulated sugar
1 shot of espresso
around 1/2 cup of water
1 1/2 teaspoons cocoa powder

Make the cakes. Preheat an oven to 325°F (160°C). Butter and flour two 8-by-4-inch loaf pans, set aside.

Place the two types of chocolate in the top of a double boiler or a heat proof bowl set over a pan of simmering water. Stir until melted; remove from heat and allow to cool slightly.

In a small bowl, whisk together the water and sour cream to combine. Set aside.

In a medium bowl, sift together the flour, baking powder, baking soda and salt. Set aside.

In a large bowl, using a hand mixer or whisk, beat together the sugar and oil until well blended, around 1 minute. Add the eggs, one at a time, beating well after each addition. Scrape down the sides of the bowl as needed. Stir in the vanilla, then the cooled chocolate. Add flour mixture alternating with sour cream, starting and ending with the flour mixture and stirring until just blended. Stir in the chocolate chips.

Divide the batter between the two prepared pans and bake until a cake tester inserted into the middle of the loaves comes out clean, around 55-65 minutes. Remove from oven, cool 10 minutes in pan, then remove the cakes to a wire rack to cool completely (right side up).

For the glaze, take the shot of espresso and pour it into a 1/2 cup liquid measure. Add enough water to bring the level up to a 1/2 cup. Pour the water mixture, sugar and cocoa into a small saucepan and whisk to combine. Bring to a boil over medium heat, stirring occasionally. Simmer until the glaze is thick, about 5 minutes.

To glaze the cakes, set the cooling rack over a rimmed baking sheet. Using a pastry brush, paint the glaze all over the top and sides of the cakes; carefully apply multiple thin coats for the finest finish. Let stand until set.

Makes two 8-by-4-inch loaf cakes.

Notes:

• If you do not like espresso, use only water for the glaze.
• The cake pictured was baked in a Nordic Ware Pro Cast Brownie Bundt pan (thanks Mum!). In this size, the recipe will yield about 36 cakes.

And now for the giveaway. The fine folks at Subscription.com were generous enough to offer me a complimentary magazine subscription. Sadly, I am unable to take advantage of their kindness due to international distribution restrictions. So, we thought to pass the offer on to you.

Subscription.com will give one reader a full-year subscription to the cooking/food magazine of their choice (as selected by the winner from their list of titles). There is no cost to be incurred by the winner, the only condition is that you must be is a resident of the United States or have a US mailing address. To enter, leave a comment at the end of this post, with a mention of your desire to be included in the draw, and I will compile these comments into a master list (this way, non-entrants can still comment if they'd like). A random winner will be selected and announced on April 21, 2009.

My apologies to Canadian and international readers for their exclusion. There will be some more giveaways in the future to make it up to you; please understand that I simply could not pass up the opportunity to share this prize.