Instagram Instagram

Thursday
Jul232009

Just you wait

I know that I am more than late for our usual Thursday chat, but please forgive my tardiness. Due to an oversight on my part, our guest of honour was not ready for their debut. But finally, the wait is over.

The pickles have arrived. And what pickles they are. But before I tell you about their end, let me tell you of how they came to be.

At the market last weekend, I overheard a farmer describing the progress of his crop. Speaking in glowing tones that were more than tinged with pride, he detailed the specific traits of each of his vegetables; how they grew, their likes and dislikes, their particular qualities. He had a quiet intensity about the way he spoke, an enthusiasm that shone through his words. It was evident that the subject matter was of the utmost importance - more than a livelihood, but a passion as well.

There's just one of the many reasons why he's our Regular Vegetable Man.

On that same weekend his summer squash was especially fine, slender and small, with delicate, taut skin that was perfectly blemish-free. I do not know what it was that sparked my idea of pickling these little darlings, but a pickle was my particular plan. It was a surprising choice, as my usual tendency is to grill, griddle, or roast. But a pickle seemed the order of the day, the promise of crisp, cold slices of squash, puckery and astringent had me salivating. As a good pickle should.

Five days after salting, boiling and sealing the jars tight, I opened the fridge with fork in hand and anticipation in my heart.

That's the thing about pickles, they require faith. Commitment. They take their own sweet time. You do what you can to set things in motion, but that is where your influence ends.

What you put in the jar is as acrid and overblown, eye-twitchingly sour. But wait, just you wait, this is only the beginning. From there, the pickle really takes care of itself. The wait is transformative, and what happens inside that glass coccoon is entirely out of your hands. But your patience will be duly rewarded.

And rewarded I was. After those days, the vinegars had mellowed and muted, now balanced with a sweetness that is first to the tongue. The heat follows, with the indisputable zing of acid to finish.

I wonder if our Vegetable Man might like a jar.

Bread and Butter Pickled Summer Squash
Inspired by a recipe from Simply Recipes. As these are meant as a refrigerator (chilled) pickle, they are not processed after being canned. Please see the link above for valuable tips on sterilizing and, if you so choose, how to process pickles so that they are shelf-stable.

Ingredients
2 pounds mixed summer squash, cut into 1/8-inch slices (I used yellow summer squash and zucchini)
1 medium white onion (about 8 ounces), halved and thinly sliced
2 heaping tablespoons kosher or pickling salt
2 cups ice cubes
2 cups cider vinegar
1 cup white vinegar
2 1/4 cups sugar
2 teaspoons whole mustard seeds
3/4 teaspoon celery seed
3/4 teaspoon whole black peppercorns
1/4 teaspoon turmeric
1/2 teaspoon crushed red pepper flakes
1/8 teaspoon or a good pinch of ground cloves

Toss squash and onion with salt in a large colander set over a bowl. Add ice, toss again. Refrigerate, tossing occasionally for 3 hours. This process will increase the crunch of the pickles by drawing out excess water. Once the 3 hours have passed, drain the squash, picking out any ice cubes that might remain. Rinse well and drain again.

Bring vinegars, sugar, mustard and celery seeds, peppercorns, turmeric, red pepper flakes and ground clove to a boil in a saucepan. Add the drained squash and onion. Ladle into 4 hot sterilized pint jars, leaving about 1/2 inch below each jar's neck. Carefully wipe rims of jars with a clean, damp cloth. Cover tightly with new, sterilized lids and screw tops. Cool to room temperature, then store in the fridge for 3-5 days before opening.

Makes 4 1-pint jars, to be eaten within weeks of making.

Thursday
Jul162009

Not a moment's hesitation

I am not one to make quick decisions. I never have been. My paralizing inability to make snap judgements is a periodic subject of (loving) mockery amongst those who know me best.

When going out to dinner, I might be inclined to sneak a glance at menu in advance, just to be well-versed in my options. (But then, my best-laid plans are frequently set aside as soon as the specials are announced). Suffice it to say, I am a planner, a ponderer. A girl who likes to know her options.

But in regards to certain things, special things, passion overrules reason and I have my answer ready before you've finished the question. Unsurprisingly, considering my fixation with breads, bagels are one of those things.

In my mind there is but one city that can claim the crown of bagel-making supremacy, and that is Montreal, Quebec, Canada. Full stop. No equivocation. Not a moment's hesitation.

Montreal is home to the best bagels around. There, I said it.

Bring it on New York. I'm ready for you, Toronto. As far as I am concerned, Montreal's bagels are a thing unto themselves, a whole other (perfect) incarnation of bagel. And although I hasten to mention I've not had many bagels overseas, I'm nonetheless willing to cross my heart and raise my right hand to pledge my allegiance to those from the town where I was born. And no, I will not admit a trace of bias there.

I cannot overstate the lure of a freshly-baked bagel from one of the many storied shops in Montreal. To truly understand their greatness, I implore you, get thyself to la belle province as soon as possible and experience them firsthand. You'll thank me later.

In the off chance that you are not willing to take me at my word, let me count the ways that Montreal's bagels are the so divine.

They inspire devotion. Example; I used to know someone whose job would take him from Toronto to Montreal on a fairly-regular basis. On those glorious days when he would return, those waiting for his arrival would set upon him almost immediately, hungry for their fix. Setting upon the nondescript brown bags he held in his clenched fists, they would tear them open, their contents would spill across out, sesame seeds scattering everywhere.

I was one of those people. Sometimes I would stash an extra bagel in my purse to take home. I'm not proud of that fact, but it is true.

The inspire gluttony. Even though nobody, save myself, was "much in the mood for bagels" when I set about baking, our batch of 24 was gone in 48 hours.

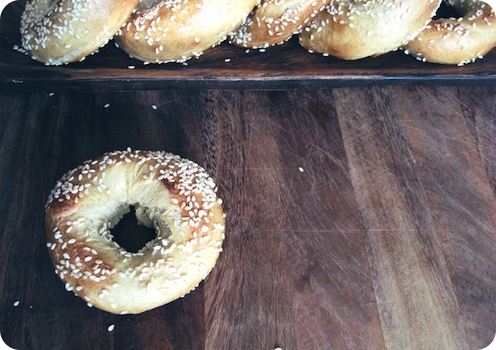
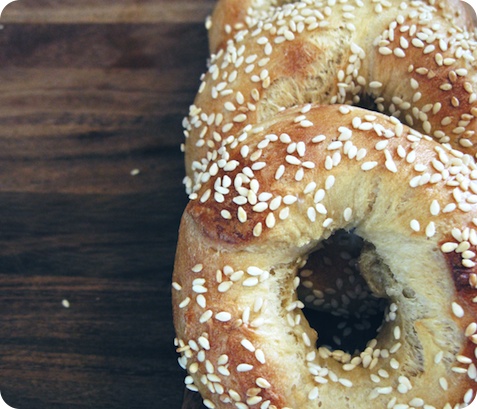
You see, Montreal bagels are not the billowing cotton-ball, bite-down-on-a-pillow, overgrown mass of tasteless fluff that so many bagels are these days. These bagels are ropey and irregular in their looks, skinny limbed and gorgeously misshapen. Before baking, the bagels are dipped in a honey-laced bath, the sweetness reinforcing the trace of malt syrup in the dough. They are studded with seeds, sesame or poppy, before being torched in requisite wood-fired ovens. Those seeds get scorched in spots, turning gold and brown, their nuttiness brought forth by the flames full throttle. The interiors are tightly crumbed, dense and chewy. There is no mistaking a these for a glorified roll.

Now which bagel shop in Montreal gets my heart? Don't get me started.

Montreal Bagels
While I do not have a wood-fired oven at home, these bagels are a close approximation of those from Montreal. From HomeBaking: The Artful Mix of Flour and Tradition Around the World by Jeffrey Alford and Naomi Duguid (Random House Canada, 2003). The ingredient list below is theirs, while the method is my interpretation of their instruction.

As the boiling and baking of bagels is a bit of a procedure, it is best to have all equipment at hand . When ready to begin, have a slotted spoon and baking peel (or a baking sheet to use as a peel) at the ready. Put the sesame seeds or poppy seeds on a large, shallow dish, and have a cooling rack nearby.

Ingredients for dough
2 teaspoons granulated sugar
1 cup lukewarm water
1 tablespoons active dry yeast
2 tablespoons wheat malt syrup (see note)
1/2 cup warm water
1 large egg, room temperature
1 tablespoon vegetable oil
2 teaspoons salt
About 4 cups all-purpose flour

Ingredients for shaping and topping
3 tablespoons honey
About 1 cup hulled sesame seeds or black poppy seeds or some of each

In a medium bowl, or the bowl of a stand mixer with the dough hook attached, dissolve the sugar in the lukewarm water. Stir in the yeast. In a small bowl, dissolve the wheat malt syrup into the 1/2 cup warm water. Stir in the egg, oil, and salt. Set aside.

If proceeding by hand, add 1 cup of the flour to the yeast mixture and stir to combine. Add the wheat malt mixture and then 2 more cups of flour and stir, always in the same direction, until a smooth dough forms. It will be quite moist. Add the remaining 1 cup of flour and stir to incorporate. The dough will be quite stiff. Turn the dough out onto a lightly-floured work surface and knead for 5-10 minutes, until it becomes smooth and elastic.

If using a stand mixer, add 2 cups of flour to the yeast mixture and mix on low speed for about 1 minute. Add the wheat malt mixture and the remaining 2 cups of flour, and stir on the lowest speed for 3 to 4 minutes. Turn out onto a lightly-floured work surface and knead briefly, until the dough is smooth and elastic.

Place the dough in a clean medium bowl and cover with plastic wrap. Let rise for 1 3/4 to 2 hours, until the dough has doubled in volume and is soft. Punch down the dough gently, recover and let rise for another 1 to 1 1/2 hours.

If you have one, place a baking stone or unglazed quarry tile (see note) on a rack in the upper third of the oven. Preheat oven to 450°F (230°C).

Cut the dough into quarters, working with one piece at a time and covering the remaining in plastic wrap. Divide the piece of dough into 6 equal pieces (weighing approximately 2 ounces each). Roll each small piece out into a skinny rope, around 10 to 12 inches long. Press down on the rope, rolling it back and forth under your palms against the work surface, pushing out and gently towards the ends. The dough is very elastic, shrinking back if overworked. It is easiest to work two ropes at a time, alternating between the two and allow each to rest in between.

When the rope is to the appropriate length, lay the dough over one hand, with one end across your palm and the other hanging free. Bring this second end across the back of your hand to form a loop, and bring the two ends together, overlapping by about an inch. Pinch the ends together, then bring them down under your hand against the work surface, rolling them together gently. Place bagel on a parchment-lined baking sheet and repeat the process with the remaining 5 pieces of dough. Cover with a cotton cloth and let stand for 15 minutes.

Meanwhile, bring 8 cups of water to a gentle boil in a wide 4-to-6-quart pot. Add the honey and stir to dissolve. Gently slide 3 bagels into the boiling water; they may sink for a moment, but should break the surface within 10 seconds. Use the back of the slotted spoon to gently press the bagels back under the water now and again, letting them boil for a total of 45 seconds. The should be slightly puffed. Remove the bagels using the slotted spoon and move them directly to the sesame or poppy seeds. Roll and press the bagels into the seeds, coating well, then place them on your baking peel or a parchment-lined baking sheet, leaving about an inch between them. Repeat the process with the remaining 3, placing them beside the first 3.

Bake for about 8 minutes on the baking stone or parchment-lined baking sheet, then use a long-handled spatula to turn them over and bake for another 5 to 7 minutes, until golden brown.

As soon as you put the bagels in to bake, start shaping the next batch of 6. Remove the baked bagels from the oven to a cooling rack, allow the stone to recover for a couple of minutes, then bake the second batch. Repeat until all of the bagels have been shaped, boiled and baked.

Makes 24. Best eaten the day they are made, or can be split and frozen in a well-sealed freezer bag.

Notes:

• I do deviate from Alford and Duguid's direction regarding size, upsizing their bagels slightly from (when raw) 1 1/2 ounces to 2 full ounces. To follow their lead, cut the quarters of dough into 8 pieces instead of 6, resulting in 32 finished bagels.
• For those who do not have a baking stone, I remembered a tip from ages ago regarding the use of cast iron pans for pizzas. I tried the method, using my basic 10-inch skillet, to particularly fine results. Michael Ruhlman suggests inverting the pan, but I didn't. A flat top cast-iron griddle would be ideal.
• Wheat malt syrup is a grain product used in bread dough to assist in rising and to develop a deeper, more complex taste. Wheat malt syrup is available at specialty and natural food stores.
• A thorough discussion of Montreal's bagels can be found at Tasting Menu.

Monday
Jul132009

There were fireflies

People are already starting to talk about summer in the past tense. And it makes me want to weep.

I am evidently the vulnerable sort. Or just a trifle prone to the dramatic. Either way, its making me a bit emotional. We're only just barely two weeks into the month of July, and I've heard the hushed mention of back-to-school. Really?

A few days ago I was innocently flicking through a clothing catalogue and noticed sleeves were getting longer than those shown a month before. And while I might have gazed longingly at a particularly-tweedy ensemble for a nanosecond, I rallied myself against that affection. Surely the season cannot be over already, before it has even really begun?

We've only had one carnival, the tomatoes are still green and I have not had nearly enough time in the pool. And the other night, there were fireflies. There is still so much of summer left.

I hope that there are days to come with time for walks on warm evenings, the sort that lead you to meander through neighborhoods until the last of the light. For strong coffee in the quiet of the early morning, when the air is already thick with heat. And opportunity to savour sunwarmed peaches, and raspberries picked by eager hands, brought home in baskets stained purple with juice.

And picnics. Days and days for picnics, please and thank you. Did I tell you? We've become the sort to picnic. Picnic folk, if you will. Give me a tree, a patch of grass, even a rock and a box of takeout, I am blissful to sit and while away a minute or an hour or an afternoon. I will find each and every possible excuse to pack up our boys, pack up some nibbles, and make our way to the great outdoors - even if that just means the backyard.

I consider this cake, this raspberry-rippled marvel you see before you, to be my sticking point, my line drawn in the sand against all of those eager to write off the season and look forward to fall.

A buttery base is drowned in an ocean of blue-black raspberries, dolloped with more batter, then covered in a nut-flecked crumble. It is a cake full of berries and peaches and it is ideal for a picnic. Pretty as it is, it is a sturdy sort of beauty. It is a cake as easily eaten out of hand as it is with a knife and fork, and truth be told, I prefer the former method. It makes for effortless picnic-ery.

No siree Summer, I'm not letting go of you yet.

Raspberry Peach Crumb Cake
Adapted from a Better Homes and Gardens recipe, via Inn Cuisine. It is a fine dessert, a grand snack, and I'm sure nobody would sneer if it was offered alongside that aforementioned early-hour coffee. My wonderful (and super cool) nephews, ages 5 and 10, were kind enough to pick these for us - bringing in not one, but two generous harvests. Thanks to you both for your enthusiasm and stained knees.

Ingredients
6 ounces raspberries, fresh or frozen, I used fresh wild black ones
2 medium peaches, peeled and sliced into chunks
1 tablespoon cornstarch
1/4 cup granulated sugar
1 egg
1/2 cup sour cream
1/2 cup milk
1 teaspoon pure vanilla extract
2 1/4 cups all-purpose flour
3/4 cup granulated sugar
3/4 cup butter, cold and diced
1/3 cup sliced (flaked) almonds
1/2 teaspoon baking powder
1/2 teaspoon baking soda
1/8 teaspoon salt
coarse sugar for dusting

Preheat an oven to 350°F (175°C). Butter and flour a 10-inch tart pan with a removable bottom, or a 10-inch springform pan.

In a medium saucepan, toss the raspberries and peaches with the cornstarch to coat. Stir in the sugar and cook over medium heat until bubbling and thick. Remove from the heat and mash the berries and peaches slightly. Take approximately 1/3 of the mashed fruit and transfer to a medium bowl. Set a sieve over the same bowl, and a little at a time, push the remaining fruit through the mesh to remove any seeds and large pulp. Remove the sieve, discard the seeds and pulp, then stir the purée to combine with the reserved fruit. Set aside to cool slightly.

For the cake, in a medium bowl stir together the sour cream, milk, egg and vanilla. Set aside.

Combine the flour and sugar in a large bowl. Using fingers, two knives or a pastry cutter, cut the cold butter into the flour mixture until you have a texture that resembles coarse meal. Remove 1/2 cup of the crumb mixture to a small bowl and stir through the almonds. Set aside.

To the remaining flour mixture, whisk in the baking powder, baking soda and salt. Make a well in the centre of the dry ingredients and pour in the liquids. Using light, quick strokes, stir until only just combined. The batter should be thick, but smooth.

Take about 2/3 of the batter and spread it across the bottom and up 1-inch of the sides of the prepared pan. Damp fingers or a wet palette knife make easy work of this. Spoon the reserved raspberry filling over the batter, gently spreading to cover and leaving a 1/2-inch border at the edge. Dollop irregular mounds of the remaining dough over the fruit layer, again using damp fingers or a wet palette knife to coax the batter to almost cover - some gaps are good. Top with the crumb topping over all and then sprinkle with a couple of teaspoons or so of coarse sugar.

Place on a sheet pan and bake in a preheated oven for 30-35 minutes or until a cake tester inserted in the centre comes out clean and the cake starts to pull away from the sides of the pan. Cool, in pan on a rack, for 15 minutes. Remove from the tart pan and serve at warm or at room temperature.

Makes one 10-inch cake.

Notes:

• Although I have not tried it, I am certain another berry or fruit could be substituted in the filling. The original recipe asked for all raspberries, with all the pulp and seeds removed. I am one who believes that sometimes a bit of seeds is a good thing, somehow making the berries taste all the more like themselves, and so I kept some seeds for texture. By all means though, follow what is your preference.

Friday
Jul032009

Worse things I could do

I have something to say, but I am unsure as to how I should feel about it. Should I be proud? Ashamed? A bit sheepish, maybe?

Luckily, I think we're all friends here, and I can be honest with you. Here goes.

We bought a deep fryer.

There, I said it. It's out in the open. There's no turning back now. We've stepped up from a deep-sided pot on the stove, we're in the big leagues now. We've gone Pro. We have purchased an appliance, a unitasker at that, designed for the sole purpose of deep-frying food. Scandalous!

What is it about the notion of a deep fryer that sends hands clutching for the proverbial pearls? I nary blink an eye at baking cake after cake, or cupcake or cookie, but speak of a deep fat thermometer and I feel as though my ladylike self should swoon at the thought.

I should, but I don't.

Instead, I am giddy. On Canada Day there were donuts. The day after, there were fries. Alas, even as I happily plunged the slivered fingerlings into the depths of the fryer, I could hear the imagined whispers of a hundred judgements.

"Sure, she started with fries. But they were just a gateway."
"Next thing you know there will be churros. Or maybe even beignets."
"From there it is a slippery slope into the hard stuff. Corndogs."
"Mark my words, shel'll be battering Twinkies within a month and buying bulk packs of chicken wings on the sly."
"You know, I wouldn't put it past her."

Not to worry, I can handle my deep-frying. I promise. So what if I get a bit of a thrill when I shake the chip basket? A little golden-fried perfection never hurt anyone. There are worse things I could do.

Now if you will excuse me, I have to get back to my fryer.

Garlic Fries with Mustard and Horseradish Mayonnaise
For the fries, prepare them how you like to - fat, thin, shoestring, chips, whatever (see below for links to recipes). Make enough for the size of your crowd or your appetite. This recipe is for about a standard quantity of fries for 4 people. Any leftover mayonnaise should be refrigerated immediately, and can be used as a sauce, a dip or sandwich spread.

Ingredients
1/2 cup mayonnaise
2 teaspoons fresh lemon juice, or a good squeeze, optional
1 tablespoon prepared horseradish
2 teaspoons grainy Dijon mustard
1 teaspoon prepared English mustard
Kosher salt and freshly cracked black pepper to taste

Fries (see above)
1-2 cloves garlic, minced
1/4-1/2 teaspoon dried red chili flakes, optional
1/2 cup fresh flat leaf parsley, chopped
Kosher salt to taste

Prepare the mayonnaise first. In a bowl, stir together the first five ingredients. Taste, and adjust for seasoning with kosher salt and freshly-cracked black pepper to taste. If the sauce is to thick, thin with additional lemon juice or some warm water. Cover and refrigerate for at least 30 minutes to allow the flavours to mellow and blend.

When the fries are hot and crisp, toss through with the minced garlic, dried red chili flakes (if using) and almost all of the parsley, reserving some for garnish. Season with kosher salt. Tumble the fries out onto a platter, with the mayonnaise alongside. Sprinkle with the reserved chopped parsley.

Recipes for French Fries:
Easier French Fries from Cook's Illustrated, cold oil fried (via their site, requires login). Sticky Crows likes this method, and has some step-by-step photos.
Twice-Cooked French Fries (via Epicurious)
Oven-Baked Fat Chips with Rosemary Salt by Jamie Oliver (via the Food Network)
Definitive Fries (from here, ages ago)

Notes:
• I used the Cook's Illustrated recipe for these, which use a technique also attributed to Joël Robuchon. You start your potatoes in cold oil, turn the heat to medium-high, then leave them be. Once they start turning golden, you stir the fries about a bit to prevent sticking, then cook until crisp. Details and specifics are available in through the links provided. I had feared that the fries would be greasy, poking at them suspiciously now and again, but they were surprisingly not so. According to the accompanying article, this method yields a result with less oil absorption than traditional double-fry methods.

• Homemade mayonnaise is my preference, but if you are at all unsure on the freshness of your eggs, your favourite store-bought brand is more than fine. If using homemade, less lemon juice might be needed, depending on the recipe.

Thursday
Jun252009

Darn good

in the spoon

What would you consider the value of a bowl of frozen yogurt?

To be clear, I don't mean its sentimental value, nothing as romantic as all of that, I'm talking about nitty-gritty, slap-a-pricetag-on-that-puppy value.

Hold on, let me give you the details before you all start yelling out answers all The Price is Right-style on me.

This is not just any frozen confection. It is removed from the insipidly-sweet ranks of those frozen yogurts parading as ice cream. It has the unmistakable twang of yogurt, softened only slightly by sweetness. This is one that puts Greek yogurt front and centre; yogurt so thick that when spooned it falls lazily back upon itself in luscious folds. This is one where the yogurt plays equal partner to handful upon handful of mixed berries that have been squished and squashed into a violet-hued pulp.

It's darn good stuff.

Still can't decide? I'll be more specific. Would you think that the aforementioned frozen yogurt was worth, hmm ... I don't know ... say, a bouquet of peonies?

I'm totally serious. You can keep your dollars and cents, thank you very much, I will happily hand over pints in exchange for armfuls of blooms.

Why, you ask? The peony is one of my two absolute favourite flowers. They are, without a doubt, the most feminine of beauties; debutante-dreamy with their frilled crinoline petals. And I am surrounded by them, everywhere but in our yard. While our neighborhood is filled plentiful bushes, heavy with showy blossoms, ours is a peony-free zone. Our yard is too shady for their liking.

In lieu of turning to a life of floral theft, I am seriously considering a trade with our neighbors. Or, better yet, a frozen yogurt stand at the end of our driveway. One bloom for one scoop of equally girly-girl pink yogurt sounds fair, doesn't it?

Epilogue:

My father has glorious peonies growing at home; if our neighborhood's contingent are debs, his are divas. His bushes boast bountiful blooms, bodacious in their size. He kindly gifted me with some recently, on Father's Day no less. (If you look carefully in the photograph above, you'll catch a glimpse of his flowers in the reflection on the spoons.)

The next day, I made Dad a batch of mango frozen yogurt.

So all's well that ends well, dear reader. The only thing wanting is that I do wish I offer you some frozen yogurt. We could sit around my kitchen table, leaning into our bowls, and have a good chat. I could excitedly share with you the news that I am a contributor to the summer issue of UPPERCASE magazine.

I came to know about UPPERCASE gallery through the art of Jennifer Judd-McGee. When she unveiled the piece she had completed for an upcoming show, I was curious to learn more about the (Canadian!) gallery hosting the exhibit. And when I did, I became an immediate fan of Janine Vangool and her many creative endeavours. The magazine is her latest, and I am happy to be included in its pages.

The issue will out on July 2nd. Here's a sneak preview of what I made, and a peek between the covers. In other news, I have also been working on a revised About section, with a little more about me and answers to often asked questions. See the link at the left.

Bumbleberry Frozen Yogurt
Greek yogurt is rich to say the least, and heavy on the tongue. It provides a rounded base to all the high-note acidity of the fruit juices.

Ingredients
2 cups fresh mixed berries, I used strawberries, blueberries, blackberries and raspberries
2/3 cup granulated sugar, see note
1 tablespoon freshly-squeezed lemon juice
2 cups Greek yogurt, or well-drained whole milk yogurt

Take your lovely berries and, in a large bowl with 1/3 cup of the sugar, crush the life out of them with a potato masher or the back of a spoon. Add the lemon juice, stir briefly, and cover. Allow the berries to macerate at room temperature for about an hour.

Using a coarse sieve set over another large bowl, press the berries through the mesh with the back of a spoon. Underneath the juices should be thick and slightly pulpy, but all seeds and larger fibers should remain above. Once all the berries have been sieved, you should have a generous 1 cup of purée.

Stir in the yogurt. Sweeten, a little at a time, with the remaining sugar. As so much will depend on the sweetness of your berries, add the sugar judiciously, tasting often. You want to take the mixture to where it tastes balanced to your palate, then sweeten it a little bit further. Sweetness is dulled by freezing, so this extra oomph will compensate.

When satisfied with the level of sweetness and all the sugar has dissolved, cover and chill the mix for two hours. Freeze according to your ice cream maker's manufacturer's instructions.

Makes about 1 quart. Soften at room temperature for a few minutes before scooping.

Notes:

• I have used as little as a 1/2 cup of sugar, and as much as almost a full cup for this recipe.
• As Elise points out, frozen yogurt will turn icy once frozen for more than 6-8 hours. So really, the universe is telling you to eat this yogurt the day its made. If you really must store it for longer than that, follow her advice and "add a tablespoon of vodka or kirsch to the mixture right before churning."